Talk to a Silverado 1500 Sales Tech
1-888-706-1096
M-F 8:30A-11P, Sat-Sun 8:30A-9P
$20K Sweeps! 10 Chances to Win! Enter Daily >

Rough Country Forged Upper Control Arms for 2.50 to 3.50 or 7-Inch Lift; Bare Aluminum (07-16 Silverado 1500 w/ Stock Cast Aluminum or Stock Cast Steel Control Arms)

Item S112693
Verify parts fit and get product recommendations.
Silverado 1500 Sales Techs: Connect Now M-F 8:30A-11P, Sat-Sun 8:30A-9P
$0.00
Our Price

$299.95 (pair)

FREE Shipping Market Price $344.99 You Save 13% ($45.04) Up to 10% off for Military & First Responders! See Details

Will this fit your Vehicle?

Select a different vehicle Help?
Update or Change Vehicle
Ship to: Ashburn - 20149
Sorry, please enter a valid US or CA postal code
We're sorry, zip can't be updated at this time.
Recommended Install Shops
How It Works
Install Shops are available near Ashburn - 20149

Add Local Shop Installation

Total cost of service $399.00
    Create a list
    Add to New List

    Saved - View your saved items

    We're sorry. We couldn't save this product at this time.

    or use

      Product Videos

      Jake: Jake here for AmericanTrucks. And today, I'm taking a look at the Rough Country Forged Upper Control Arms for lifted 2007 to 2016 Silverado 1500s. Before we dive in too deep here, I wanna take a moment to discuss that fitment. Again, these are made for lifted trucks only, specifically 2007 to 2016 Silverado 1500s, with a 2.5 up to a 3.5-inch lift. And also, 2007 to 2013 Silverado 1500s with a 7-inch lift. Anything outside of those, including a stock ride height truck, you're gonna need a different setup. These are also not gonna fit on trucks that had factory stamp steel knuckles or control arms. But if your truck fits into those other categories, then stick with me here because these are actually pretty cool.Now, lifting your truck can put some excess wear and tear on crucial suspension components. So, if you've got a lifted truck, upgrading or replacing worn-out stock control arms is a good idea for ride quality, maintaining the cool lifted looks, and making sure your truck performs and drives how it's supposed to. Now, these are gonna be the perfect replacement upgrade from your stock control arms. They're durable, serviceable, and affordable, and a definite improvement for your lifted truck.The first and perhaps the most important thing that you'll notice right out of the gate here is the increased ball joint angle, which of course, is gonna help accommodate for that extra lift versus stock. Now, this extra angle allows for a greater range of motion out on the street or trail. So, if you're off-roading, there's no need to worry about that additional travel that's needed as these are gonna accommodate for the extra articulation. Now, since these are set up for lifted applications, this is also gonna remove much of the hassle of getting your truck aligned, as it's gonna keep things pretty close to the factory suspension geometry since you've got that angle here. Now, these are also forged for strength and durability. So, as you can see, there are no welds on here, so it's a much lower chance of anything breaking as you don't have any weak points or joints in here.You also get brand new Clevite brand OEM style rubber bushings at the top on the mountain points here and new ball joints on each. Now, the ball joints are greaseable so that makes them not only serviceable but also easy to do and they provide a long life. Now, having both of these included right out of the box means that install is, one, much easier for you because you pull 'em outta the box looking just like this. And it's also gonna refresh the ride quality on your truck too, since you've got all new bushings in here and that new ball joint.Now, construction here, again, is all forged aluminum for the arms themselves. Again, it's gonna make them really strong, lightweight, and durable. And like I mentioned a moment ago, being forged means that you don't have any joints or welds here that could break. Bushings and the mounting points, again, are Clevite rubber and those ball joints have polyoxyethylene or POM. And again, they're greaseable, so that's gonna make for an extremely low friction coefficient, meaning, both should have a long life and provide smooth operation for a long time to come.Now, pricing comes in at around $350, making them the least expensive option in the category as far as these aftermarket control arms go. Now, these may not have all the bells and whistles and the adjustability of some of the more expensive options, but they are good quality. They're strong and they're gonna be an effective and worthwhile mod if you've got a lifted truck.Installation will come in at a two out of three on our difficulty meter and doing both should take you about two hours. Now, this isn't a terribly complicated process, but you do have to get in there, move some suspension bits around. And if you've ever had to separate stubborn old ball joints before, you know that can be a pain. But not to fear, this is definitely a job that you can still handle at home. One thing to make note of though is that you should absolutely plan on getting your truck aligned properly once you've got these in because again, you are changing around some of the suspension geometry to how it's been driving. And to show you that install process now, let's throw it over to one of our AT customers.Man: Before we get today's installation video started, we will be needing quite a few tools. You'll need a 21-millimeter wrench, a 15-millimeter wrench, an 18-millimeter wrench, a 0.5-inch ratchet, torque wrench, 21-millimeter socket, 15-millimeter socket, 7/8-millimeter impact socket, impact, not required, but it'd be helpful. If you don't have that, you'll need a breaker bar, a hammer, jack stand, and jack. One thing I would like to say about this repair is once you do your repair, you will need a new alignment done. It will mess up your alignment, that's just normal. It's good to get your alignment done anyway.I also forgot to add on that you will be needing a 10-millimeter socket and ratchet for that. Today, we're gonna be working on this 2014 Chevy Silverado. We're gonna be putting some rough country 2.5 to 3.5-inch lift, upper control arms. To start, we're gonna need to jack the vehicle up, and you're going to wanna put the jack stand onto the frame. Doing this so we will relieve the front suspension of any stress or weight, which will be easier for us working on it. After we get the vehicle jacked up in the air, we're gonna need to take off the front wheels. You're gonna take your 7/8 socket and impact or a breaker bar, whatever tools you have to take these off.Now we're gonna remove the tire from the vehicle and we're gonna move it out of the way. Next step, we're gonna need to take off the brake line bracket on the control arm. If you wanna come and zoom in a little bit closer. This specific truck didn't have one, the bolt, because it was ziptied beforehand. But there's gonna be a 10-millimeter bolt, you're gonna wanna take this bolt out and then it loosens up. You see where it goes in right there.Next step, we're gonna put our jack underneath the lower control arm. We're not gonna jack it up too much, we're just gonna put a little bit of support on it, just like that. Next up, we're gonna take a 17-millimeter wrench and down over here under your upper control arm, we're gonna have bolt. We're gonna wanna start loosening that off.So, we're gonna wanna keep loosening this bolt here until where you have a gap but you don't wanna pull it all the way off. Because when we hammer this here, your ball joint's gonna wanna pop off and you don't wanna keep this on here so it doesn't come all the way off. Next up, once we got that loosened, we're going to take a hammer and you're gonna wanna hit not on the upper control arm or the ball joint, but on the metal hub around it.Next step, we're gonna take our 21-millimeter wrench, you're gonna wanna secure this side of the bolt there. And at the same time, we're gonna start taking this nut off over here. We're not gonna take 'em out all the way yet. We're gonna roll over to the next side. Now, we're gonna do the same thing on this side. Now, we're gonna finish taking out this ball joint. We'll do this by loosening the nut at the bottom of it, and you're gonna do that with your 18-millimeter wrench.So now that we have the nut off of the bottom, we can then hold the hub. We can pull our ball joint up and control arm, and then we can move this to the side. You wanna make sure it's not too tight, when you let go, it's not putting any stress on your brake lines or wires. If it is, you can put a zip tie between here and your sway bar to hold it back. So now we're gonna finish taking off our upper control arm. You're gonna put your 20-millimeter wrench at the end of this and your socket, and we're gonna continue taking it off.Now at this point, we're gonna remove our camber plates, this slide's right off. And then we're gonna wanna push this back in here. So one issue we ran into when we try and slide it out, our bolt hits on the spring. So what we're gonna have to do is we're gonna have to, there's three bolts at the top of your shocks, you will have to take these all out. They're gonna be 18-millimeter, we're gonna lose 'em all out, and then that gives our shocks some play. Hopefully, we can get it out. We're gonna start removing these three bolts. It may take a little force to get 'em both loose at first.All right, so now that our three bolts are out, we're gonna go down here, we're gonna drop the jack so it relieves some pressure off the top and the whole assembly will slide down. We're gonna need to take off our sway bar link. We're gonna use a 15-millimeter on top and then it's another 15 at the bottom. We're gonna start loosening that off. If you do have an impact, it makes this a lot easier. And then this will slide right off the bottom. Then I wanna make sure we're not losing any of these components.Once we've dropped our sway bar, this allows us to have this assembly drop down farther where we can pull our shock out of the way. Go ahead and drop the jack. So now that our spring is out of the way, we're able to slide our bolts out. We're gonna pull our bolts out. We're gonna continue taking off this bolt here. We're gonna lightly influence it out. We're gonna have to do some wiggling, but sure enough, it'll come right out.Now that we have our bolts removed, we can simply wiggle our control arm out. Wire down here, it's always important to make sure you have your pins installed. My truck was missing some from a previous shock broke 'em off, so I went ahead and installed some new pins on the inside of 'em. So now, we're gonna slide our new rough country upper control arm. We're going to slide our bolts back in. Now, we're gonna take our camber plate and our bolt, and we're gonna slide it right in. Be sure to get your camber plate into the pin. When you're installing your camber plate, you'll see there are little notches and dots and lines. We're gonna wanna make sure that is facing out so when someone's doing the alignment, they can tell what notch they're on.And you're just going to thread that on. Make sure it's just hand tight, that's all we need because we still want it to move for the other side. Now, we're gonna line up our bolt and our alignment camber plate. We're gonna do the same thing on this side. Now, we're gonna take our other camber plate, we're gonna make sure our lines are facing outward. We got our lines here. Slide that off. Then we're gonna pick our nut and we're install that up.So now, we're gonna tighten up the control arm. You're gonna take your 21-millimeter, slide it back there. It's really important to make sure your camber plates are in with your pins. All right, so now we're going to tighten it up. I'm not gonna tighten it too much just yet, we're gonna move over to this side and we're gonna tighten up this side. Let me get my forset out of the way. Now, we're gonna jack our vehicle up so we can install our shock back in the holes up there. So go ahead and jack it up really slow. Keep going. We're gonna go all the way up. Make sure it's aligned up to the top where your studs come back to the top. Those nuts.Now, what we're gonna do is we're gonna wanna pull our hub this way, might take a little bit of force. You're gonna put your ball joint down up in there. Grab your control arm, push it down, hold it. And you're gonna go get your new hardware. With our control arm installed into the hub, we're gonna take our rough country nut that is included with it and we're gonna start threading that on. That will be a 15-millimeter, just like the old. And we're gonna tighten it down. We're gonna continue to tighten this down. The torque spec for this nut right here is gonna be 37-foot-pounds. You're gonna wanna make sure that gets torque down correctly. As for these bolts up here, there's two types of bolts. If yours were like mine where both camber adjustment plates were separate from the bolts, that torque spec is gonna be 140-foot-pounds.Now, as for the bolts that are connected over here, if your camber plate is connected to your bolt, you have a different torque spec, I'd recommend looking that up. But as for these style bolts it would be 140-foot-pounds. Now me personally, I'm just gonna tighten these down as tight as I can do. Now we're gonna finish up tightening up our control arms. Like I said, torque spec on these would be 140-foot pounds. We're gonna continue to the other side, we're gonna tighten this side down too.Now, we're gonna continue back up top, and remember we need to tighten down our shock bolt. We're gonna finish tightening up these upper strut mount bolts. And when you torque these you're gonna torque 'em to 37-foot-pounds. Now we're gonna attach our sway bar. We're gonna take, make sure you have your nut, your little washer, the rubber piece, slide it under. Sometime you can put that under there. There should be another rubber piece here, I'm missing it, I have it on order right now. So, make sure you have that there.Then you have another rubber piece there. Right. Now, yours should be a lot tighter than this because you should have a rubber piece here. Now it's time after we double check everything on the vehicle, make sure everything is tight, we're gonna vault our wheel assembly back on. Put these and the torque spec for these lug nuts would be 140 foot-pounds. Now, let's turn the vehicle up, bring our vehicle to the ground. Just jack it up on the frame. We're gonna pull our jack stand. Now it's time to torque our wheel. Now it's time to start torquing. Starting to [inaudible 00:18:32] on that.Jake: Well, that's gonna wrap it up here for our review and install of the Rough Country Forged Upper Control Arms, for lifted 2007 to 2016 Silverado 1500s. Thanks so much for watching. And remember, for all things Silverado, be sure to keep it right here at americantrucks.com.

      Product Information

      Features, Description, Reviews, Q&A, Specs & Installation

      Features & Specs

      • Helps Improve Your Vehicle’s Suspension
      • Front Upper Control Arms
      • Accommodates Vehicles With 2.50 to 3.50-Inch Lift for 2007-2016 Model Years
      • Accommodates Vehicles With 7-Inch Lift for 2007-2013 Model Years
      • Crafted From Forged Solid Steel
      • Boasts OEM Style Rubber Bushings
      • Made With Greaseable Ball Joints
      • Moderate Installation Level
      • Sold as a Pair
      • Includes Rough Country’s Lifetime Limited Warranty
      • Fits 2007-2016 Chevrolet Silverado 1500 With Stock Cast Aluminum or Stock Cast Steel Control Arms

      Description

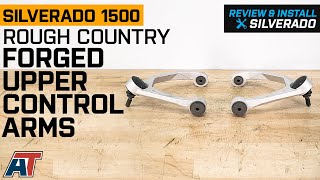
      Offers Better Handling and Wheel Articulation. Enhance your Silverado 1500’s off-roading capabilities by switching its stock upper control arms with Rough Country Forged Upper Control Arms for 2.50 to 3.50-Inch or 7-Inch Lift. Installing these control arms yields to increased efficiency in your vehicle’s handling and wheel articulation, so you can rest assured that your future off-road trips will stay smooth and comfortable.

      Boasts a Tough Steel Construction. Due to their forged solid steel construction, these control arms are more durable than your Silverado’s factory control arms. What’s more, their greaseable ball joints feature an incredible polyoxymethylene ball race, which reduces friction and increases the arms’ lifespan.

      Installation Is of Medium Difficulty. Installing these control arms can be challenging, so it’s recommended to have moderate mechanical expertise if you’re planning to handle the task by yourself. Fortunately, all of the necessary installation hardware is provided, which means you can finish the job in no more than 2 hours.

      Includes Rough Country’s Lifetime Replacement Warranty. A lifetime replacement warranty is included with every pair of Forged Upper Control Arms sold. Please visit Rough Country’s website if you’re interested in learning more about the warranty’s terms and conditions.

      Application. These Rough Country Forged Upper Control Arms for 2.50 to 3.50-inch or 7-inch lift are compatible with all 2007-2016 Chevrolet Silverado 1500 models with Stock Cast Aluminum Stock Cast Steel Control Arms.

      Shop All Truck Parts And Accessories

      Shop All Truck Control Arms And Accessories

      Shop All Truck Suspension

      Fitment:

      Rough Country 19401A

      CA Residents: WARNING: Cancer and Reproductive Harm - www.P65Warnings.ca.gov

      Installation & What's in the Box

      Installation Info

      What's in the Box

      • (2) Upper Control Arms
      • Installation Hardware
      4.8

      Customer Reviews (97)

        Questions & Answers

        10 More Questions