Installation Time
(approx) 6 Hours
Difficulty Level:
Mechanical expertise or professional installation required.
Guaranteed Free Delivery by 12/24! available on most items - Details
$1,199.95 (kit)
FREE Shipping Market Price $1,379.99 You Save 13% ($180.04)Saved - View your saved items
We're sorry. We couldn't save this product at this time.
Jake: Jake here for American Trucks, and today, I'm taking a look at the Rough Country 3.5-inch suspension lift kit with the front M1 monotube struts and rear M1 monotube shocks fitting 2019 and newer RAM 1500s without air ride, excluding TRX models. If you're looking for a comprehensive way to get more height for off-roading or some larger wheels and tires at a more budget-friendly price, you're going to want to check out this kit from Rough Country. This is a bolt-on all-inclusive lift kit. It's going to get you 3.5 inches of extra height and it's also going to level out the stance of your truck while still maintaining that stock nice ride quality and allowing you to keep your overall suspension geometry in very good shape close to stock. As that really long name would imply, this is a 3.5-inch lift. So this is going to provide you with enough clearance to run some larger wheels and tires on your truck as well.Now some beefy 33-inch tires are going to fit on here with no issue, as you can see on our truck in the shots here. But if you want to go larger, some modification may be required, or you might just have to go with a larger lift kit. So, for that reason, we would recommend sticking with 33s for this setup. Now starting out up front, you get a set of Rough Country's heavy-duty upper control arms. These are forged aluminum arms and they include new Clevite rubber bushings. So they're going to provide you excellent absorption of road impacts. Now they're pretty lightweight for a set of control arms and they've got a lot of structural integrity here as well, again, because they're forged, enough, in fact, to hold up to whatever abuse you can probably think of to throw at them.Now you might have noticed too that you've got new ball joints already pressed in here and these are also angled to help accommodate for the extra lift. So despite having quite a bit of height over your factory suspension setup, these are going to keep things pretty close to the factory geometry. It's going to help maintain that really nice ride quality and it's going to give you a full range of motion so you can take advantage of that added height. Now, again, these ball joints come already pressed in. You've got the new bushings in here as well. And these ball joints have Zerk fittings on them so you can grease them too, which is going to help extend their already nice long life. So Rough Country has really thought of quite a bit of everything here with these.Now, also up front, you get a set of Rough Country's M1 loaded struts. Now these are going to give you that 3.5 inches of lift. As you can see, they come pre-assembled so you don't need to mess with spring compressors for the sake of assembly. You're just going to bolt them right in. Now they also feature the ability to adjust the height. So should you want to lower them down, kind of, change up the stance of your truck a little bit, you've got the option to do that. Now you may not be able to see it too well, but right underneath of this spring perch, there's a collar and there's different levels that you can adjust this to. So if you want to lower it down, you have the option to do that later. However, just be warned, that job is going to require some disassembly. You are going to need a spring compressor for that.Now these are one of Rough Country's more premium shock options featuring nitrogen charging. They also have infinitely variable damping, so it's going to give you a really nice smooth almost stock type of ride quality. But these are designed specifically for lifted applications, and the damping and the spring rates here are tuned to keep that ride smooth out on the road. But they've also got self-adjusting deflective discs inside, and that allows for independent rebound and compression adjustments, which is all done inside here automatically. You don't have to do anything. So these are going to do a really great job of absorbing impacts and controlling rebound out on the trail.Now nitrogen charging is also going to help with heat dissipation. So even under really aggressive off-roading conditions where these are compressing and rebounding really fast, the shocks aren't going to suffer from fade. So all of that, of course, means that you can use them to their full extent. You're not going to have to worry about fading or losing control of the truck. In the rear, you get a set of coil spring spacers, and these are what's going to give you that extra height in the rear of the truck. It's going to level everything out and match the front. These are going to add about a 2.5-inch lift overall in the rear again. So this is going to function as a leveling kit to level out the stance of your truck.Now, out back, you also get a set of Rough Country's M1 monotube shocks to keep everything in check and, again, help maintain that really nice ride quality. Like the front struts, these also feature nitrogen charging and infinitely variable damping. So it's going to again give you that really smooth almost stock ride quality. You see the theme going on here. And you're also going to then have a nice match set of shocks, both front and rear.Construction here is all quite solid as well. Now, as I mentioned, the control arms out front are made from that forged aluminum for strength and weight saving. So, as you can see, there's no seams or welds or anything here to break. And you can be sure that these are gonna be really nice and strong. Both the front struts and the rear shocks feature an absolutely massive 2-inch extruded tube with a 45-millimeter bore and an 18-millimeter hardened chrome piston rod. So these are also really solid. In fact, probably some of the most solid ones I've seen come out of Rough Country. These are some serious shocks that you've got going on here. And the bodies are also zinc-plated for good looks and durability. So these are gonna stand up well to the elements also.Now, like I mentioned earlier, you also get those new springs up front plus the top hats and all the hardware, and you get new bushings and hardware for the rear as well. Plus, you've got the spacers that we talked about earlier, and these are a heavy-duty composite material that's strong and lightweight. So everything here is really set up nicely to make your truck, not only perform better out on the trail but do it for a long time as well. Now, of course, you are gonna have to pay a bit of a price for that.And as for that price, well, this one's going to come in at about $1,400. And for all that you're getting here, this is a really comprehensive kit, and it's a pretty competitive price. Now, there are, of course, less expensive options out there, but they're not going to have all the features like these really hefty shocks and these really nice control arms. You could also spend a lot more on another kit, but for a truck that's going to see some mixed street and trail usage, this is going to be an excellent option that will not only give you the height that you're looking for, the ability to get those larger wheels and tires on there, but it's also going to maintain that really nice ride quality that the RAMs have been known for.At this point, you probably find yourself thinking, "Well, what's the catch?" Well, installation is going to get a 3/3, and it's likely going to take you upwards of 6 hours to do this job. Now, you can certainly do this all at home. This is a totally bolt-on kit. It doesn't require you to make any modifications to your truck. So even if, down the road, you need to put things back to stock, you can do that. You're not going to have to chop anything up. And again, everything just bolts right on.However, this is an involved job. You are going to have to drop quite a bit out. You're going to have to pull those front struts out, remove the rear springs, drop the axle, all that stuff. So this is going to be a heck of a job to do, especially if you don't have access to a lift. So just make sure that you have the tools and you've got the space to do this. And most importantly, you've got the time. Again, definitely something you can do. And if not, you can always find your local shop to do it. You can check out our install connect program where we'll hook you up with a local shop who'll install these parts for you. But should you want to do it yourself, let's hop over to the install bay now and we'll show you a detailed breakdown of what you've got to do to get this on your RAM.Instructor: Tools required for this install include a couple different size impact guns, a clip remover tool, a pair of flush cutters, 14-millimeter and 15/16 wrench, 15, 18, 19, and 21-millimeter ratcheting wrench, a hammer, a hook, 8, 14, 18, and 21-millimeter sockets, 13, 16, and 21-millimeter swivel sockets, a ratchet, a pry bar, and pull jacks or jack stands. What's up, guys? Today we're installing a lift kit on our RAM, so let's get started.So our first step is to remove a 13-millimeter bolt holding our brake line in to get a little more slack on that as well as pop our ABS line out of some clips. So we can grab our 13-millimeter socket to remove this bolt holding our brake line in place. And then we can grab a clip remover tool to pop out the clip in our upper control arm, holding our ABS line in place, and then we can pop our ABS line out of the clip that's attached to our brake line. Now on the backside of our knuckle, we have this S-Clip that has a grommet on our ABS line that we can pop out of place.Next, we can disconnect our tie rod end. We have a 21-millimeter nut that we can take a 21-millimeter socket to loosen up. Now, once we have our nut loosened up, we can take a hammer and smack the side of the knuckle to pop our ball joint free. And then we can thread the rest of our nut off and throw it back on so that we don't lose it. Next, if we come to the bottom side of our lower control arm, we have an 18-millimeter nut holding our sway bar end link into place, so we'll grab a socket to take that off. Now you're going to want to do that same thing on the other side to make it easy to pop your sway bar out of place.Now with our sway bar end link unbolted on both sides, we can grab a pry bar to get our sway bar end links out of our lower control arm. Next, we can disconnect our upper control armball joint. So I've got a 21-millimeter ratcheting wrench to loosen up our nut. And then we'll do the same thing as the tie rod and hit it with a hammer. And then once we have that loose, we'll give the knuckle a couple smacks with a hammer to pop our ball joint free. And then we can pull down on our upper control arm and loosen up our nut.Next, we can loosen up our lower strut bolt. I have a 15/16 wrench for our nut side and a 21-millimeter socket for our nut side to loosen this up. And to get the bolt the rest of the way out, I'm just going to grab a wrench on the flat side of the bolt and pull backwards while loosening it up with a 21-millimeter socket. Next, we can remove the three nuts at the top of our strut. Now I like to start with the back since they're a little harder to get to. And once you get them loose, you can just spin them the rest of the way off. I'm using a 16-millimeter ratcheting wrench to remove these nuts.So now we're ready to remove our strut. So you're gonna wanna grab a buddy to grab a pry bar and pry down on the lower control arm so we can get the bottom strut mount over the lower control arm. Next, we can remove our upper control arm. We have a 21-millimeter bolt on each side holding this in. I've got a hook on our knuckle holding it up just so that we don't put any tension on the axle or the brake lines. So we'll grab a 21-millimeter socket, get it behind our fender liner. and remove our bolts.Now, moving on to the rear, the first thing we're gonna do is remove our fender liner. We have four 8-millimeter screws that will take an 8-millimeter socket to remove. Next, we can disconnect our sway bar end link from the frame. We have a 16-millimeter bolt, so I'll grab a 16-millimeter socket to remove that. You're gonna wanna make sure that your axle is supported on jack stands once you start disconnecting this. Next, we can disconnect our track bar from our driver's side. We have a 21-millimeter bolt that will take a 21-millimeter socket to remove. Next, we can begin to remove our shock. So we'll start with our bottom mount. We'll take a 21-millimeter wrench on our nut side and a 21-millimeter socket on our bolt side to pull that out. Next, we can remove the nut at the top of our shock. I've got an 18-millimeter ratcheting wrench to take that off.So now with everything disconnected that we need to disconnect, we can start lowering down our axle to be able to get our springs up. So now with our axle lowered down, we can pull our spring out. Now with our spring removed, we can pull up our top isolator. Now once we have our spring and our isolator removed from one side, we'll do that same thing on the other side. So now we're ready to install our new upper control arm. So we're gonna get this up into our mounts and then we can slide our bolts through and get our nut plates on the other side. And then once we have our bolts through, we'll grab our nut plate. And we'll do the same thing on the other side. And then we can grab our 21-millimeter socket to tighten that down.So now we're ready to install our new strut. I've got myself a buddy here with a pry bar to pull down on the lower control arm so that we can get the bottom mount over the lower control arm to get it in place. Now that we have our strut in place, we can install our included nuts at the top of our strut. We'll just throw those on a few threads for right now so that we have enough play to get our lower strut bolt into our lower control arm. So now, once again, I've got a pry bar on our lower control arm so that we can pry down to get our lower strut bolt in. Now we can screw our nut on the other side of our lower strut bolt. And then we'll take our 21-millimeter socket and 15/16 wrench to tighten that down.Now we can reconnect our upper control arm to our knuckle. I've got the new nut included in our kit. I've got a buddy with a pry bar to pull down on the upper control arm so that we can get this nut on. And now that we have our nut threaded on, we can take a 21-millimeter ratcheting wrench to tighten it down. Next, we can reinstall our tie rod end into the knuckle and thread our nut back on. And then we'll take a 21-millimeter socket to tighten that down. Next, we can reinstall our ABS line into that S-Clip on the backside of our knuckle. Next, we can reinstall that 13-millimeter bolt into our brake line and tighten it down with a 13-millimeter socket. And then we'll take our ABS wire and clip that back into the clip on our brake line.Now, at this point, you're going to want to do the whole process on the other side, and then we'll tackle our sway bar since we want to put both of our links into the lower control arms together. Once you have that done, we can pull down on the sway bar. You might have to go back and forth a couple times to line everything up, but then once we pop it through, we'll get our nut on. We can grab that 18-millimeter nut and thread that on and then we'll tighten that down with our 18-millimeter socket. And then we'll do that same thing on the other side. Now we can go back up to the top of our strut and tighten down our three nuts. I've got a 15-millimeter ratcheting wrench to do so.Now we're ready to start assembling our rear. The first thing we're going to do is install our spring spacer. We have this plate with a welded nut that's going to go over the top of our spring perch and then we'll put this on the bottom side. We have a bolt with a lock washer and a flat washer that's going to go up through this hole and thread into that nut. Now we can grab a 14-millimeter socket for the bolt side and a 14-millimeter wrench on our nut and tighten that down. Now, before we reinstall our spring, we're gonna have to cut the two nipples off of our factory isolator, that way, it can sit flush against our spacer. So, I have a pair of flush cutters that we'll cut these off with and then we can get this back in the truck and install our spring.Now we can take that isolator and slide that on to our spacer. So now we can install our spring back into place. Now we have a little lip on our isolator that the end of our coil is going to rest against, so we'll get it lined up. Now, once you have your springs installed on both sides, we can start to reinstall our end links. And then once we have that bolt threaded in, we'll grab a 16-millimeter socket to tighten that down.So now we're ready to install our shock. We have two of these metal plates, one has a bigger hole in the middle. That's gonna go on first so that it can clear the thicker part of the shock. And then we have two bushings that are exactly the same. We're gonna have that little lip facing up and then we can slide that into place. We'll grab our second bushing, the lip is gonna be facing down this time. And then we'll grab our plate with the smaller hole and then we can thread our nut on top. We'll just leave that hand tight for now until we get our lower shock bolt into place.Next, we can reinstall our lower shock bolt. So, we'll get this into our mount. If your holes don't line up, you might need to raise your axle a little bit. And then we'll get our nut on the other side. And then we can grab our 21-millimeter socket and 21-millimeter wrench to tighten this down. And now we can go back up to the top of our shock and take a 19-millimeter ratcheting wrench to tighten down our nut. Now, once we have one of our shocks installed on one side, we can do the same thing on the other side. And now we can reinstall our fender liner. So we have our four 8-millimeter screws that we'll thread into our U-clips and then tighten down with an 8-millimeter socket. And now we can do that same thing on the other side.Jake: So that'll wrap up this review and install of the Rough Country 3.50-inch Suspension Lift Kit with Front M1 Monotube Struts and Rear M1 Monotube Shocks for your 2019 and newer RAM 1500 without air ride and excluding the TRX. Thank you for watching, and for all things RAM, keep it right here at americantrucks.com.
Subscribe to our YouTube Channel
Features, Description, Reviews, Q&A, Specs & Installation
Brand | Rough Country |
Lift Height | 3.50 Inch |
Lift Kit Type | Suspension Lift |
Lift Kit Max Tire Size | 33 Inch |
Lift Kit Includes Shocks | Shocks Included |
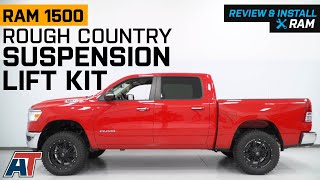
Aggressive Ride Height. improve the off-road performance and appearance of your 2019-2023 RAM 1500 without Air Ride, Excluding TRX? The Rough Country 3.50-Inch Suspension Lift Kit with Front M1 Monotube Struts and Rear M1 Monotube Shocks is the perfect solution. Designed with precision and engineered with the highest quality materials, this Suspension Lift Kit is designed to deliver superior off-road performance and handling. With its 3.50-inch lift, it provides increased ground clearance, allowing you to tackle rough terrain with ease and confidence.
Better Off-Roading. The kit also includes front M1 Monotube Struts and rear M1 Monotube Shocks, which provide exceptional shock absorption and damping. This ensures a smoother ride, even on the most rugged and uneven terrain.
Installation. For the safety of your hardware during removal and replacement, professional installation is recommended.
Warranty. There is a limited lifetime warranty on this product.
Application. The Rough Country 3.50-Inch Suspension Lift Kit with Front M1 Monotube Struts and Rear M1 Monotube Shocks fits 2019-2023 RAM 1500 with no Air Ride, Excluding TRX models.
Fitment:
Rough Country 31440
CA Residents: WARNING: Cancer and Reproductive Harm - www.P65Warnings.ca.gov
Installation Info
Installation Time
(approx) 6 Hours
Difficulty Level:
Mechanical expertise or professional installation required.
What's in the Box
10 More Questions