Installation Time
(approx) 3 Hours
Difficulty Level:
Mechanical expertise or professional installation required.
Installation Guides
FREE 2 or 3-Day Delivery on Orders $119+ Details
$459.95 (kit)
FREE Shipping Market Price $528.99 You Save 13% ($69.04)Add Local Shop Installation
Saved - View your saved items
We're sorry. We couldn't save this product at this time.
or use
Hey, guys. It's Sara with americantrucks.com, and today we have a review and install of the Rough Country 2.5-inch leveling kit with lifted struts and premium N3 shocks, fitting your '04 to '08 F-150 4-wheel drive models. This kit will work for the F-150 owner who wants a leveling solution that includes complete strut and shock replacements. This kit lifts the front and the rear of your truck without losing all of the factory rake and includes some nice upgrades for your aging factory components. This kit provides two and a half inches of lift in the front, thanks to these lifted struts. It also has an inch of lift in the rear, thanks to these lift blocks which measure in at exactly one inch. So the stock tire size we have on our truck is a 31. Depending on the year or model of your truck, you may have a different stock size, so keep that in mind.The manufacturer states that this kit can run up to a 33-inch tire comfortably. Now, tread does matter. If you're running a larger, more aggressive tread, like a mud terrain that you see in this video, you may see some rubbing on the factory plastics. However, if you are running a more mild tread like what you've seen in all-terrain, it should clear just fine. So the recommended size is a 33, as I said before. Because we have 305s, we threw them on so you can see how they look and fit. Although they do fit sitting on our flat shop floor, they will rub during normal driving going over bumps or turning. This kit includes two lifted complete strut assemblies for the front, two and three shocks for the rear that feature is similar to factory ride quality. It also includes two rear lift blocks as well as the longer U-bolts so you get that level of appearance to your truck with all upgraded components.So as far as price goes, this kit comes in at around $225. And this is a full shock and strut replacement, which is a nice upgrade for the money. So you still get a more level truck and more room for wheels and tires. And as far as the install goes, I'm giving this one a three out of three wrenches on the difficulty meter. It does feature a direct bolt-up install with no modification required and can be done within three hours. So with that said, let's check out our install. For this install, you will need an impact gun or a ratchet and hand tools will work just fine, 30-millimeter, 24-millimeter, 22-millimeter, 21-millimeter, 18-millimeter, 13-millimeter, and 15-millimeter sockets. You may also want a swivel extension. You'll need a vacuum tool and a caliper hanger, or a bungee cord will work just fine, a hammer or a rubber mallet, a flathead screwdriver or a pop clip removal tool, 14-millimeter, 15-millimeter, 18-millimeter, and 27-millimeter wrenches, and you will need a pry bar.All right. So the first step in our install, we're gonna unplug our ABS sensor. We're also gonna disconnect the vacuum line from the back of the knuckle. Remove the sensor from behind your wheel well liner. The plug should be right here. What you're gonna do is press down on the connector and remove it. Grab a pop clip removal tool and remove the pop clip the hold this line. Disconnect the vacuum line from your brake line and then pull it off of the spot on the back of your knuckle. Next up we're gonna remove the nut on the outer tie rod. Grab a 21-millimeter socket and get it off. Next up we're gonna remove the nut that's holding on the knuckle to the upper control arm. Grab a 21-millimeter socket, and you will on a swivel here. Go ahead and get it removed. We are going to tread this back on though until we release this ball joint. All right. So it's not likely that this ball joint will release on its own. If that is the case, you're gonna wanna grab a hammer and hit the top of the knuckle here to shock it loose.All right. So we do have to disconnect the sway bar, and I think the easiest way to do this is to remove the nut on the underside of the end link. Now, you only have to remove one side of the end link to be able to remove this. You should have take off both sides of your sway bar just to make your job a little easier. Go ahead and grab your 18-millimeter socket. And remove it. Next up we're gonna remove the 2 18-millimeter bolts holding on our brake caliper. This will relieve the brake line and also make it so we can remove the knuckle. Go ahead and grab an 18-millimeter socket and remove both of these bolts. Now you can pull your caliper off of your truck and hang it off to the side. If you don't have a caliper hanger tool, you can use a bungee cord or anything that secures the caliper and doesn't have any tension for the brake line. Next up, we're gonna remove the nut that holds on the knuckles of the lower control arm. We're gonna grab a 24-millimeter socket and remove this nut. We are gonna thread it back on because we still have to release this bolt joint.We're gonna repeat the process we use up top and we're gonna hit this part of the knuckle to release the ball joint. Next up we're gonna remove the rotor itself. Now, we recently had the breaks apart on this truck, so the rotor should come straight off. If yours does not, you can around it and on the backside, but with a rubber mallet. Next up, we're gonna remove the dust cover that blocks the axle months so that we can remove the nut itself. So you're gonna wanna hit this with a little PB blaster, depending on how rusty it is, and then get behind it and pry it off with a flat head. Next up we're gonna remove the axle nut with a 13-millimeter socket. Now, if the ball joint in your outer tie rod does not release from the knuckle, go ahead and grab your hammer and release it the same way you released the other two ball joints.Next up we need to pull vacuum to be able to release a four-wheel drive so we don't damage it. Grab a line and slide it over the larger port that your vacuum line used to be attached to. Now we're gonna use our vacuum tool to pull 24 pounds of vacuum. This releases the four-wheel-drive actuator because it's engaged unless it sees the 24 pounds and allows us to slide the axle out of the back of your knuckle without damaging your four-wheel drive. We're setting our vacuum tool to the side so we can start to disconnect the knuckle. Set your vacuum tool down, make sure it's still pulling pressure and you don't bump it to release the pressure. We're gonna now start to disconnect the knuckle. Go ahead and pull down on your upper control arm and remove this nut. Slowly release your upper control arm. If it doesn't come all the way out, carefully pry it the rest of the way. And actually, our axel has already released out of the back of the knuckle, which is good.Now we can carefully remove the nut on the bottom of your knuckle and remove the knuckle off the truck. Now, we do have to maneuver around our axle a bit here. I'm lifting it up so you guys can see the bolt that we're going for. There's a 30-millimeter nut on this side and a 27-millimeter bolt on the other side. This holds on the bottom of our strut. Let me set the axle down here for a second. Grab my 27-millimeter wrench for the other side and my 30-millimeter socket for this side and remove the nut. Now, depending on how much tension, this should wiggle its way out. Next up, we're gonna remove the 3 15-millimeter nuts on the top of our strut. What you're gonna do is grab a 15-millimeter ratcheting wrench just because we don't have a ton of space up there. You can use a small socket if you'd like and remove these. We're gonna leave one or two at the front just loosely installed to keep the strut from falling all the way out. With all of the nuts loose or removed, you can lift up a little bit on your strut to get the last one off. And remove it off the truck.All right. So now that we have the factory strut uninstalled from our truck, we can check it out side by side with our new stride here. And as you can see, it is a nice upgrade over the worn-out factory strut. It's still gonna get you the lift you're looking for in the front-end without having to add one of those spacer kits on your factory strut. So you will get a nicer functioning unit that's a lot easier of an install. So with that said, let's finish up that install. Now we can get our strut installed. Line up the studs at the top of your strut tower and also line it up with the lower control arm as well. Press it up to expose the studs and install the hardware that came with the strut. Don't forget about the strut all the way in the back. This one might be a little hard to see. Tread the nut on there as well. With all your nuts in place, grab a 15-millimeter wrench. We're using a ratcheting wrench because there's not a ton of room up top here. And tighten it down. Now, between prying a bit on the strut itself and prying on the lower control arm, line it up and slide the bolt through. Install your nut. Grab your 27-millimeter wrench and 30-millimeter socket and tighten it down. With vacuum still pulled on your knuckle, line it up to both the axle and the lower control arm. Slide your nut over the bottom of the lower ball joint and go ahead and turn this nut over your lower ball joint to get a couple of treads in place to hold the knuckle in place. Grab your 24-millimeter socket and tighten down the nut on your lower ball joint.Double-check that you're still pulling the 24 pounds of vacuum on the back of your knuckle. Slide your axle through the knuckle and thread the nut on the end of it. Grab your 13-millimeter socket and tighten it down. Now you can release your vacuum and remove the line off the back of the knuckle. Line up the knuckle to your upper ball joint. Grab a pry bar and pry down on the upper control arm while you line it up. Once it's in place and you can see some threads, thread on the factory nut on the bottom of the bolt joint. I'm gonna tilt the knuckle a little to be able to get some more room for our impact gun. Grab your 21-millimeter socket and a swivel extension. You're also gonna wanna pry down on the upper control arm, right where the ball joint is to prevent it from moving. While prying down on your upper ball joint, grab your 21-millimeter socket with a swivel extension and tighten down the nut for your upper bolt joint.While jacking up on lower control arm, line up your outer tie rod and install the factory nut. While supporting the ball joint with a pry bar, go ahead and grab your 21-millimeter socket and tighten it down. At this point, grab your rotor, line it up over the studs on your wheel and slide it into place. What we're gonna do is throw a lug on there just to ensure it stays in place while we finish installing the caliper. Thread on the nut on the bottom of your sway bar end link, grab an 18-millimeter socket, and tighten it down. Grab your caliper off the hanger, line it up over top of the rotor, and slide it into place. Once you line it up with the holes in the back of your knuckle, grab your factory hardware and thread it in. I'm just gonna turn the knuckle a little bit to give us some more room for our gun. Grab your 18-millimeter socket and tighten it down. Make sure you reconnect the vacuum line, reconnect the Christmas tree clip that holds on your ABS line, and connect it to the factory connector. Re-install your dust shield, press it into place, and you can lightly tap it in with a rubber mallet.All right. So once you're done with the front, repeat that step on the other side. And once both sides of the front are complete, we're gonna move on to the rear. The first thing we're gonna do is to remove the bolt that holds on the lower part of our shock. With an 18-millimeter wrench and a 15-millimeter socket, remove the bolts. Repeat that with the upper bolt with an 18-millimeter wrench and a 15-millimeter socket. And remove your shock. Next up we're gonna remove the four 21-millimeter nuts that hold your U-bolts to your axle.All right. Now that we have our factory components uninstalled from our truck, we can check them out side by side with our new components here. As you can see, Rough Country has included one of their premium shocks that's gonna deliver that factory feel and ride quality while being a nice upgrade over your worn out stock shock. In addition, they've also included new hardware, new longer U-bolts to replace the worn-out factory ones, which a lot of times it won't come off the truck in one piece. So with that said, let's finish up our install. At this point, we're gonna drop our axle down so we can slide the spacer in between the current spacer and your spring. Once you've dropped it down far enough with the openings up top, slide it on top of your factory spacer and line up the holes. And you can begin to raise your axle. Now, if this doesn't line up perfectly, you can do each side simultaneously because it is a straight axle vehicle that might help with aligning this spacer. As you raise your axle, make sure that it's still in line and it slides into place. Now you can install the U-bolts into the factory brackets. Install the included hardware, the washer and the lock nut. Repeat that with the other U-bolt. Make sure the U-bolts are seated in top of the bracket on top of your leaves.All right. Now you can tighten down these nuts with a 22-millimeter socket. Make sure you do so evenly across the U-bolt and also across the axle. At this point we can install our shock. We are installing it with the body down. Rough Country confirmed this is the proper way to install, although the directions say otherwise. So go ahead and get the top portion installed with the factory hardware. Grab your 15-millimeter socket and 18-millimeter wrench and tighten this down. Compress your shock and line it up with the mount and install the factory hardware. If you need to, you can tap it into place. Grab your 15-millimeter socket, an 18-millimeter wrench, and tighten it down.All right. Now that the side is complete, repeat those steps on the other side. And as I said before, it may be easier because of the straight axle to do the sides simultaneously. Once you're all finished, make sure it's torqued to spec, and you may want to get a professional alignment afterwards. But that is gonna do it for the review and install this kit. And remember, for all things F-150, keep it at americantrucks.com.
Subscribe to our YouTube Channel
Features, Description, Reviews, Q&A, Specs & Installation
Brand | Rough Country |
Leveling Kit Location | Front |
Leveling Kit Lift Height | 2.50 Inch |
Leveling Kit Includes Shocks | Shocks Included |
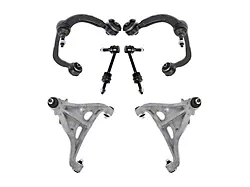
Ideal for Off-Road Applications. This Rough Country 2.5-Inch Leveling Kit with Lifted Struts & Premium N3 Shocks is a great solution for leveling the F-150 while also improving off-road performance. The kit is easy to install and looks great.
Lifted Struts and N3 Premium Rear Shocks. To ensure excellent off-road performance, this kit comes with Rough Country’s lifted struts and N3 Premium Shocks. They’re Nitrogen-charged for a lightning-fast reaction. Additionally, they’re precision-made from high-quality materials for strength and durability for long-lasting service.
Heavy-Duty Strut Spacers and Lift Blocks. This kit features strut hats that look like natural extensions of the struts for a beautiful finished look. The spacers and lift blocks are made to be durable and are resistant to corrosion and the elements.
Bolt-On Installation. This Rough Country 2.5-Inch Leveling Kit with Lifted Struts & Premium N3 Shocks does not require any additional modification to install. It has the added benefit of easily returning to stock if needed.
Lifetime Replacement Warranty. This Rough Country 2.5-Inch Leveling Kit with Lifted Struts & Premium N3 Shocks is warrantied against defects in materials or workmanship for the life of the vehicle on which it is installed. Exclusions will apply.
Application. This Rough Country 2.5-Inch Leveling Kit with Lifted Struts & Premium N3 Shocks is designed for 2004-2008 4WD Ford F-150 models.
Shop All Truck Parts And Accessories
Shop All Truck Leveling Kits
Shop All Truck Lift Kits
Fitment:
DetailsRough Country 57031
CA Residents: WARNING: Cancer and Reproductive Harm - www.P65Warnings.ca.gov
Installation Info
Installation Time
(approx) 3 Hours
Difficulty Level:
Mechanical expertise or professional installation required.
Installation Guides
What's in the Box
10 More Questions