FREE 1 to 3-Day Delivery on Orders $149+ Details
How to Install Rough Country Bull Bar - Black (99-03 2WD; 97-03 4WD) on your Ford F-150
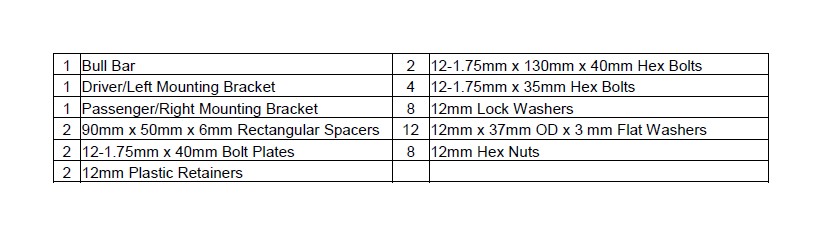
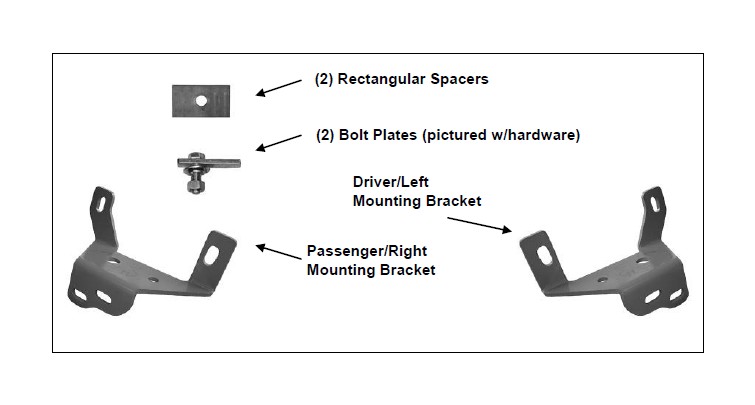
PARTS LIST:
NOTICE: Bull Bar may interfere with the performance of forward facing cameras and sensors , if equipped.
PROCEDURE:
1. REMOVE CONTENTS FROM BOX. VERIFY ALL PARTS ARE PRESENT. READ INSTRUCTIONS CAREFULLY BEFORE STARTING INSTALLATION. CUTTING MAY BE REQUIRED.
2. NOTE: It may be necessary to remove/relocate front license plate and license plate bracket. It is not required, but strongly recommended. If local/state law requires a license plate, license plate relocation kit is available.
3. Starting on the driver side of the vehicle, determine if the vehicle is equipped with factory tow hooks. NOTE: Factory tow hooks will not be reinstalled.
Vehicles equipped with factory tow hooks:
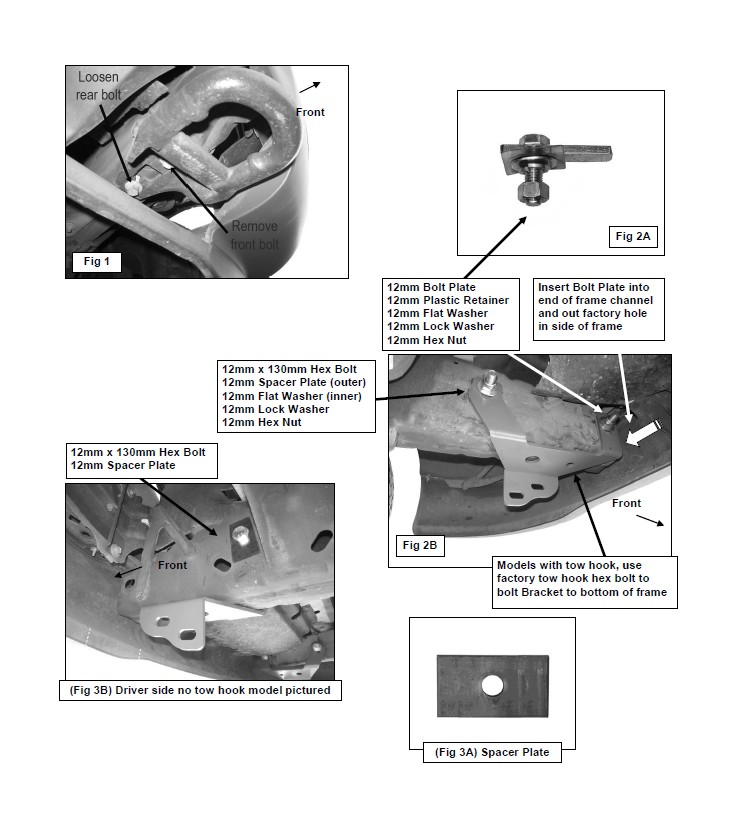
a. Remove the forward tow hook bolt. Loosen but do not remove the rear bolt. Slide the tow hook out from under the rear bolt. IMPORTANT: Loosen but leave the rear bolt in to hold the factory nut plate in place inside the frame, (Figure 1).
b. Insert (1) Bolt Plate into the open end of the frame and out through the hole in the inner facing side of the frame, (Figures 2A & 2B). Thread (1) 12mm Plastic Retainer over the threaded end of the Bolt Plate and down tight against the frame. IMPORTANT: The Plastic Retainer is designed to prevent the Bolt Plate from falling back into the frame and to aid in installing the Bracket.
c. Select the driver side Mounting Bracket. Hold the Bracket up to the bottom of the frame with the mounting tabs on the inside of the frame channel over the Bolt Plate. Secure the Bracket to the Bolt Plate with the included (1) 12mm Flat Washer, (1) 12mm Lock Washer and (1) 12mm Hex Nut, (Figure 2B). Leave hardware loose at this time.
d. Insert (1) 12mm x 130mm Hex Bolt with (1) Rectangular Spacer into and completely through the rear hole in the outside of the frame and the rear mounting tab on the Bracket, (Figures 3A & 3B). Secure the Bracket to the Hex Bolt with (1) 12mm Flat Washer, (1) 12mm Lock Washer and (1) 12mm Hex Nut. Leave hardware loose at this time. IMPORTANT: Make sure that the Rectangular Spacer is on the outside of the frame covering the factory hole, (opposite side from the Bracket, Figure 3B).
e. Bolt the Bracket to the bottom of the frame with the factory tow hook bolt.
f. Tighten all Bracket hardware starting with the tow hook bolts.
g. Repeat Steps a - f for passenger side bracket installation. NOTE: Installation pictured without tow hook.
4. Vehicles without tow hooks:
a. Select the driver side Mounting Bracket. Bolt the Bracket to the inner side of the frame channel as described in Steps 3b - 3d, (Figures 2A - 3B). Push the Bracket up to the bottom of the frame and tighten hardware at this time.
b. Repeat for passenger side Bracket installation.
5. Position the Bull Bar onto the outside of the Mounting Brackets.
Vehicles equipped with factory tow hooks:
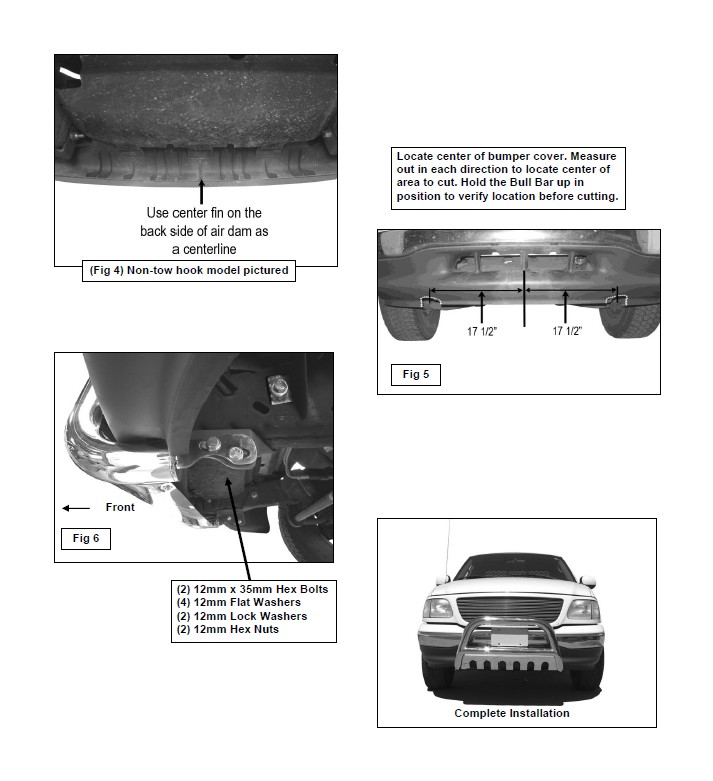
a. Use the included (4) 12mm x 35mm Hex Bolts, (8) 12mm Flat Washers, (4) 12mm Lock Washers and (4) Hex Nuts, (Figure 6). Do not tighten hardware at this time.
Vehicles without tow hooks:
a. From the back of the front bumper, locate the center of the lower bumper cover. Measure out 17-1/2" to the left and to the right, (Figure 4). Draw a vertical line up from the bottom edge. Mark a center spot to drill 2" up on the line from the bottom edge. This is the approximate center of the Bull Bar tube.
b. Check the above measurement before cutting by first, bolting the Bull Bar to the rear mounting location only on both Brackets with (1) 12mm x 35mm Hex Bolt, (2) 12mm Flat Washers, (1) 12mm Lock Washer and (1) Hex Nut inserted into each Bracket to use as a hinge, (Figure 6). Rotate the Bull Bar up to the bottom of the air dam. The center of the tube should match the vertical line drawn at 17-1/2" out from the center of the bumper cover.
c. Cut a 3” diameter round hole out of each marked location, 2” up from the bottom of the bumper. Trim the opening into a “U” shape, (Figure 5). IMPORTANT! Use the Bull Bar to determine exact area to be cut from air dam. Only remove material required to clear the Bull Bar. NOTE: It may be easier to remove the lower bumper cover to cut for clearance once properly marked.
d. Once properly trimmed, reinstall the bumper cover and Bull Bar, (if removed), as previously described, (Figure 6).
6. Align Bull Bar properly and tighten all hardware at this time. Trim air dam if necessary for proper clearance.
7. Do periodic inspections to the installation to make sure that all hardware is secure and tight.
To protect your investment, wax this product after installing. Regular waxing is recommended to add a protective layer over the finish. Do not use any type of polish or wax that may contain abrasives that could damage the finish.
For stainless steel: Aluminum polish may be used to polish small scratches and scuffs on the finish. Mild soap may be used also to clean the Bull Bar.
For gloss black finishes: Mild soap may be used to clean the Bull Bar.