


Installation Time
(approx) 3 Hours
Difficulty Level:
Mechanical expertise or professional installation required.
 FREE 1 to 3-Day Delivery on Orders $149+ Details

$159.95 kit
CONFIRM THIS FITS YOUR VEHICLE!
Saved - View your saved items
We're sorry. We couldn't save this product at this time.
or use

Features, Description, Reviews, Q&A, Specs & Installation
| Brand | Rough Country Suspension |
| Leveling Kit Location | Front and Rear |
| Leveling Kit Lift Height | 2.00 Inch |
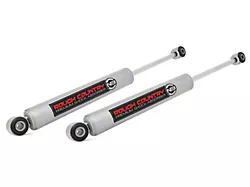
| Leveling Kit Includes Shocks | Shocks Included |
Instantly Adds 2 Inches of Ride Height. Give your Ford F-150 a more aggressive stance with this 2-Inch Leveling Lift Kit from Rough Country. With this kit, not only will it raise your truck by 2 inches, but it’ll also allow you to install up to 33-inch tires. Plus, this leveling lift kit is compatible with your truck’s factory components, making it an affordable upgrade.
Made From Premium Quality Materials. This Leveling Lift Kit is designed to keep up with your extreme off-road lifestyle. Each of its components is made from high-quality and durable materials, so it can endure the harshest road conditions and climates.
Boast a Bolt-On Design. You won’t have any problems installing this 2-inch leveling lift kit. Since it features a bolt-on design, you don’t have to drill or cut anything when setting up this product. This also means that you won’t have to disassemble your struts to complete the installation.
Comes With a Lifetime Replacement Warranty. A lifetime replacement warranty is included with every purchase of this product. To know more about this coverage, please visit Rough Country’s website.
Application. The Rough Country 2-Inch Leveling Lift Kit fits all 2009-2020 Ford F-150 models, excluding Raptors.
Shop All Truck Parts And Accessories
Shop All Truck Leveling Kits
Shop All Truck Lift Kits
Rough Country Suspension 52230
CA Residents:  WARNING: Cancer and Reproductive Harm - www.P65Warnings.ca.gov
Installation Info
Installation Time
(approx) 3 Hours
Difficulty Level:
Mechanical expertise or professional installation required.
What's in the Box

