 FREE 1 to 3-Day Delivery on Orders $149+ Details
How to Install Recon 62 in. BIG RIG LED Running Light Kit - Amber on your F-150
1. Remove all contents from the box. Each 48” & 62” kit contains the following:
a. Two amber L.E.D. bars with Three wires coming out of each light bar
b. Ten metal brackets in 48” kit & Twelve metal brackets in 62” kit
c. Ten self tapping screws in 48” kit & 12 self tapping screws in 62” kit
d. Four male and Four female 3M wire splice connectors
e. Eight plastic “zip-tie” wire loom fastemers
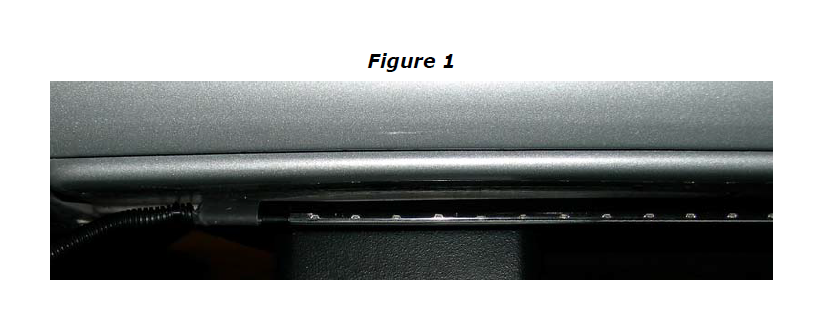
2. First identify which is the drivers side bar and which is the passenger side bar. Keep in mind that the wires coming out of each bar should come out towards the front of the truck. Evenly space out and attach half the metal brackets contained in the kit to the drivers side bar (be careful not to cover any of the L.E.D.’s with the brackets). The top of the bar will be black and you should be able to see the L.E.D.’s inside the bar. The bar will be angled downward slightly when installed properly. “See figure 1”
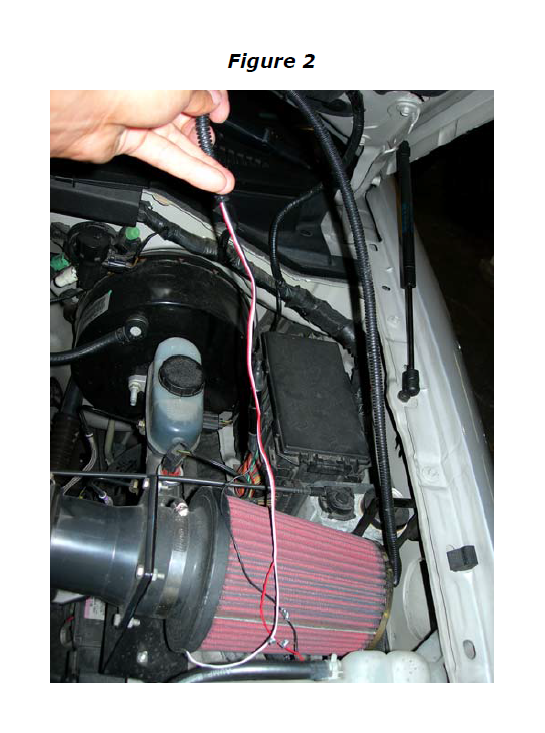
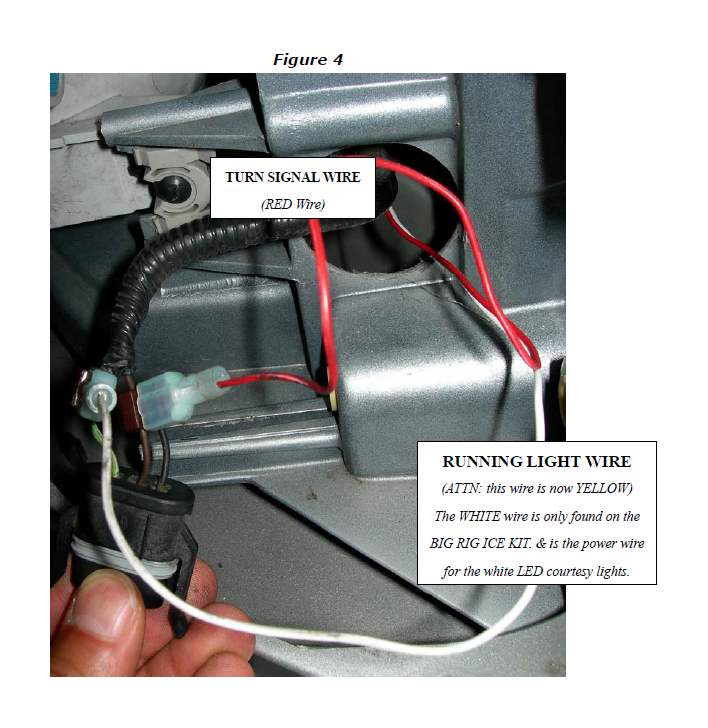
3. Once all 5 brackets have been screwed into the flat metal surface directly beneath your drivers side door(s) aka pinch well, rocker panel, or frame rail, you are ready to begin plumbing the 3 wires behind the front wheel dirt-guard and then up in front of the firewall to the engine bay. You will splice the positive wires at the drivers side front corner marker lens. “See figure 2 next page” The three wires are labeled as follows:
a. YELLOW Wire – Running Light Positive Wire
b. RED Wire – Turn Signal Positive Wire
c. BLACK Wire – Negative / Ground Wire
d. WHITE Wire – Courtesy Light Positive Wire (**Only Found On BIG RIG “ICE” KIT**)
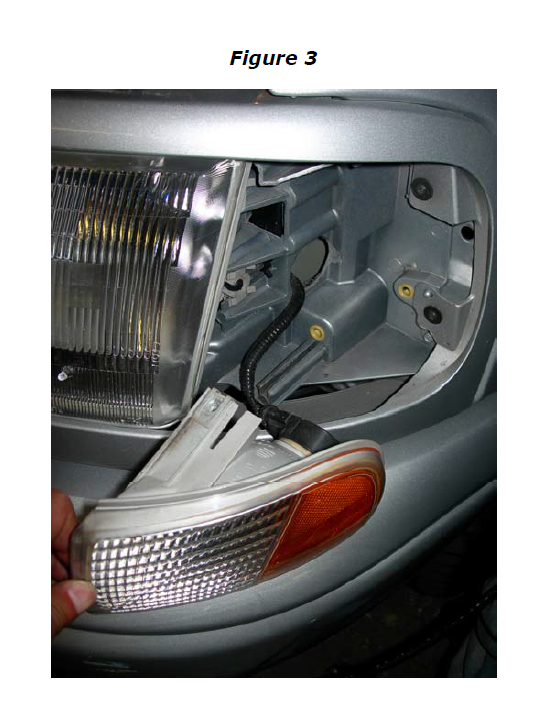
4. The next step is to remove the corner marker lens and use the included splice connectors to splice each of the positive wires to the cooresponding positive wire coming off the bulb plug in your corner marker lens. “See figure 3 & 4 next page”. Next you will need to ground the Black Wire to a metal surface preferrably under a metal screw located near the corner marker lens or under the hood.
5. Now you are ready to test the bar by turning on your headlights and activating your hazard lights to confirmthat the bar illuminates properly and gets brighter as the hazard lights blink. Once you have confirmed that everything is working as it should, complete the assembly of the drivers side and begin the installation of the remaining L.E.D. bar on the passenger side of the truck by repeating everything you have done to the drivers side.
The wires for the BIG RIG ICE Running Light Kit are color coordinated differently from the wires on a standard BIG RIG Running Light kit, please note the instructions below.
You will notice that with RECON’s new BIG RIG ICE Running Lights (part # 26413X & 26414X) there is an additional wire coming off each of the two bars. This WHITE wire is your WHITE LED power wire and it must be connected to your dome light/cargo light. The simplest way to power this wire is to tap into the positive wire leading to either your dome light inside your cab or your cargo light which illuminates your trucks cargo bed…once connected: the WHITE LEDs on your new BIG RIG ICE Running Light Kit will illuminate and are dominant over the amber LED running lights & turn signals. This means when the white LEDs are illuminated, the amber LEDs will turn off. The YELLOW COLORED running light wire RED COLORED and turn signal wires will be connected in a similar way to that of the standard BIG RIG Running Light Kit. Please refer to those instructions located above if you need assistance with the other aspects of the install.
If you cannot locate your positive dome light wire or your positive cargo light wire, please consult with your local truck dealer to find out where these wires can be found on your particular vehicle.
