FREE 1 to 3-Day Delivery on Orders $149+ Details
How to Install RBP Body Armor Fender Trim - Textured Black on your F-150
Tools Required
- No. 8 Phillips Head Screwdriver
- Allen Wrench Set
- 5/16" Wrench
- Drill with 7/64" bit
KIT INCLUDES:
- 1 Driver Side Front Fender Flare
- 1 Passenger Side Front Fender Flare
- 1 Driver Side Rear Fender Flare
- 1 Passenger Side Rear Fender Flare
- 2 Plastic Push Clips
- 2 S Clips w/ Screws
- 14 No.8 x 3/4 Trussflange Phillips head Screw
- 44 Button Head Bolts
- 44 Lock Nuts
Installation of Front Fender Flares
Step 1. Preparing Fender Flares
• Set the flares on a clean surface so as not to damage them while working on them.
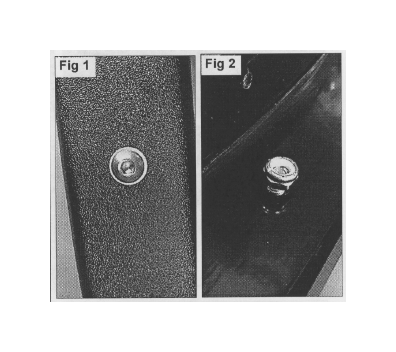
• Locate the provided button head bolts and install them onto the fender flares using the provided lock nuts. Fig 1 & 2
Step 2. Installing Front Flares
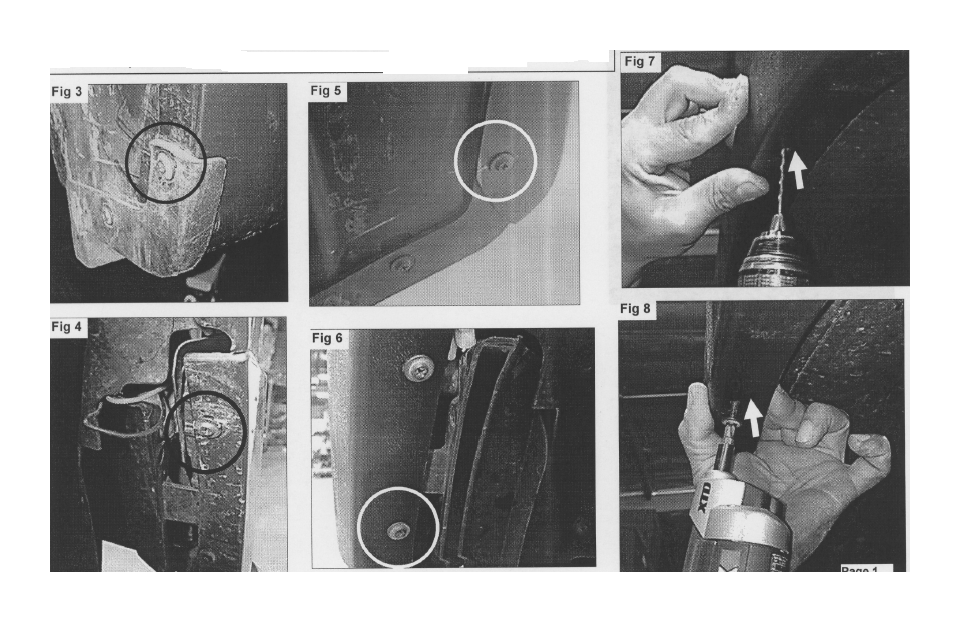
• Locate and remove the 2 OEM phillips screws on the inner fender lip (1 in the bumper cap, 1 in the mudguard) and set aside for reuse. Fig 3 & 4
• Place fender flare against vehicle lining up the holes in the flare with the OEM holes in the fender lip.
• Reinstall the OEM phillips head screws removed from the mudguard and the bumper cap. Fig 5 & Fig 6
• While keeping the flare flush against the fender, use a drill with a 7/64" bit and drill into the fender lip where the top 3 holes are located in the flares. Fig 7
• Locate 3 trussflange phillips head screws and screw them into the newly drilled holes in the fender lip, Fig 8
Repeat this process for the other side of the vehicle.
Installation of Rear Fender Flares
Step 1. Installing Rear Fender Flares
• Remove push clip from plastic rear bumper lip and save for reuse. Fig 9
• Locate one of the provided S clips and attach it to the front of the rear fender lip. Fig 10
• Place flare against vehicle to line up front hole in the flare with S clip and rear hole with rear bumper lip.
• Using the OEM push clip insert it back into the rear bumper lip attaching the rear of the flare to the vehicle.
• Using a provided S clip screw attach the front of the flare to the S clip.
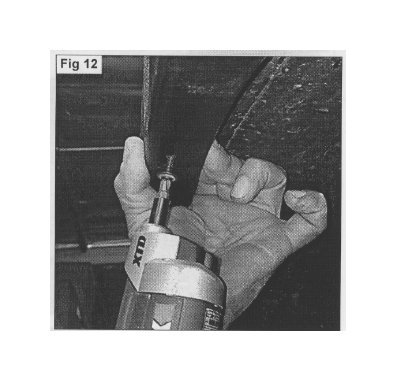
• With the flare firmly pressed against the vehicle use a 7/64" drill bit and drill into the inner fender lip where the holes in the flares are. Fig 11
• Locate 4 trussflange phillips head screws and screw them into the newly drilled holes in the fender lip. Fig 12
• Repeat this process for the other side of the vehicle.
• This completes the installation process.