FREE 1 to 3-Day Delivery on Orders $149+ Details
How to Install Raptor Series 7 in. SSR Stainless Steel Running Boards - Polished - Body Mount
Installation Time
1 hours
Tools Required
- RATCHET
- TORQUE WRENCH
- 17MM SOCKET 14MM SOCKET
Torque Specifications:
For Cab Mount Installations
Cab mount bolts are torqued to 70 Ft Lbs. All other M8 through M12 sized bolts/nuts are set to 15-20 ft lbs.
Note: When installing the brackets and bars, all hardware must be left loose until all the items are attached.
1. Remove all contents from the package and check stainless steel running boards for any damage. Also, verify that all components and hardware listed above are included before you begin installation.
2. Read installation manual and installation drawing completely. Understand all brackets and bolts before installation.
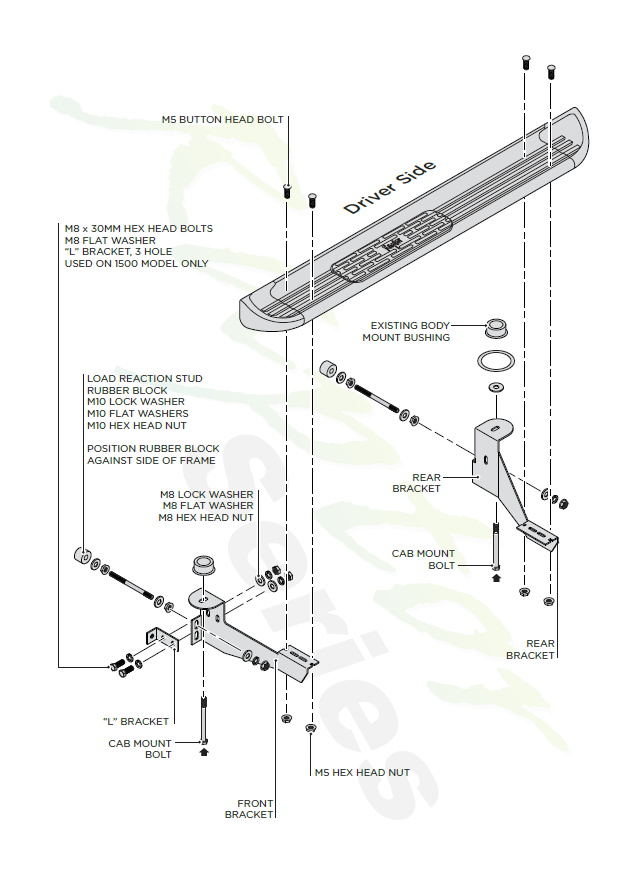
3. Begin installation on driver side. Position drivers side Front Bracketand Rear Bracket as shown along driver side.
Assemble the Load Reaction Studs as follows:
4a. On the short threaded end of the Load Reaction Stud, install a M10 Hex Head Nut, a M10 Flat Washer to the bottom of thread, then install a Rubber Block tight up against the M10 Washer and the M10 Hex Head Nut. (The end of the Stud must be recessed in the rubber washer approximately 3/16").
4b. On the long threaded end of the Load Reaction Stud, install a M10 Flat Washer, a M10 Lock Washer and a M10 Hex Head Nut to the bottom of the threads.
NOTE: IF MOUNTING THE RUNNING BOARD ON A 1500 MODEL TRUCK. YOU MUST ATTACH "L" BRACKET, 3-HOLE BRACKET TO FRONT BRACKET IN ORDER TO USE THE LOAD REACTION STUD.
5. Remove the factory front and rear body mount bolts and install the mount brackets and running board per following instruction.
6. Install the Brackets to the Cab Mounts as shown. Hand tighten, until the Load Reaction Stud and the Running Board has been installed.
7. Attach the load reaction stud assemblies to the mounting brackets as shown. Insert the stud from what will be in the inboard or frame side thru the lowest hole in the bent flange of the bracket that will allow the rubber washer to seat firm against the side wall of the frame. Install a M10 flat washer, a M10 lock washer and a M10 Hex Head Nut (Hand tighten only).
8. Attach the Running Board to the Frnot, Center and Rear Brackets using M5 Button Head Bolts and M5 Hex Head Nuts.
9. Repeat these steps for passenger side installation. When all hardware is in place, everything must be tightened. See Page 1 for Torque Specifications.