 FREE 1 to 3-Day Delivery on Orders $149+ Details
How to Install Timbren Suspension Enhancement System - Front on your F-150

Shop Parts in this Guide
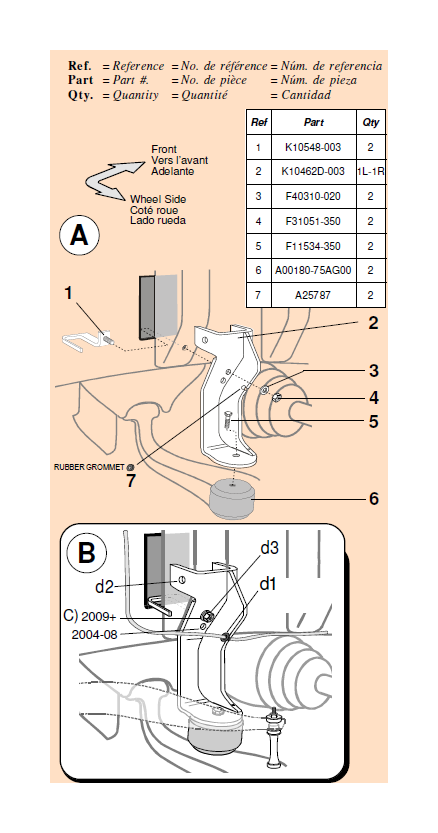
INSTALLATION INSTRUCTIONS
a) Raise vehicle allowing the axle to hang freely.
b) Clean out any debris inside OEM frame extension and insert fastener weldment (#1) through side of frame opening.
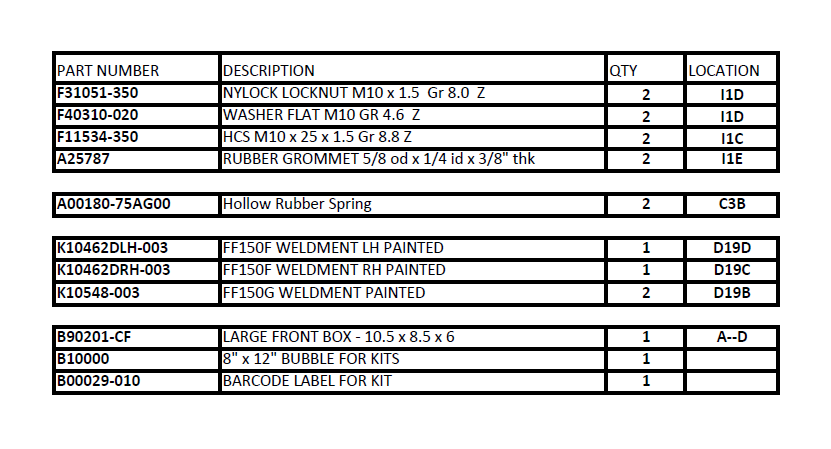
c) Mount Timbren bracket to truck frame using either mounting hole. Use diagram "B" and model years as a guideline as vehicles and applications may vary.
d) OEM brakeline clip locations differ by model year:
1) Slip rubber grommet over brakeline. Insert rubber grommet and brakeline into weldment cutout to secure
2) Oem brake clip and bolt through tab/ holes of #2 bracket
3) Between #2 bracket and #4 nut.
e) Assemble Aeon rubber spring as shown in the adjacent diagram.
f ) Place rubber grommet over brakeline. Insert rubber grommet and brakeline into weldment cutout to secure.
g) Lower vehicle.
NOTES: Torque upper nuts of Timbren bracket to 35 ft.lbs. (47 Nm)
Engage four wheel drive and turn wheels full lock both directions to ensure there is no interference with Timbren assembly.
Check that brake line or brake cable locations do not interfere with Aeon spring bracket.
Do not exceed vehicle manufacturer.s recommended axle weight rating. Check for AEON® interference with vehicle components - Under load AEON® will .expand. in diameter.
ASSEMBLY NOTES:
RUBBER GROMMET A25787 MUST BE CUT AS PER DRAWING. APPLY 'LEFT' LABEL TO L/H BRACKET
ASSEMBLY NOTES:
RUBBER GROMMET A25787 MUST BE CUT AS PER DRAWING. APPLY 'LEFT' LABEL TO L/H BRACKET
Clearance Instructions:
Rear SES Kits for Pick-Ups and Vans should have a 1/2" to 1-1/2" gap between the rubber spring and contact point when empty.
A partial load, or vehicle accessories will reduce or eliminate the gap.
Front SES kits are usually in full contact.
Medium and Heavy-Duty Trucks, Trailers and Motorhomes will be in constant contact, and have no gap.
Lifetime Warranty:
Timbren SES Kits are warranted against defects in material and workmanship, under normal use and service, for the life of the vehicle on which the kit was
originally installed. The warranty is not transferable and proof of purchase is required. The warranty is limited to the replacement of the failed part.
TIMBREN will not be responsible for any labour or freight charges involved in the replacement of any product. TIMBREN shall be entitled to make its own
inspection to determine the validity of the claim. TIMBREN shall not be liable nor warranty the product in the event of alteration, misuse, overload, negligence
or damage caused by others.

