FREE 1 to 3-Day Delivery on Orders $149+ Details
How to Install Pypes Violator Cat-Back Exhaust - Split Rear Exit (02-05 4.7L RAM 1500) on your Dodge RAM

Shop Parts in this Guide
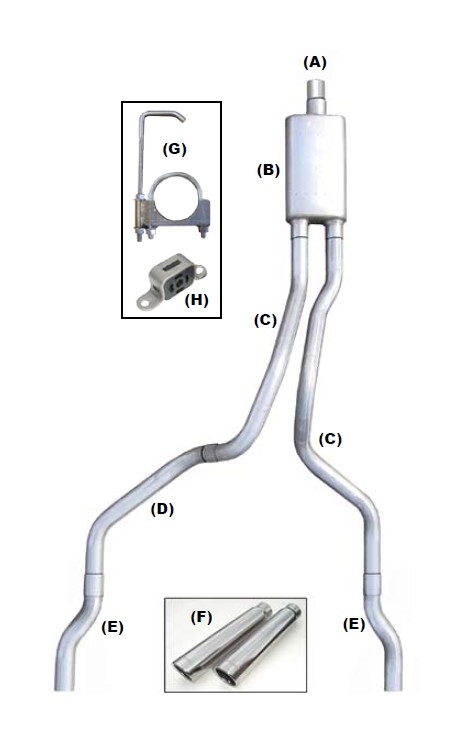
Thanks again for purchasing your new 409 stainless steel Pypes Performance Exhaust Cat-back system. Please be sure to confirm all the components in the kit were received in your shipment before beginning installation. These kits will include (1) cat-back mid-pipe adapter, (1) Muffler (2) Over-axle pipes from muffler, (1) LH tailpipe, (2) PVT10 “S“ bend tailpipe extensions, (2) 12” polished tips, (6/7) 2-1/2”clamps, (1) 3” clamp, (4) HVH11S Clamp/hanger combo, (2)TPHV6 hanger blocks and mounting hardware. The kit you purchased includes an 18” muffler, you will see the following notation after the system number: (R) RacePro, and (V) Violator. If you find any component missing, please contact our office at 800-421-3890 for replacement. Installation of this kit will require some simple hand tools; box wrenches, deep sockets w/ ratchet, extension, a saws-all and some penetrating lubricant. For a quicker and tighter installation, air tools are recommended. Fully welding the system is always recommended when possible. Technical assistance is available both online at www.pypesexhaust. com or 800-421-3890. Also our online Installation Gallery is a great assistant during your installation, www.pypesexhaust.com/pictures.html .
Note: Pypes Performance Exhaust Cat-back truck systems are designed to fit stock height vehicles with OEM hitches and spare wheel and tire combos. Vehicles with aftermarket components such as trailer hitches, larger spares or ride height changes may require modifications to the system for proper fit.
1. Begin by placing the vehicle on a lift or four jack stands at maximum height to aid in an easier installation. To help ease the installation, pre-fit all the components into a complete system on your garage floor, using the diagram provided.
2. Remove the existing exhaust starting with the tailpipe first. Cut the tailpipe off just behind the muffler, remove. Cut the muffler out next. Remove the pipe from the muffler to the catalytic converter.
3. Now it’s time to install your new components. Begin by choosing the proper after cat mid-pipe for your application. Most kits are supplied with two options depending on cab and wheelbase. It is really simple to determine the one used without measuring, the outlets of the muffler should land just under or just in front of the factory muffler hanger on the truck. Here is a quick reference chart with approx required cutting measurements:
• SDT13: no trim required. Cut the original muffler off right at the inlet neck.
• SDT16: trim required. Cut the original muffler off right at the inlet neck.
4. Install the proper mid pipe for your application. Be sure to slide the necessary clamps on the pipe before sliding it into the muffler. With the muffler installed, the outlets should land closely under the muffler hangers. Install 2 clamps on the outlets of the muffler.
5. You can now install the two over axle pipes onto the outlets of the muffler. The driver side pipe is bent to travel around the spare tire. Install two HVH11S hangers, one on each over axle pipe and hang in the factory rubber muffler hangers. The threaded rod on the hanger allows for height adjustability. Snug up the clamps to hold the muffler in place.
6. Next, install the PVT10 “S” bend tailpipe extensions. One HVH11S should be slide over each tailpipe, adjust the threaded rods to the correct hanging height. The passenger side hanger will slip into the factory rubber hanger. The driver side will require the provided TPHV6 rubber block hanger to be bolted using 5/16” bolts to the frame rail approx 18” from the rear bumper.
7. Now install the tips with the HVC21 clamps.
8. Finish the system by making all your final adjustments to position of the muffler, over axle pipes, tailpipes and tips. Now tighten all the clamps and hangers in the desired locations (Warning: tightened clamps will leave marks in the tubing, making removal or adjustments extremely difficult) or for the best fit weld all the slip joints. A minimum of ½” of clearance should be maintained around all piping. All clamps should be tightened to 65 ft lbs and should be checked after the first 50 miles. The 409 stainless can be welded with your standard mig welder, and is highly recommended when possible.
Now it’s time to fire up that muscle truck and enjoy your new Pypes Performance Exhaust.