FREE 1 to 3-Day Delivery on Orders $149+ Details
How to Install Putco Grille & Tailgate Emblems - Black (09-14 w/o Backup Camera) on your Ford F-150
Tools Required
- 3/8” Ratchet
- 10mm and 3/8” Socket
- 3/8” Wrench
- Needle Nose Pliers
- Flat Blade Screwdriver
- T-30 Torx Bit (92100 only)
Please read all instructions before installation and to check to see that all parts are included.
Front Emblem Installation
1. Remove Emblems from packaging. Check to see if all parts from above kit contents table are included.
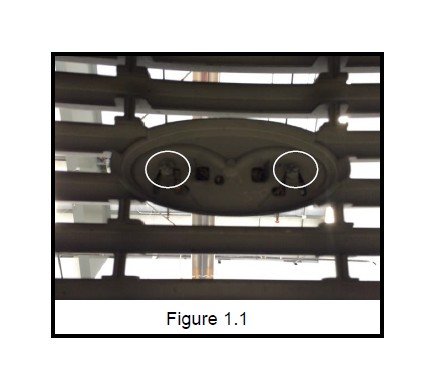
2. Open hood, Remove two 10mm nuts and that secure the emblem to the hood. Shown in figure 1.1
3. Unclip the two shafts that held the two 10mm nuts but gently pushing upwards on them and pulling the emblem off the grille.
4. Install the provided threaded shafts into the back of the new emblem by hand until shafts bottom out in emblem.
5. Install the emblem into the grille and finish the installation by installing the washers and tightening the lock nuts using a 3/8” socket and ratchet. Be careful not to over tighten the fasteners and damage the surrounding grille
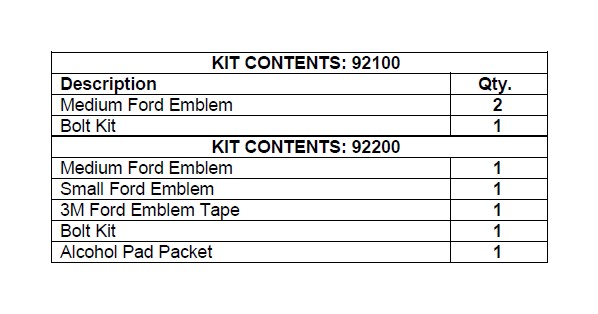
Rear Emblem Installation Kit: 92100
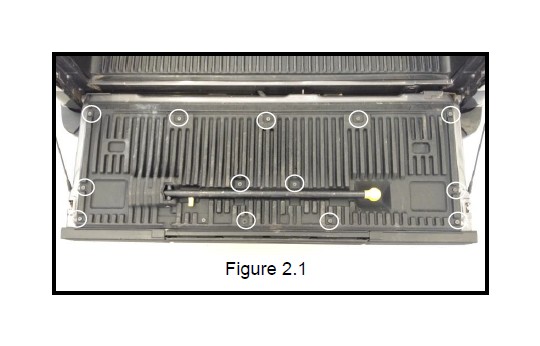
1. Lower tailgate and remove the 13 T-30 screws holding the plastic tailgate protector marked in figure 2.1
2. Remove the protector
3. Locate and remove the two 10mm screws holding the rear emblem on
4. Unclip the two shafts that held the two 10mm nuts but gently pushing upwards on them and pulling the emblem off the tailgate
5. Install the provided threaded shafts into the back of the new emblem by hand until shafts bottom out in emblem.
6. Install the emblem into the tailgate and finish the installation by installing the washers and tightening the lock nuts using a 3/8” socket and ratchet. Be careful not to over tighten the fasteners and damage the tailgate.
Rear Emblem Installation Kit: 92200
1. Gently pry against the smaller part of the emblem shown in figure 3.1. Be careful not to damage either part of the emblem
2. Set the factory emblem off to the side. Prep the new emblem and the truck with the alcohol pad
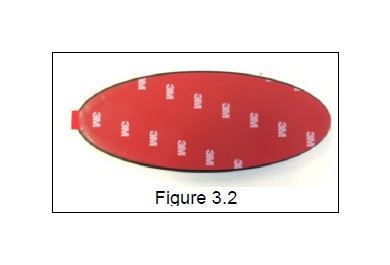
3. Peel one side of the 3M tape and install it on the emblem. Center on emblem and apply pressure. Figure 3.2 shows an example of properly positioned 3M tape.
4. Remove the other side of the 3M tape from the emblem and position the emblem on the truck. Once the position is finalized, press firmly on the emblem against the truck for 30 seconds.
Note: PUTCO recommends applying a high quality automotive wax to maintain the original appearance on your new Ford Emblems