How to Install Putco Black Platinum Rocker Panels - F150 Logo on your F-150
Installation Time
10 minutes
Tools Required
- Rubbing Alcohol
- Clean Towel
- Painter's Tape

Shop Parts in this Guide
Rocker Panel Installation
STEP 1. Clean and dry the vehicle thoroughly.
STEP 2. The vehicle surface temperature must be a minimum of 10°C (50°F).
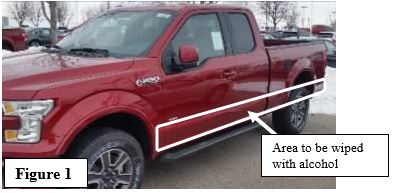
STEP 3. Apply rubbing alcohol to the clean towel and wipe down the entire boxed area shown in Figure 1 on both driver and passenger sides of the vehicle. This will ensure proper adhesion to the vehicle.

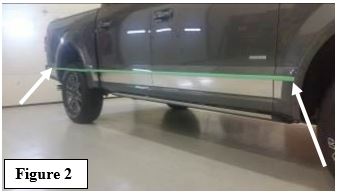
STEP 4. As shown in Figure 2, apply painter's tape along body line with the bottom of the tape sitting about 1/4" below the body line. IMPORTANT: Be sure the tape is applied straight and evenly. The tape line must be one piece and start at the front wheel well and follow the body line to the rear bumper.

STEP 5. Each panel will be numbered 1D/P - 5D/P (for Regular Cab) or 1D/P - 6D/P (For SuperCab and SuperCrew). (D = Driver Side, P = Passenger Side) Determine and verify the exact location for each panel by holding them up to the vehicle, lining the top edge of the panel with the bottom edge of the tape line. Panel #1 should be located behind the front wheel. Panel #2 located on the front door and so on until you reach the last panel located on the bed behind the rear wheel.
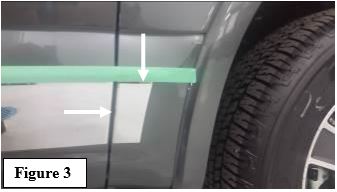
STEP 6. Once you verify the location for each panel, begin applying the panels by removing the red protective film from the back of Panel #1 on the passenger side. Align the top edge of the panel with the tape and the back edge about a 1/16" from the back edge of the quarter panel. IMPORTANT: Do not to allow the adhesive surface of the panels to touch the vehicle prior to being in the correct location. When aligned, press and hold in position for 30 seconds to ensure proper adhesion. See Figure 3 for proper alignment.

STEP 7. Remove and fold down about ½” of the red protective film from the entire top side of panel #2. Hold the ends of the panel as you align it to the tape on the front door. When the part is aligned to the door and the tape line, gently press the exposed adhesive part onto the vehicle, while maintaining alignment. Slowly pull the remaining red protective film downward until the film has been completely removed. Press the panel firmly onto the vehicle for 30 seconds to ensure proper adhesion.
STEP 8. Repeat step 7 for the remaining panels on the passenger side, then lastly, remove painter’s tape on the passenger side.
STEP 9. Repeat steps 6 thru 8 on the driver side of the vehicle.
