 FREE 1 to 3-Day Delivery on Orders $149+ Details
How to Install Putco Bar Design Lower Grille Insert with 10 in. Luminix Light Bar on your F-150

Shop Parts in this Guide
- Putco Bar Design Lower Bumper Grille Insert with 10-Inch Luminix Light Bar and Heater Plug Opening; Black (09-14 F-150, Excluding Raptor, Harley Davidson & 2011 Limited)
- Putco Bar Design Lower Bumper Grille Insert with 10-Inch Luminix Light Bar; Black (09-14 F-150, Excluding Raptor, Harley Davidson & 2011 Limited)
- Putco Punch Design Lower Bumper Grille Insert with 10-Inch Luminix Light Bar and Heater Plug Opening; Black (09-14 F-150, Excluding Raptor, Harley Davidson & 2011 Limited)
- Putco Punch Design Lower Bumper Grille Insert with 10-Inch Luminix Light Bar; Black (09-14 F-150, Excluding Raptor, Harley Davidson & 2011 Limited)
- Putco Diamond Design Lower Bumper Grille Insert with 10-Inch Luminix Light Bar and Heater Plug Opening; Black (09-14 F-150, Excluding Raptor, Harley Davidson & 2011 Limited)
- Putco Diamond Lower Bumper Grille Insert with 10-Inch Luminix Light Bar; Black (09-14 F-150, Excluding Raptor, Harley Davidson & 2011 Limited)
- Putco Bar Design Lower Bumper Grille Insert with Heater Plug Opening; Black (09-14 F-150, Excluding Raptor, Harley Davidson & 2011 Limited)
- Putco Bar Design Lower Bumper Grille Insert with Heater Plug Opening; Polished (09-14 F-150, Excluding Raptor, Harley Davidson & 2011 Limited)
- Putco Diamond Design Lower Bumper Grille Insert; Black (09-14 F-150, Excluding Raptor, Harley Davidson & 2011 Limited)
- Putco Diamond Design Lower Bumper Grille Insert; Polished (09-14 F-150, Excluding Raptor, Harley Davidson & 2011 Limited)
- Putco Diamond Design Lower Bumper Grille Insert with Heater Plug Opening; Black (09-14 F-150, Excluding Raptor, Harley Davidson & 2011 Limited)
- Putco Diamond Design Lower Bumper Grille Insert with Heater Plug Opening; Polished (09-14 F-150, Excluding Raptor, Harley Davidson & 2011 Limited)
- Putco Punch Design Lower Bumper Grille Insert; Polished (09-14 F-150, Excluding Raptor, Harley Davidson & 2011 Limited)
- Putco Punch Design Lower Bumper Grille Insert with Heater Plug Opening; Polished (09-14 F-150, Excluding Raptor, Harley Davidson & 2011 Limited)
Please read all instructions before installation and to check to see that all parts are included.
KIT CONTENTS:
| Description | Qty. |
|---|---|
| Bumper Grille | 1 |
| Hardware Kit | |
| 1/4" - 20 Socket Button Head Bolt | 2 |
| 1/4" - 20 SS Lock Nut | 2 |
| 1/4" SS Washer | 2 |
| Only for Lighted Grille (below) | |
| Light Bar (Installed) | 1 |
| Wiring Harness | 1 |
| Switch | 1 |
| Light Bar Installation Instructions | 1 |
Bumper Grille Installation
1. Open hood to gain access to the back side of the grille opening.
2. For 2014 models, the plastic insert will have to be removed to install the Putco grille. (Refer to Figure 1)
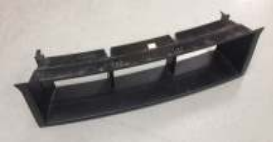
3. Align the two bottom tabs with the slots in the bumper. (Refer to Figure 2)
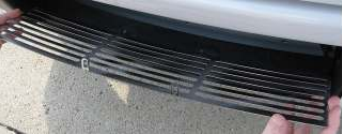
4. Rotate the grille up into the bumper opening. (Refer to Figure 3)
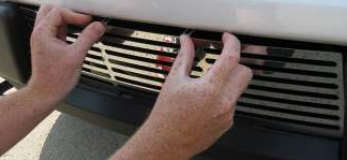
5. Align the top mounting tabs with the existing holes in the bumper. (Refer to Figure 4)
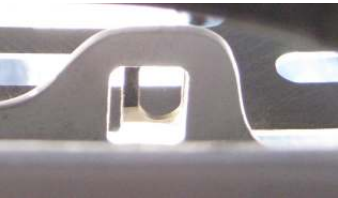
6. With the head facing down, insert the Socket Button Head Bolt through the upper grille and the existing holes in the bumper. (Refer to Figure 5)
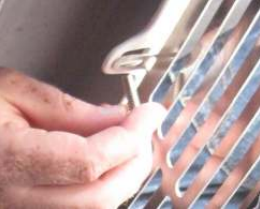
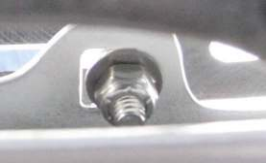
7. Secure the Socket Button Head Bolts with the provided washers and lock nuts. (Refer to Figure 6)
8. Continue onto wiring instructions if you purchased the lighted grille.

