 FREE 1 to 3-Day Delivery on Orders $149+ Details
How to Install Putco 48 in. Blade Tailgate LED Light Bar on your F-150

Shop Parts in this Guide
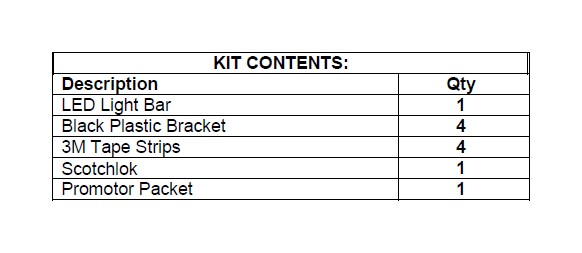
Please read all instructions before installation and to check to see that all parts are included.
Note: The tailgate light bar is intended to be installed on the bed of most trucks between the tailgate and bumper.
Tailgate Light Bar Installation
1. Verify the kit contents (check against parts list) Remove any protective wrapping.
2. Clean and dry the vehicle thoroughly in location where light bar is to be installed.
3. The vehicle surface temperature must be a minimum of 15°C (60°F).
4. Read through the following options for installation. Determine which method is correct for your application. Place tailgate light bar in position with or without brackets. Check the following before determining position:
i. Will the tailgate interfere light bar when opened. If it does the light bar will need to be repositioned.
ii. Is the tailgate light visible from the rear when tailgate is closed?
Note: Tailgate light bar is easier to install if tailgate is removed.
Option 1 Install (Removable)
5. Install 3M tape on back of black plastic brackets. Brackets are more useful if there are any obstructions on truck where light is to be installed. Brackets will hold light bar away from truck. Use promotor packets to prep surface on bracket where tape is going to be applied. Refer to Figure 1.

6. Use at least 90% Isopropyl Alcohol to prep surface on vehicle where light bar is going to be installed.
7. Install black plastic brackets with tape onto the back of tailgate light bar. One on each end, then evenly space out.
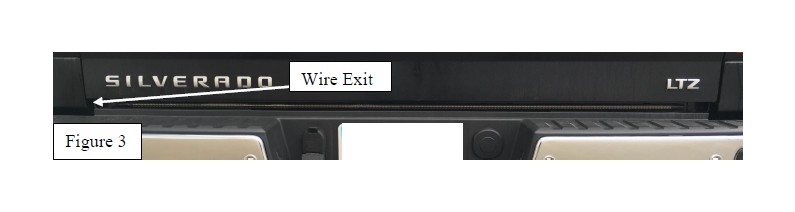
8. Remove tape release liner on all brackets. Place light bar in chosen position on the bed of truck. Do not stick tape to truck until light bar is in correct position. Light bar wire should exit toward driver side of truck. Refer to Figure 3
Note: (Optional) Brackets may also be mounted with nuts and bolts (not included) by drilling into the truck. Use a #10 nut and bolt to attach to truck. The brackets will need to be attached to truck before light bar is installed.
Option 2 Install (Non-Removable)
5. Install 3M tape on back of light bar. Use promotor packet to prep surface on light bar where tape is going to be applied. Place the four tape strips evenly across the back of light bar. Refer to Figure 2

6. Use at least 90% Isopropyl Alcohol to prep surface on vehicle where light bar is going to be installed.
7. Remove tape release liner on all brackets. Place light bar in chosen position on the bed of truck. Do not stick tape to truck until light bar is in correct position. Light bar wire should exit toward driver side of truck. Refer to Figure 3
Wiring Installation
Note: Some trucks will recognize the tailgate light bar as a trailer or will not have a towing package. If desired, a separate connector can be purchased from Putco Part# 8726F. This connector will allow you to bypass/add the trailer connector and wire the light bar into your factory taillights.
1. Plug the 4 pin connector on tailgate light bar into the 4 pin trailer connector on truck.
2. Wire reverse light (white wire) into the reverse light on 7 pin trailer connector (Middle Pin) or into factory reverse light (White Light) using a supplied Scotchlok.

