Installation Time
(approx) 2 Hours
Difficulty Level:
Light to Moderate mechanical skill required.
Guaranteed Free Delivery by 12/24! available on most items - Details
$509.08 (kit)
FREE Shipping Market Price $595.99 You Save 15% ($86.91)Add Local Shop Installation
Saved - View your saved items
We're sorry. We couldn't save this product at this time.
or use
Justin: Hey, everyone. I'm Justin with americantrucks.com. And today, we are taking a closer look at and installing the PowerStop Z36 Extreme Truck and Tow Setup for the front end of your '07 through '18 Silverado 1500 at home.Now, you should be checking out this setup for your Silverado if you're after a very affordable turnkey package to totally overhaul and update the front brakes on your rig, improving your stopping power, most importantly, but also your appearance in the process.So the foundation of the kit, guys, is gonna be the company's cross-drilled and slotted G3000 iron rotors, which, as you can see, have been finished off in this really attractive silver zinc coating, and that's just there to help prevent any rust or corrosion on your non-friction surfaces.Now, you're looking at the slotted and drilled rotors here. Those are done to help keep the braking surface clean. For one, that's mainly gonna be your slots here, but those drilled holes are gonna aid with cooling, and PowerStop claims that this combined is gonna help lower the surface temperature of the rotors by nearly 180 degrees.And that's pretty huge when we're talking about braking because heat is gonna lead to fade, and fade is the enemy of braking performance. So keeping those things a little bit cooler in the process, certainly beneficial when you're working to haul down maybe a load that you're trailering or even possibly just something that you're hauling in the bed of your truck.Now, the second part of the equation here, guys, will be the Z36 Heavy Duty Carbon Ceramic Pad. Now, the Z36 pad is unique to this kit and it is a unique pad built specifically for heavy-duty truck in SUV use. Now, when combined, the pad and all of the components here, the result will be roughly a 20% increase in stopping power. That's according to the gang over a PowerStop, and that's gonna be huge, right? Especially when we're replacing some pretty tired components.Now, along with more initial bite, basically, that first time you jab the pedal should bite nice and hard for you. That Z36 compound is also gonna be a little bit less resistant to heat, and again, that's gonna be huge when you're towing. Things get a little bit hot, of course, we're talking about that fade.These things are built to handle that heat a little bit better, and that, again, even comes down to if you've upgraded your tire and wheels on your truck, a lot of times those 33s or 35-inch mud terrain tires, they're pretty heavy, right? Especially when compared to your stock wheels and tires. So something like this will definitely help restore that stopping power that you might be missing out on.Finally, guys, those Z36 pads are gonna be loaded into the PowerStop Remanufacturer Dual Piston Calipers for the front end of your Silverado. Now, these calipers have been refreshed with all-new hardware here, guys. We're talking pins, brand new bleeder screws, fresh rubber boots and seals, and finally, everything has been finished off in that bright red high-heat powder coat to help keep things looking good for many years to come. And as an added bonus, certainly, it will look pretty good behind your favorite set of wheels.Now, finally, guys, I do wanna point out that the PowerStop Kit here is backed by a three-year or 36,000-mile warranty, whatever comes first, and that's just in place in case you run into any issues.Price point for the front kit here for your Silverado is gonna live in that low $500 range, which is certainly gonna be a little higher than maybe a generic part store replacement, but at the same time, it's not nearly as expensive as some of your aftermarket big brake kits from companies like Wilwood, Brembo, or so forth. So definitely pitted right there in the middle.And again, you're getting, not only an increase in stopping power here with the PowerStop components, but it's also nice to point out too, there is a slight appearance upgrade as well. If you value that sort of thing, you like seeing the drilled and slotted rotors, the bright red calipers, certainly something to consider here as well, and certainly something you are not gonna receive with those generic part store replacements.Now, as far as your installation is concerned, well, brake jobs are certainly gonna be one of the automotive basics, if you will. But since there is some elbow grease involved for this swap, along with having to bleed the system anytime you swap out calipers, the site is gonna automatically just kick things up to a middle-of-the-road, two out of three wrenches on the difficulty meter.Call this one a couple of hours or so to complete from start to finish. But again, there's no hurry for this job. Take your time, set aside a few hours, couple hours, whatever, and you should be good to go. But when you say we head out to the shop, walk you through it with our detailed walkthrough and tool breakdown.Man: The tools you'll need for this project are a 1/2-inch drive ratchet, a 3/8 drive ratchet, an 11-millimeter, a 13-millimeter, an 18-millimeter socket, a 13/16 wrench, an 18-millimeter wrench, and some sort of clamping device for your brake line.Hi, everyone. Today we're installing a set of brakes on our Silverado, so let's get started with the uninstall first. First thing we're gonna do is remove our brake line from our caliper so that we can get that off of there. And to do that, what you're gonna wanna do is use some sort of a clamping device on your brake hose to make sure that you don't lose too much brake fluid.Now, I'm just using a pair of needle nose vise grips with some rubber hose on the end of it. And we're just gonna clamp this on close to the end so that we lose as little brake fluid as possible. Now we're gonna use our 11-millimeter socket to remove our brake line from the caliper. Now, you will lose a little bit of fluid, but it shouldn't be too much.So now we can just go ahead and get this out of the way and go ahead and finish taking off the rest of our stuff. Now we'll go ahead and remove our caliper. Removing the two 19-millimeter bolts, one at the top and one at the bottom. With our bolts removed, just lift up on our caliper, and get it out of the way. Now we can go ahead and remove our caliper mounting bracket. We've got an 18-millimeter bolt here and another one down here. Let's go ahead and take those out. And lift that out and the pads will come with it.Now, to remove our rotor, we're gonna need a T30 Torx bit to remove this screw right here that's holding it to the hub. And with that out of the way, we can just slide our rotor off. Now that we're ready to install our rotors, we need to make sure that we're putting the right one on the right side.One of the ways that you can tell, obviously, there's a sticker on here that says it's for the front driver side. The other one will say it's for the front passenger side. Another way that you can tell is look at the slots on the rotor themselves. As long as you're facing the vehicle correctly and the slots end towards the back of the vehicle, then you know you've got the right one for the right side.Another way is look at the stampings on the edge of the rotor here, and it will have the part number listed as well as a left or right marking on it. So just make sure that you're putting it on the right side of the vehicle. And one other thing before you actually put it on, we recommend that you go ahead and use some brake cleaner, spray down the contact area for the pads just to make sure that there's no manufacturing residue left on here or anything that got on there from shipping. So we'll go ahead and spray this down with our brake cleaner. And then wipe it down with a clean cloth. And make sure that you get both sides as well.Now we can go ahead and get this installed on the truck. Now, we'll go ahead and slide our rotor on. And you wanna make sure also that this alignment hole here for the retaining pin lines up with the hole on the hub. So we'll slide that on, reinstall our Torx bolt, and tighten it down with our T30 Torx bit. That'll make sure that we hold it in place while we're putting on the calipers and our brake pads. Now we can go ahead and install our new anti-rattle clips into our mounting bracket here. And they're just gonna snap into place, and tension will hold them in.Now, once you've got your clips in, we can go ahead and install our pads into the mounting bracket as well. And you wanna make sure that the pad that has the wear indicator on it goes towards the inside of your mounting bracket. Also, we recommend that you use the supplied lubricant to put on the ends of your brake pads. It'll help reduce the noise and the movement as well and also put some of this lubricant on the back side where it's gonna be contacting the pistons and the caliper.Now, because we're not making this a permanent change to our truck, we're not gonna put the lubricant on there, but we'll just go ahead and install the pads. So you just slip those inside the anti-rattle clips. And now we can go ahead and slide this into place and reattach the mounting bracket using the original hardware.Now we'll go ahead and slide our pads over the rotor and get the mounting bracket into position. And go ahead and insert our original hardware. And we'll go ahead and tighten these down using our 18-millimeter socket. Now we can go ahead and install our caliper. And before we actually install the caliper, you wanna make sure that you take off the old copper gaskets that go through the bolt that holds your brake line to the caliper.Make sure that you get those out of the way. And also make sure that you've got a clean mating surface between the bolt and the brake line itself. So we're gonna put a new washer on the brake bolt, insert it through the line, put a washer on the other side, again, making sure that these are clean and you have the new washers in. And then we'll go ahead and insert that into our caliper.Now we can go ahead and slide our caliper onto the new mounting bracket. Now we can go ahead and install the supplied bolts to hold the caliper to the mounting bracket. And we'll tighten them down with our 19-millimeter socket. And now you can repeat that process for the other side. Now we'll go ahead and tighten down our brake line with our 11-millimeter socket. Remove our clamp. And now you can repeat that process for the other side.And that wraps up our review and install of the PowerStop Z36 Extreme Truck and Tow 6-Lug Brake Rotor Pad and Caliper Kit for the front of your '14 to '18 Silverado 1500. Thanks for watching, and remember, for all things Silverado, keep it right here at americantrucks.com.
Subscribe to our YouTube Channel
Features, Description, Reviews, Q&A, Specs & Installation
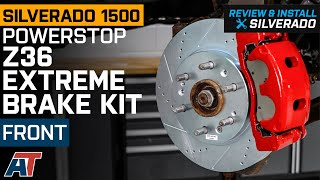
Brand | PowerStop |
Brake Rotor and Pad Kit Placement | Front |
Brake Rotor Type | Drilled and Slotted |
Brake Pad Material | Carbon Ceramic |
Great Braking Power. Stop reliably no matter what the weather with this PowerStop Z36 Extreme Truck and Tow 6-Lug Brake Rotor, Pad and Caliper Kit; Front. Manufactured for better control on rainy days, it features drilled and slotted rotors that offer space for water to pass through, resulting in more traction and metal contact.
Durable Build. Built for all weather reliability, it features a tough cast iron construction with zinc plating for added resistance to corrosion causing debris and moisture.
Warranty. There is a limited 3-year 36,000-mile warranty on this product.
Application. The PowerStop Z36 Extreme Truck and Tow 6-Lug Brake Rotor, Pad and Caliper Kit; Front fits 2007-2018 Silverado 1500 Models.
Information on PowerStop's proper Break-In Procedure can be found here: https://www.powerstop.com/brake-pad-break-in-procedure/
Fitment:
PowerStop KC2069-36
CA Residents: WARNING: Cancer and Reproductive Harm - www.P65Warnings.ca.gov
Installation Info
Installation Time
(approx) 2 Hours
Difficulty Level:
Light to Moderate mechanical skill required.
What's in the Box
10 More Questions