 FREE 1 to 3-Day Delivery on Orders $149+ Details
How to Install PIAA Performance Ion Yellow LED Fog Light Bulbs - 9006 on your F-150
Notice to customers: Carefully read through the instructions before using this product.
● This product is intended to be used on automobiles. Do not use for any other application.
● This product is a 12V bulb for vehicles. Check the bulb type before use. Do not mount or use the product for different types.
● This product is intended especially for fog lamps. Do not install in headlamps (low-beam/high-beam).
● This product can be installed in lamps that use resin type sockets such as H8, H11 and H16 bulbs. Before replacement, verify the indications on the bulb that is being replaced and make sure it is the right type.
● On some vehicles (including imported models) a warning lamp may go on indicating that the bulb has burned out or some other type of abnormal indication may occur. This phenomenon is common to LED products. In addition, in order for the system to sense that a bulb has burned out, a minute amount of electric voltage continues to flow even when the switch is turned off. Therefore, please be aware beforehand that when the bulb is replaced, the LED bulb may light up slightly but this is not a product abnormality. (The amount of voltage that is consumed when the LED lights up is minimal. The amount is equal to what is used to power the vehicle's clock and will not lead to a sudden drop in battery power.
● Because LEDs have a different luminescence process from H.I.D. or halogen bulbs, even if the light color is the same it may look different when seen from a human eye. In addition, depending on the lamp setting, the light color may change. (Even when installing a bulb with the same color temperature as a headlamp and fog lamp, the color variation may vary.)
● When using this product in vehicles that have idling stop systems or have weak battery power, the light may fail to light up or may flicker when starting the engine.

Precautions for Use
WARNING
● Do not look directly at the operating lamp for any period of time; this may cause serious eye injury.
● If there is abnormal vibration or sound when the vehicle is in motion, immediately stop the vehicle in a safe location and inspect the vehicle.
● Please do not disassemble or modify the product. Such actions may damage the product or may cause fire and/or bodily injury.
● Keep the product out of reach of infants. Otherwise infants may swallow or break the product, leading to injury.
● When the lamp is lit, the lens becomes extremely hot. Do not wash the vehicle while the lights are on or immediately after turning them off.
Precautions for Replacement
CAUTION
● As a result of replacing the bulb, the axis of the light may become misaligned. Therefore, after replacement, check the lamp position and make necessary adjustments to the alignment.
● This product has plus ( ) and minus (-) poles. Verify theses poles on the vehicle's connector. Be careful not to mistake plus ( ) and minus (-) poles and then connect them securely.
● Make sure not to touch the base part or the area that illuminates light. Also, prevent any type of oil or dirt from adhering to the product. If the light is turned on in this condition, it may cause a lighting malfunction.
● Make sure to prevent moisture from adhering to the product. If the light is turned on in this condition, it may cause a lighting malfunction. If moisture is present, let it dry out thoroughly before use.
● Bulb replacement should be done safely in a flat place where a wide space is available. Before replacement, stop the vehicle engine, apply the side brake, place the shift in parking or neutral position, and pull out the key.
● Do not yank on the harness when disassembling. Doing so may damage the harness leading to overheating and potential failure.
● Be careful not to lose the original bulbs by keeping them in a safe place after removal.
● In the case of connector or terminal desorption, hold the connector terminal and straighten it out. Please note that if excessive force is applied to the terminal it may break or it may no longer connect. As a result it may cause damage leading to overheating and potential failure.
● Verify the position of the product as well as the metal base of the connector. Check the proper direction and the install it securely.
● Make sure not to apply excessive force to the light emitting part. If this part is damaged, it may cause a lighting malfunction. Please handle this product with extreme care.
Replacement procedure
1. Refer to your vehicle's service manual and remove the fog lamp's bulb.
2. Connect the LED bulb (part ① ) and the controller (part ② ).
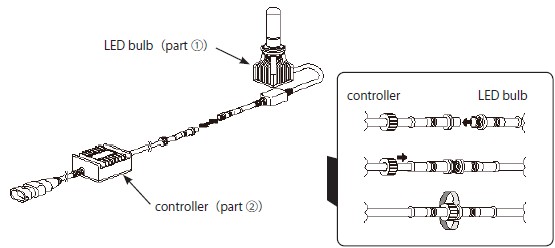
3. Use the reverse procedures in (1) and install the LED bulb to the light unit.
4. This product has plus ( ) and minus (-) poles. Connect the controller's connector (part 2 ) to the vehicle's connector and verify that the light turns on. If the light does not go on, disconnect and try changing the direction of the installation and connect it again. Depending on the model of the vehicle, when verifying that the light goes on, the small notch on the controller's connector may interfere with the connector on the vehicle side which may prevent it from inserting all the way. If this is the case, we will use the next step to remove it. Therefore, confirm the polarity with the connector while not completely inserted.

5. The notch on the connector of the controller interferes with the connector on the vehicle side preventing it from inserting further and locking. If this is the case, use a cutter and cut the notch out and allow it to insert. (If the controller's connector is able to securely connect to the vehicle side connector, this step will not be necessary. Therefore go on to step (6).)
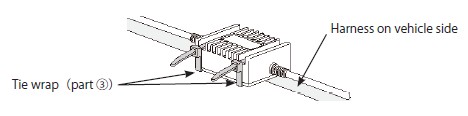
6. Fix the controller part in place on the vehicle side using the tie wrap (part ③ ).
7. Adjust and align the angle of the lamp as required.

