How to Install PIAA 1500 Series Clear Halogen Back-Up Lights - Flood Beam - Pair on your F-150
Tools Required
- Vinyl electrical tape
- Diagonal cutters
- Pliers
- Phillips driver (medium)
LAMP INSTALLATION
• The work site must be clean and level with enough working space to complete the job without distractions.
• The PIAA 1500 Back-Up lamp is intended to mount hanging down or upright. For an upright mount just reverse the mounting bracket. The "PIAA" on the lens should always read right side up.

• When mounting the lamps mount them in such a place that they are free of obstructions.
• Do not modify the lamp system in any way or it will void the warranty.
• Do not mount the lamps in a place that will obstruct an existing automotive function.
• Do not mount the lamps so low to the ground that they have a chance to get damaged easily.
• When the lamp mounting spot has been decided use the supplied double-sided tape to mount the lamps and/or the supplied mounting screws.
• If using the double-sided mounting tape, the mounting surface must be clean and oil free. The double-sided tape works best at room temperature above 65ºF (18ºC).
HARNESS INSTALLATION
1. Run the PIAA harness from the engine compartment next to the battery back to the PIAA back-up lamp. Run the switch into the drivers compartment and mount it in a location that is easy for the driver to control and so that it is out of the way of other automotive functions.
2. Before connecting any wires disconnect the negative (-) battery terminal.
3. When installing the harness follow the wiring diagram and make connections as instructed.
4. Connect the harness to the lamp.
5. Connect the lamp ground(-) wire to chassy ground. This connection should be metal to metal. Scrape all rust, paint, dirt and undercoating from the connection location.
6. Connect the switch power( ) wire to a positive( ) lead for the reverse lights. To do so use the supplied connector or any connector that is suitable for this application.
7. For proper lamp operation it is recommended that the main positive( ) and negative(-) wires be connected directly to the battery terminals.
8. After all wires are connected test the system for operation.
9. If the switch is in position ON1 the PIAA back-up lamp will be on. If the switch is in position ON2 the PIAA back up lamp will only come on when the vehicle is in reverse and the vehicles factory reverse lights are on. If the switch in the OFF position the PIAA back-up lamp system will be off.
10. After checking the system for proper operation secure the PIAA harness with wire ties or other means to keep it away from moving vehicle components, hot components and to keep it from dragging on the ground.
11. If the system does not operate properly contact your PIAA dealer for assistance.
WIRING DIAGRAM

LAMP SERVICE

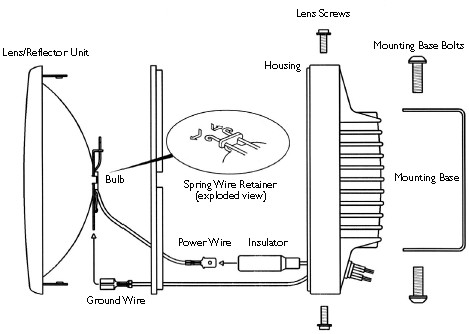
Use this illustration when changing the bulb or repositioning the bracket for correct mounting.

