Installation Time
(approx) 3 Hours
Difficulty Level:
Mechanical expertise or professional installation required.
FREE 1 to 3-Day Delivery on Orders $119+ Details
$107.99 (kit)
FREE Shipping on orders over $119 Market Price $137.99 You Save 22% ($30.00) Up to 10% off for Military & First Responders! See DetailsAdd Local Shop Installation
Saved - View your saved items
We're sorry. We couldn't save this product at this time.
or use
So if you own a '04 to '14 two-wheel or four-wheel drive F150 and you're looking for hands down, one of the most affordable 3-inch leveling kits, you found it. MonoFab's 3-inch front and 2-inch rear leveling kit is currently the least expensive option available on the site at around $100 price point. And that's for a pretty simple reason. We're retaining all of our factory suspension components. That makes this kit 10 times more affordable than a full pull suspension lift and at around 3 inches of lift in the front, this is about the limit that I would go with your factory suspension components if you daily drive your truck. Anything higher than 3 inches in the front, I would consider a differential drop kit just to keep your CV angles in check, but at 3 inches, they're not too crazy. Shouldn't be anything you have to worry about even if you drive your truck on a daily basis. Now as far as the install goes, it is pretty involved. You are still pulling a lot of suspension components out and you do have to tackle some crazy bolts and nuts with some specialty tools, so for that reason, I'm gonna give the install a solid 3 out of 3 wrenches on my difficulty meter. The site says it'll take you maybe two to three hours, but honestly, if this is your first time doing something like this, it'll probably take you an honest day's worth of work. Now leveling kits are cool because they get rid of that factory rake. They level out the truck, which I'm personally a fan of. I don't like the way the F150 dips down in the front from the factory and chances are if you're watching this video, you probably agree with me. Now as far as leveling the truck out, you can fit up to 33-inch tires with no rubbing issues whatsoever as you can see from our shots there. Now if you wanted to fit 35s well, they might rub a little bit. It's nothing too crazy, surprisingly, and that was actually with a wheel that has a relatively neutral offset, which gives you a little bit of poke and it makes the rubbing a little bit worse. So if you went with a high positive offset wheel and 35s, you might have to do some basic trimming under there, but I wager you'd probably get them to fit just fine. Now again, if you want one of the least expensive 3-inch leveling kits for your F150, this is gonna be the one to go with and if you decide to pull the trigger on this one, you can come back to this video in a little bit. I'm actually going to show you guys all the tools you need to get the job done so you can be prepared, and I'm actually gonna walk you through the entire install step by step. All right guys, to complete this install, you will definitely be breaking out the entire toolbox. You'll need standard drive ratchet at a minimum with a metric socket set from 8 millimeters up to 22 millimeters. You might need a 27-millimeter socket as well. Now the wrenches you'll need include a 13, 15, 17, 18, 21 or 13/16th in a pinch, and a 22-millimeter wrench. You'll need a standard hammer. You'll also need an air hammer and you will also need a 5/16 Allen head socket or Allen key. Now optional, but helpful tools include a pry bar, an impact gun, a cutoff wheel with safety glasses, channel locks, or some sort of grips, some spray lubricant and extension, a flathead screwdriver, and some impacts swivel socket. All right, so first we want to take some weight off of the end of our steering assembly, so we're gonna be removing our caliper. Now to do that, you'll need a 14-millimeter socket and a ratchet or an air gun if you're working with power tools like me, then you want to hang this caliper up out of the way. Now we're gonna get a little bit of slack in the lines here, so we're also going to be removing the bracket that secures the brake lines and the ABS line to the upper control arm. You'll need an 8-millimeter and a 10-millimeter socket for those. All right, once you got those bolts removed, you can pry your caliper off, either with a flat head screwdriver or pry bar. Again, you want to hang it out of the way. We're going to be hanging on the frame rail back here. All right, next we're gonna loosen our tie rod end link here. You're gonna use an 18-millimeter socket to hold the nut and you're actually going to be spinning the stud. You need an 8-millimeter socket for this one. If this gives you grief, you might want to use your impact gun and an 18-millimeter socket to break that nut loose first. If you get to the point where you can't keep your 8-millimeter socket on that stud anymore, you can actually come in here with channel locks and you can actually grab the rubber boot, give it a good squeeze, that should protect the threads and then you can come in with an 18-millimeter socket to finish the job. All right, our tie rod end is the same deal. You're gonna be holding that nut with a 21-millimeter wrench and you're gonna be spinning the stud with a 10-millimeter socket. Now if the stud doesn't want to spin free of the nut, you might have to break it loose with a 21-millimeter socket and then you can switch over to your wrench. Now if you get lucky, it might just stay in place and you can just use the socket to pop it free. All right, next we're going to loosen our lower shock bolts here. Those are 18-millimeter nuts, so you'll need an 18-millimeter socket. All right, next up is our upper ball joint here. It's the same deal as the tie rod end and the sway bar end link. You'll either need a 21-millimeter socket to get the nut off if you're lucky and it stays in place, or you'll need a 21-millimeter wrench and a 10-millimeter socket to spin the stud. All right now that we've got that nut loosened from the stud on the ball joint, we're gonna separate it from the knuckle. So you're going to be hitting the knuckle with a hammer. You should be wearing eye when you're doing this. All right, we're finally ready to remove our strut assembly. To do that, you're gonna be loosening the three nuts on the top here on those studs. You'll need a 15-millimeter wrench for these. To make removal of the strut and reassembly a little bit easier on ourselves, we're gonna be loosening the lower control arm hardware here. You'll need a 27-millimeter deep socket to loosen this nut. Now we're not removing it entirely, we're just getting it a little bit freed up. All right, so our lower could arm is loosened. Our strut is technically free of the vehicle itself, it's just resting in there. Now we're gonna try and pull it free. Now you might be lucky, you might be able to pull it out without having to do any extra work, in which case, you're gonna be grabbing a big old pry bar. There's one easy way to go about this. You're gonna try and get the pry bar in between the bottom of the strut and inside of this little valley here in the lower control arm, go ahead and pry up on the strut and that should pop it out of here and that should give you enough room to pull it out of the vehicle. Now, if that's a problem, if these lower bolts here are causing any issues, I'm gonna show you guys how to remove those. Those are press-fit bolts. But let's go ahead and try and pull it free with the bolts in place. All right, so unfortunately with both of these studs inside of the bottom of the shock, they don't clear the lower control arm even though we loosened everything. So it's pretty simple. We're actually gonna press these bolts out of here using an air hammer. They're splined, so just press fit into the bottom of the strut. What you're going to do is you're going to pop both of the nuts back on the end here. You want to tighten down one completely to hold the strut to the lower control arm. Go ahead and put the nut just on the end of the bolt that you're gonna pop loose here. That's gonna make sure you don't mushroom the end of it so you can still thread this back on and off. Then you're going to take your air hammer, or if you have a regular hammer, you're just gonna tap it out of the entire strut itself. All right, so we got one of those press fit bolts out of there. Now we went ahead and we threw another bolt and nut on this side and tightened it down. That way when we go to hammer out the other one, we're gonna keep our strut bolted to our lower control arm. That way when we hammer down on this other bolt, it's not just pressing the entire assembly out of the lower control arm. All right, so we got those splined studs out of there. We can finally pull the strut out of our truck. Now again, you're gonna have a pry bar handy or a to friend help you. Either way, you want to get the lower control arm pressed down enough. That way, the top of the strut can clear itself out of the housing. Same thing with the bottom, it can clear itself out of this little valley in the lower control arm.All right, we finally got our strut removed. We are ready to install our spacers up front. Now in order to do that, you're going to be grabbing these little Allen head bolts in the kit. These are going to be acting as the new studs that secure the top of the strut to the truck itself. So we're going to thread those through the pre-threaded holes in the spacer. And to tighten these down, you'll need a 5/16 Allen key or a 5/16 Allen head socket. All right, once you've got the studs on the spacer, you're going to align the unthreaded holes on the spacer up with the original studs on the strut itself, and you're gonna secure the space to the strut using the provided nylon locking nuts. You will need a 17-millimeter deep socket to tighten these down. All right, with our spacer installed, we're almost ready to throw our strap back in place. However, when you throw the spacer in place, you're are actually changing the orientation of the strut 180 degrees. And if you noticed earlier when we were removing it, these little eyelets here for the spline studs are actually at a bit of an angle. So now that this is actually flipped opposite direction as it was in the vehicle, the angle on these isn't too great as far as securing those splined studs in the lower control arm. So what we're going to do, we're actually going to take this over to a bench vise, we're gonna secure it, we're actually gonna use the strut as leverage and we're going to push it in the opposite direction. That way, we're gonna change this eyelet so it's oriented at the same angle. That way when we put the strut on the lower control arm, both of those holes will line up nicely. We can get those splined studs back in there. All right, so like I said, you want to secure the eyelet on the bottom of the strut in a table vise like so. Make sure you got some cloth down so you are not messing it up too much. Get it nice and tight. You're going to use the entire strut as leverage in order to orient the eyelets themselves. And now those will line up flush with the lower control arm. All right, so once you got those eyelets oriented in the correct direction, you can throw your strut in place. Now we actually hopped over to our driver's side because we tried to fit our strut back in there and even with the lower control arm loosened and everything separated as it sits, we ran into a little bit of an issue here and that's simple. It's actually the axle itself preventing us from getting enough clearance. So what we're going to do, we're going to disconnect the axle from the hub. Now in order to do that, you're gonna be popping off this little center cap right here. You'll need a flat head screwdriver and a hammer. All right, so once you got that cap removed, you can remove the nut here on the hub. You'll need a 13-millimeter deep socket to remove that, but before you do, if you want to keep the rotor in place, it's helpful to have a log on there on one of the studs. Keep that on the hub there. You're also gonna be supporting the spindle with something like some bungee cord. Just go ahead and put it on the top here and then secure it to the top of the strut hat. All right, once you've removed that nut, go ahead and grab a hold of the steering assembly. You're gonna rotate it and the axle self should fall out of the hub. That should give us enough clearance to get that strut inside of there then we can bolt everything back together. All right, our axle is separated. We got the steering knuckle supported with that bungee there, so our lines are completely taken up there. They got a little bit of slack in them. Now we can finally throw our strut in place. Once we throw the strut in place, we're gonna line up all the studs in the top and get the nuts on there. Then we'll get those press fit bolts in the bottom. Once we got that all together in the upper and lower control arm, then we can throw our spindle back together with our axle. Okay. Now we're gonna fit the spline bolts into the bottom of our strut through our lower control arm. You want to get the splines lined up and then you're gonna thread the nut on the bottom there of the stud. Then you can zip it down enough to seat the splines and it should press itself together. You don't have to hammer down on these or anything like that. And again, to tighten these down, you'll need an 18-millimeter deep socket. All right, so we have the top and bottom of our strut secure as far as hand tightening all that hardware goes. Now we're going to lower our truck. We're going to get some pressure on the lower control arm, raise that up a little bit, and then we're going to reseat our axle assembly. You want to make sure all these splines lineup. Once you've got everything pressed together, we can put the nut back here on the end and then we can continue with buttoning everything else back up. All right, our axle is back together. We're starting to look like a truck again. What we're gonna do is we're gonna tighten down all the nuts on top of our strut there. Make sure the strut is fully seated before we go any further. You'll need that 15-millimeter wrench or socket to tighten these nuts down. All right, now we're gonna get our tie rod end seated in our knuckle and we're gonna get our nut back in place on there. Again, you'll need a 21-millimeter socket or wrench for this nut and if it starts to spin on you, then you'll need that 10-millimeter socket and that 21-millimeter wrench. All right, now we're ready to get our upper ball joint into our knuckle. Now what you want to do is put some pressure on the lower control arm with the truck close to being on the ground. Obviously, you want a floor jack under there, make sure it's nice and supported. Start to lift the lower control arm up until it doesn't have any more room too. You're just closing that gap between the hole and the knuckle and the stud itself. Once you've done that, you're gonna line up everything like so. Grab a Pry Bar, push down on the upper control arm to get the stud through, then grab your 21-millimeter nut and hand tighten it in place just to keep the assembly together. Then we're going to tighten everything down and drive it home with the necessary tools. All right, now it's the same deal here. You might be able to tighten this down using that 21-millimeter socket, but you might need that wrench and that 10-mill instead. All right, next we're going to secure our sway bar end, again with that 18-millimeter nyloc nut that we loosened earlier. And again, if this guy spins on you, you can gently hold it with some pliers or some channel locks while you tighten this guy down. All right, once you get enough of the stud popping out there, you can put a 10-millimeter socket on there to keep the wrench stationary and you can continue tightening it down. All right, with our sway bar end links secure, we're going to reinstall our caliper here. Again, you'll need those 14-millimeter bolts and a 14-millimeter socket. All right, now we're going to secure these two brackets that we removed in the beginning. You'll need an 8-millimeter socket for this little ABS line and you'll need a 10-millimeter socket for the larger bolt, for the actual brake line. All right, once you got your spacers installed upfront, it's a good idea to double check everything that you tightened down because we did remove a lot of very important hardware. So go over everything twice, make sure everything's torqued to spec if needed, make sure you tighten down those lower control arm bolts if you loosened them like we did. Once you've double check that you got all that hardware tightened down, we can move to the rear. It's a similar process. You want to make sure the truck is in the air, you want to have the axle supported because we are gonna have to drop it down gradually. We're gonna be pulling the bolts and nuts for both of our shocks to disconnect them from the axle. And for that, you'll need an 18-millimeter wrench and a 15-millimeter socket. All right. Once you got both of those bolts and nuts out of both of the shocks, you're gonna be pulling these nuts for our U bolts. You'll need a 21-millimeter socket for these. You might have to spray these down because chances are, they might be a little rusted or corroded. As you pull the last bolt, you want to hold this little guy here so he doesn't fall down. Once you've pulled those four nuts, you can pull the U bolts out. Make sure you pop this little ABS line and these plastic clips off first. All right, so once you got those U bolts removed, now comes the fun part. You're going to carefully lower the axle down just enough so you can pull those factory blocks out from underneath the leaf packs. Once you've done that, you're gonna throw the new block in place. You want the tapered end of the block facing towards the front of the vehicle, and there's gonna be little holes and little round pieces on the block itself that's going to help it align with the axle and the leaf pack. You want to make sure those things are seated before you raise the axle back up so we can bolt down our shocks again. All right, once you got the new lift block in place, you're going to be throwing on your new U bolts as well as those new nuts and flat washers. Now the U bolts on these are pretty long, so you might not be able to use a deep socket. They are 22-millimeter nuts, so you'll need a 22-millimeter wrench. What you're going to do, you're going to get both of these U bolts in place. Go ahead and fit all the hardware back on there. Hand tighten them as close as you can and then drive them home with that wrench.All right, once you've got that hardware hand tightened on here a little bit of the ways and you've cleared some of the stud, you can make this a lot easier on yourself if you have a Sawzall or a cutoff wheel. These studs are obviously needlessly long, so we're actually gonna trim these studs up enough that we can get a deep socket on there. That way we can drive these home quickly and we make sure they're nice and tight. All right, so if you decided to make those cuts to those U bolts like I did, you can go ahead and drive those nuts home with your deep socket or continuing tightening them down with your 22-millimeter wrench. At any rate, once you get all four tightened down, we're going to do the same thing to the other side, then we're gonna bolt up both of our shocks. All right, so once you got those lift blocks in the rear in place and you've tightened down your shocks, that'll wrap up the install. And that also wraps up my review of the Motofab 3-inch front and 2-inch rear leveling kit fitting your '04 to '14 two-wheel drive or four-wheel drive F150. I'm Travis. Thanks for watching, and for all things F150, keep it right here at americantrucks.com.
Subscribe to our YouTube Channel
Features, Description, Reviews, Q&A, Specs & Installation
Brand | MotoFab |
Leveling Kit Location | Front and Rear |
Leveling Kit Lift Height | 3.00 Inch |
Leveling Kit Includes Shocks | Shocks Not Included |
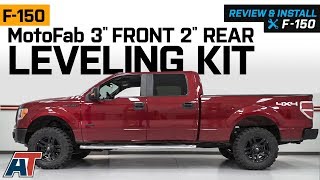
Provides A Simple Leveling Solution. The MotoFab 3 in. Front and 2 in. Rear Leveling Kit is an easy and safe way to provide a slight lift to, or leveling for your Ford F-150. The kit features a set of front strut spacers and new replacement lift blocks that are easy to install and don’t require any drilling or cutting. Additionally, the kit is designed to be tough and durable to make it fit for long-lasting service. And since the kit doesn’t change your suspension’s geometry, the kit maintains the truck’s factory ride quality.
Heavy Duty Strut Spacers and Rear Lift Blocks. MotoFab precisely manufactured the kit to provide a strong and durable leveling solution. The front struts are CNC-machined from solid billet aluminum which won’t crack over time, giving it an edge over welded strut spacers. The rear lift blocks are fabricated and are designed to outlast cast iron and solid aluminum lift blocks. Furthermore, the spacers and lift blocks are powder-coated black to match your suspension and provide additional protection.
Bolt-On Installation. The 3 in. Front and 2 in. Rear Leveling Kit’s components are application-specific and don’t need further fabrication. Installation is quite straightforward and can be completed in about 2-3 hours.
Protected by Lifetime Limited Warranty. MotoFab offers a 100% satisfaction guarantee and a lifetime warranty for the 3 in. Front and 2 in. Rear Leveling Kit.
Application. The MotoFab 3 in. Front and 2 in. Rear Leveling Kit is specially designed for 2004 to 2014 Ford F-150 4WD trucks, excluding Raptor models.
Shop All Truck Parts And Accessories
Shop All Truck Leveling Kits
Shop All Truck Lift Kits
Fitment:
MotoFab F150-3F-2R
CA Residents: WARNING: Cancer and Reproductive Harm - www.P65Warnings.ca.gov
Installation Info
Installation Time
(approx) 3 Hours
Difficulty Level:
Mechanical expertise or professional installation required.
What's in the Box
10 More Questions