 FREE 1 to 3-Day Delivery on Orders $149+ Details
How to Install KC Hilites Ford Raptor; LZR Cube LED x4 Kit w/Harness 10-14 on your F-150
Thanks for choosing a KC HiLiTES product. We take pride in building the highest quality, best engineered systems possible. Your satisfaction with our product is important, so if you have any questions, please call our customer service line at 800-528-0950. For warranty information, visit our website at www.kchilites.com.
PLEASE NOTE - These lights are for OFF ROAD USE ONLY
PARTS INCLUDED
4 - LED Lights
1 - Wiring Harness Kit using
Raptor Auxiliary Switch
2 - Bracket Sets w/hardware
ASSEMBLING THE BRACKETS
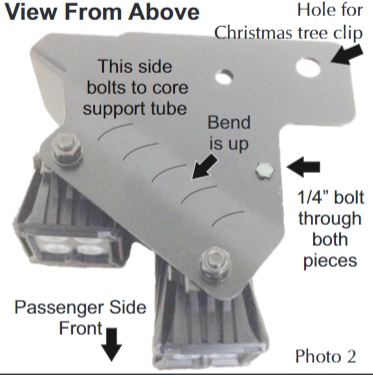
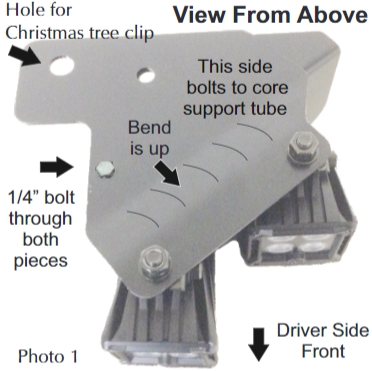
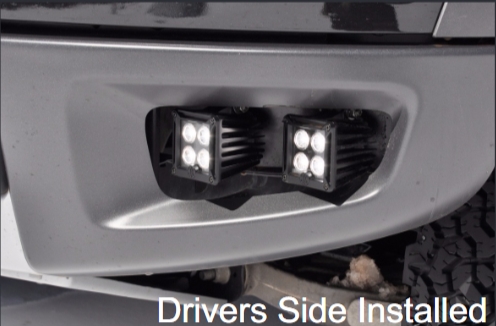
1. Find the two driver side brackets marked “ A ” . Assemble them using one of the 1/4” bolt, nut and washers as shown in photo1. Assemble the two passenger side marked “B” as shown in photo 2. Attach two lights to each set as shown in photos 1 & 2. (Ensure the bend is up before mounting lights.)
MOUNTING THE BRACKETS WITH LIGHTS
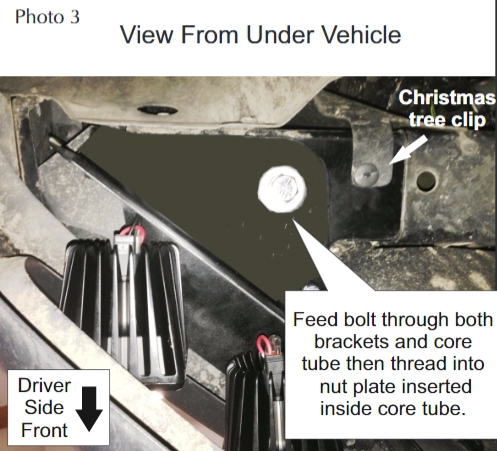
1. Starting with the drivers side, remove the plastic Christmas tree clip (photo 3). Find one of the small plates with the nut welded to it. Insert it inside the core tube and align the nut with the hole in the tube. Slide the bracket assembly underneath the tab where the Christmas tree clip goes. Align the ½” hole with the hole in the core tube and the nut plate. Insert the ½”bolt with lock washer through the brackets and core tube and thread into nut plate. Replace the Christmas tree clip, align the bracket and lights, then tighten all hardware.
WIRING YOUR LIGHTS
1. The Ford F150 Raptor has four (4) auxiliary switches on the center console. You will be using the switch “Aux 4” (Relay #4) . This controls a fused 10 amp circuit that is capable of handling the 6 amp power draw required by the KC LED lights. F150
Raptor is also equipped with four (4) pass-through 12 gauge wires. These wires are located inside the right hand kick panel, then pass through the dash panel and end under the hood at the right hand fender, inside, near the hood hinge and AC hard line. If necessary, please consult the F150 Raptor Owner Guide supplement for the latest wiring information with wire colors.
2. Remove the right hand kick panel and right hand end cover of the instrument panel inside the vehicle to access the eight (8) blunt cut wires. Four (4) of the wires are colored as follows: Yellow, Green w/Brown Stripe, Violet w/Green Stripe and Brown. The only wire used for this installation is Brown. This wire is covered with black shrink wrap. Strip insulation and shrink wrap on the Brown wire from Relay #4. Remove the shrink wrap from one of the solid color pass through wires. For future reference and consistency we recommend using the solid Red pass-through wire for lighting. Attach the Red wire to the Brown wire using the supplied standard butt connector. The other end of these pass-through wires will be located under the hood.
3. The pass-through wires are located under the hood on the passenger side inner fender near the AC hard lines. They are “blunt cut” and individually capped with shrink wrap.
4. Strip and prepare your selected pass-through wire for connection. Attach the supplied weathertight butt connector to the Red pass-through wire from step #3 above.
ROUTING THE LIGHT HARNESS
1. Find the two connectors at the end of the KC harness and attach to each of the driver side lights. Feed the harness across the front and attach the other two connectors to the passenger side lights. Secure the harness as necessary using the supplied wire ties.
2. Continue feeding the harness through the radiator support along the passenger side of the engine compartment until you reach the pass-through wires near the AC hard lines. Attach the Red KC harness wire to the Red pass-through wire with the weathertight butt connector (apply heat to make weather-tight) and the black wire to negative or chassis ground (there is a grounding screw on the side of the fender well near the pass-through wires).
AIMING YOUR LIGHTS
1. Since lights such as these are not legal on any public road or highway, aiming your off road or competition lights is entirely up to you. Most prefer the beam as far down the road as possible, others adjust them slightly off to the sides.
2. After aiming the lights to your preference, tighten all hardware.
YOU’RE DONE

