 FREE 1 to 3-Day Delivery on Orders $149+ Details
How To Install Running Boards on a Chevy Silverado 1500
AT Staff
/ Apr 17 2025
Trucks have become the family station wagon of the 21st century, offering increased cabin space, comfort, and the utility of a bed for hauling everything you need for work or pleasure. Add to that the go-anywhere capability that comes from higher clearance in your Silverado, and you’ve got a pretty compelling package. The downside of higher clearance is a higher step-in point, which can be challenging for many folks, but a set of running boards can alleviate that issue and provide easy access for people of all shapes and sizes. Read on to learn how to install Chevy Silverado running boards.
Step One: Gather Tools
Installing running boards on a Silverado is a simple job that almost any hobbyist mechanic can complete in an afternoon with the most basic tools. You’ll need:
- Flathead screwdriver
- Needle nose or standard pliers
- Ratchet set with basic sockets (depending on the kit, you’ll likely need socket sizes from 13mm-16mm or 1/2”- 5/8”)
- Big piece of cardboard, or a creeper
- Floor jack and jack stands, if your truck is too low to access the inside of the rocker panels without lifting
Step Two: Assemble the Running Boards
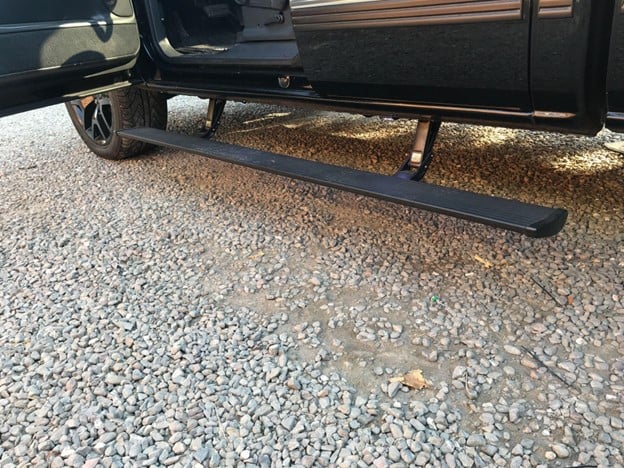
On the ground on either side of the truck, lay out your running boards and all the brackets that come with them. If there are four brackets per running board, it’s likely that two of the brackets will be slotted at the top mounting point and two will simply have a bolt-sized hole. The slots are there so that you can pre-install two bolts loosely on the truck and slide the running boards onto those bolts before installing the remaining bolts. Assemble the running boards with the two slotted brackets at either end of the running boards and the standard brackets in the middle. It also works to just alternate slotted and non-slotted brackets. At this stage, make all the connections finger-tight, so that they have a little give as you install the whole assembly on the truck.
Step Three: Prep the Mounting Area
Use your piece of cardboard or your creeper to get under the rocker panels and wipe down the areas where the brackets will contact the rocker panels. This will reduce the chances of a poorly mounted bracket causing trouble down the road. At this stage, be sure to use your jack stands to support the weight of the vehicle if you need the floor jack to access the bottom of the truck. Late model Chevy and GMC trucks from around 2019 and on have pre-installed captured nuts in the rocker panels that make installing your running boards a snap. Find the small plastic caps covering the captured nuts that line up with the brackets on your assembled running boards and pry off the caps using a flathead screwdriver and pliers. Note that the diameter of the caps will be around one inch, so don’t go for the big ones, as they are covering other important items. Once you’ve completed this stage, you’ll be ready to mount your running boards.
Step Four: Mounting the Running Boards

To complete your installation, follow these steps for the fastest and easiest installation:
- Step 1: Start by threading two of your bolts into the captured nuts that correspond to your slotted brackets on the running boards. Make sure to remember any washers, including lock washers, when you do this. Thread them far enough that they’ll support the weight of the running boards but keep them loose enough to slide the slotted brackets on easily.
- Step 2: Pull back the washers on your two pilot bolts and slide the slotted brackets into place. The running boards should now be hanging beneath the rocker panel, and you can start with the rest of the bolts.
- Step 3: Thread the remaining bolts with their washers into all the remaining captured nuts in the rocker panel that correspond with your bracket holes. Make them all finger-tight to start.
- Step 4: Complete a visual check to see if your running board lines up with your rocker panel. If you need to adjust a bracket to straighten things out, now’s the time to do it.
- Step 5: Tighten all the bracket bolts into the rocker panel using your ratchet set and then do the same for all the bolts holding the brackets to the running board.
- Step 6: Complete another visual check to ensure that things look straight and even.
Your new set of running boards will make it easier to enter and exit your truck, increase the resale value, and improve its aesthetic appeal. And no matter what project you’re working on next, our sales techs can help you find the ideal parts for the job from some of the most trusted names in the industry.