FREE 1 to 3-Day Delivery on Orders $149+ Details
How to Install Flowmaster Force II Cat-Back Exhaust - Split Side/Rear Exit (09-13 4.8L Silverado 1500) on your Chevy Silverado
Removal:
1) Raise the vehicle up on a hoist or rack to working height. If you do not have access to a hoist or rack, raise the vehicle and support securely with jack stands.
2) Support the muffler with a stand. Using a hacksaw or sawsall, cut the stock tailpipe off just behind the muffler. Separate the wire hangers on the tailpipe from the rubber mounts on the vehicle and remove the tailpipe from the vehicle. This step is not mandatory but makes removal easier.
3) Using a 15mm wrench, loosen the bolt on the clamped ball connection behind the catalytic converter. Separate the wire hangers from the rubber mounts on the vehicle and lower the inlet pipe and muffler from the vehicle. A lubricant will make removal much easier. You will need to remove the ball clamp from the stock system; it will be reused with the Flowmaster system.
Installation:
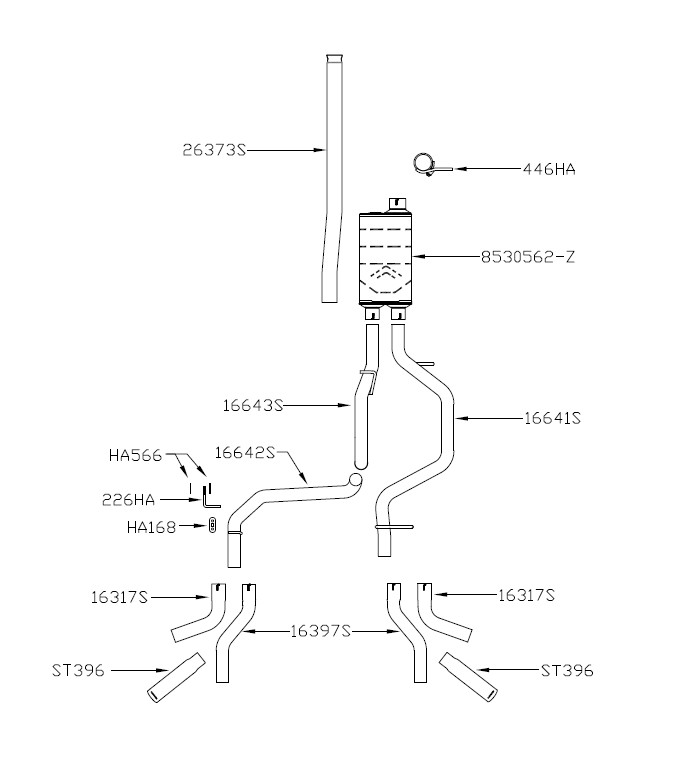
1) Place inlet pipe assembly #26373S into position onto the ball connection behind the catalytic converter. Reinstall the clamp onto the ball connection and tighten enough to hold, but still allow for a small amount of adjustment. Next, place the supplied inlet pipe clamp hanger #446HA onto the pipe and into the factory rubber mount on the frame. Tighten just enough to hold in place as it may need to be moved during final adjustment.
2) Place a supplied 3” clamp over the inlet of the muffler, then slide the inlet of muffler onto the back of the inlet pipe. Use a stand to support the muffler. Tighten the clamp just enough to hold in position.
3) Slide rubber hanger #HA168 onto the end of 226HA, then using the supplied bolts, washers, nuts and backing plates #HA566, mount the assembly to the frame on the left side of the vehicle using the angled oblong hole on the frame rail. Note: the backing plates #HA566 go on both sides of the frame between the hanger, washers & bolts to cover the oblong holes so that the frame hangers won’t bend into the oblong holes.
4) Place two of the supplied 2-1/2” clamps over the right and left outlets of the muffler. Place right tailpipe #16641S into position over the rear axle, and slide into the right muffler outlet. Connect the two hanger rods to the factory rubber mounts. Pipe should be approximately 3/4” away from the shock when adjusted.
5) Place left front tailpipe section #16643S into position over the rear axle and slide into the left muffler outlet. Place supplied 2-1/2” clamp onto the back of the pipe. Place left rear tailpipe section #16642S into the front section, and connect the hanger welded to the rear of the pipe into the rubber hanger. Pipe should be centered between the shock and the spare tire when adjusted. Tighten the clamps just enough to hold in position.
6) Slide the side exit pipes #16317S or the rear exit pipes #16397S onto the ends of both over axle pipes and place a supplied 2-1/2” clamp onto these slip-fit connections. Tighten just enough to hold in position. Place the two stainless tips #ST396 onto the exit pipes and tighten them enough to hold position. Rotate the exit pipes and tips to the desired distance from the body or bumper, so that the angle cut on the tips are in the desired location.
7) Adjust the position of all pipes and muffler to provide a satisfactory fit. A minimum 3/4” clearance around all parts of the system must be maintained; while also keeping suspension travel and vibration in mind.
8) Tighten all clamped connections down securely. Place the supplied 1/2” hanger keepers onto the end of the inlet pipe and left rear muffler hangers. Slide the 7/16” hanger keepers onto the rear tailpipe and frame hangers up to the rubber mounts, to firmly hold the system in place.
9) For a more secure installation, we highly recommend welding all slip-fit connections.
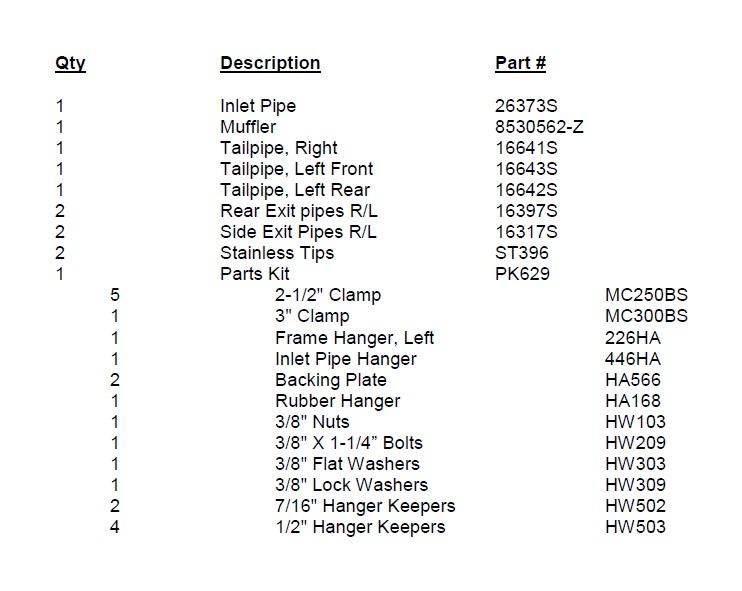
PACKING LIST