 FREE 1 to 3-Day Delivery on Orders $149+ Details
How to Install Mopar Water Temperature Gauge - Digital Stepper Motor - Black on your Dodge Ram
Read instruction thoroughly to verify all required parts are there before installing this product.
Contents:
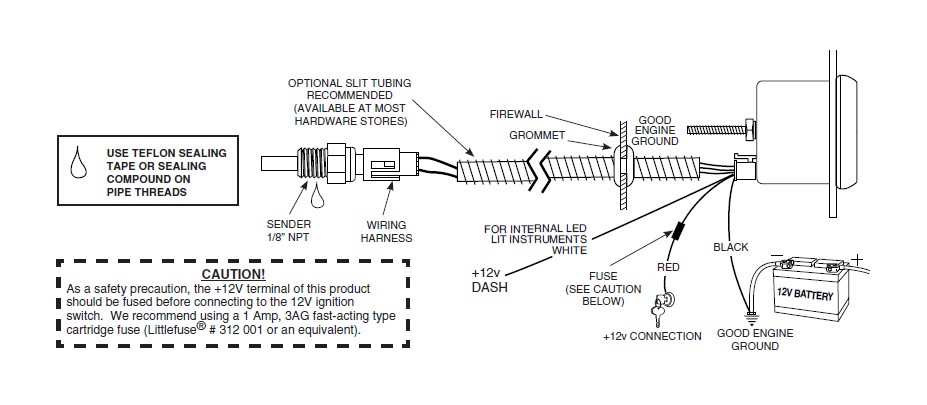
For Temperature Gauge
1 - Sending Unit - 1⁄ 8" NPT
1 - Brass Adapter – 3⁄ 8" NPT Male x 1⁄ 8" NPT Female
1 - Brass Adapter – ½" NPT Male x 1⁄ 8" NPT Female
2 - Aluminum Thumb Nuts
1 - Mounting Bracket
2 - Lock Washers
1 - Lubriplate DS-ES Tube
Installation
NOTE: Some late model vehicles use electronic sensors in their pressure and temperature senders for engine control functions. Before removing the original sender, we recommend that you contact your automotive dealer to be sure no critical functions will be disrupted.
1. Check that you have all parts required for installation, and the engine is cool.
2. Disconnect the negative (-) battery cable.
3. Gauge mounts in a 2-1/16” hole for 2-1/16” gauges, and a 2-5/8” hole for 2-5/8” gauges. Use supplied brackets and nuts to secure gauge to dash.
4. Drill 1” diameter hole where wires pass through sheet metal (such as firewall and install rubber grommet provided. (Grommet will require slit.)
5. Connect the white wire to dash lighting or switchable 12v light source, the red wire to switched 12V source and the black wire to ground.(see diagram for details)
6. Install temperature sender.
A. Water Temp: Install temperature sender. Note: Included sender is 1/8” NPT. For 3/8” NPT or 1/2” NPT ports, use included adapter.
B. Trans. Temp: Hole may have to be drilled, and adapter nut welded or brazed in pan. Be sure there is adequate internal clearance for nut and sender.
7. Cut end of included dielectric grease packet, and squeeze grease into connector of temperature sender prior to connecting harness. (Important: This will protect connection from dirt and moisture.)
8. Connect red wire to switched 12V source and the black wire to ground. (see diagram for details)
9. Reconnect negative (-) battery cable.
NOTE: Test all fittings and connections for leaks. If any leaks are detected, Determine the cause of the leak and repair. Do not operate vehicle if any leaks are detected.
Caution: LUBRIPLATE® DS-ES is a non-hazardous substance. However, it is recommended to wash hands thoroughly after use.
NOTE: When the ignition is off the pointer may not always rest at zero.
NOTE: Do not remove factory temp sender to install temp sender. If no location found, a hose adapter can be used.
Power-Up
The pointer will move backward to the stop pin and then display actual temperature. This procedure is an auto-calibration function and is performed on every power-up. While this test is being performed, the gauge may make a clicking sound. This is normal.
Warning Indicator (Optional)
To adjust the warning set point, momentarily press and release the WARN (W) button. The warning light will begin to flash and the pointer will move to the previous set point signifying that warning set mode has been selected. Once in set mode, press the WARN (W) button to move the pointer down, or press the PEAK (P) button to move the pointer up. Warning set points can only be set in the temperature range. Three seconds after the last button press, the warning light will stop blinking and the pointer will return to the current temperature reading. The warning set point is retained when power is removed from the gauge.
Peak Recall (Optional)
Press and hold the PEAK (P) button to recall the highest temperature reading since the memory was last cleared. To clear the memory, press & hold the PEAK (P) button, while still holding the PEAK (P) button, press the WARN (W) button. The pointer will move to Stop Peg to indicate that the memory has been cleared. Release the PEAK (P) and WARN (W) buttons to resume normal operation. The peak recall point is retained when power is removed from the gauge.


