Talk to a F-150 Sales Tech
1-888-706-1096
M-F 8:30A-11P, Sat-Sun 8:30A-9P
$20K Sweeps! 10 Chances to Win! Enter Daily >

PRO-Series 14th Gen G2 Style Projector Headlights; Black Housing; Clear Lens (18-20 F-150 w/ Factory Halogen Headlights)

Item T569870
Verify parts fit and get product recommendations.
F-150 Sales Techs: Connect Now M-F 8:30A-11P, Sat-Sun 8:30A-9P
$0.00
Our Price

$734.99 (pair)

FREE Shipping Market Price $845.99 You Save 13% ($111.00) Up to 10% off for Military & First Responders! See Details

Will this fit your Vehicle?

Select a different vehicle Help?
Update or Change Vehicle
Ship to: Ashburn - 20149
Sorry, please enter a valid US or CA postal code
We're sorry, zip can't be updated at this time.
Recommended Install Shops
How It Works
Install Shops are available near Ashburn - 20149

Add Local Shop Installation

Total cost of service $174.99
    Create a list
    Add to New List

    Saved - View your saved items

    We're sorry. We couldn't save this product at this time.

    or use

      Product Videos

      Noah: Hey, I'm Noah from AmericanTrucks. And we're gonna take a look at these PRO-Series 14th Gen G2 Style Projector Headlights with the Black Housings and Clear Lenses for the '18 to '20 F-150 with the Factory Halogen Headlights. These headlights are going to be perfect for the F-150 owner who's looking for a set of super bright headlights, as well as to add a modern LED daytime running light designed to the front of their truck. Now, to be clear, these headlights will fit halogen application lights only.The biggest improvement these headlights have over the factory headlights are the fact they have these projector beams in each housing. Now, those projectors focus that beam of light and cast it farther ahead of the truck rather than just a short and wide light pattern that you see when you just put LED bulbs in a set of stock headlights. Now, these headlights also have an LED bar on each side that works as the headlights' daytime running light, as well as amber turn signals. Now, those turn signals are switchback and sequential, which is gonna add a nice flare to the headlights while you're driving. And the last thing to note about these headlights is that they utilize the factory halogen bulbs. Now, these guys do come with a set of new halogen bulbs, but for the ultimate lighting performance, it would be even better to grab a set of LED bulbs right off our site and just install them into those projectors right away while you have the truck apart.The housings of these headlights are constructed from a black polypropylene plastic with weather-sealed openings to keep any moisture outta the housings. And then sealing everything shut, we do have impact-resistant polycarbonate lenses. It's safe to say that these headlights are built to withstand some abuse, and they also meet SAE and DOT standards, and they come with a two-year warranty.These headlights come in right around the $800 mark. In today's market, it is definitely easy to spend over 1,000 bucks on just headlights. So, anything quality like a set of headlights that are sub-1000 bucks, that seems like a solid option to me when you're shopping for an upgrade for your F-150.Now, installing these headlights is a fairly simple job for the average DIYer. We are looking at an install difficulty of one out of three wrenches and about an hour for the install time. Now, at this point, I'm gonna hand you off to one of the guys in the install bay and he's gonna take you through step-by-step and show you the install process.Man: The tools you'll need for this project are a trim removal tool, a ratchet, a 7-millimeter, an 8-millimeter, a 10-millimeter, and a 13-millimeter socket, a pair of wire cutters and crimpers, needle-nose pliers, some snips, a fuse tap, a spade bit, a 10-amp fuse, and some small zip ties.Hi, everyone. Today we're installing a set of headlights on our F-150. So, let's get started with the uninstall of the stock headlights first. The first thing we'll need to do is remove the upper radiator cover using the trim removal tool and remove the 13 push pins that are holding it in place. Now we can lift it off. Now we'll remove this filler panel that goes across the front of the grille. And to do that, there's two bolts on each side just inside the fender lip. So, we're gonna use our 7-millimeter socket to remove those, and then we'll just pull the filler out of. Now you remove the two on the other side, and then just pull this filler panel out.Now, there are four bolts at the top of the grille that also need to come out and we'll use our 10-millimeter wrench. There are four bolts at the top holding the grille in. We'll use our 10-millimeter socket to remove those, and then we'll disconnect the two electrical connectors in the middle of the grille. Now, to release these electrical connectors, you just push in on the release tab and lift it up. Now we'll remove the 13-millimeter bolt on this side at the lower part of the grille and one on the other side, and then we can pull the grille out. And now you can repeat that process on the other side. Now we can just pull our grille out, and now we have access to the headlights.Now, to remove the headlight, there are two bolts on top. We'll use our 10-millimeter socket to remove those, and there are two on the bottom, a 10-millimeter, and an 8-millimeter. So, let's go ahead and get those removed. Now we'll get the two on the bottom. All right. There's a 10-millimeter here and an 8-millimeter there. All right. Now, we'll just push down on this plastic piece right below the headlight. Now we can unplug the three connectors in the back simply by pushing on the release tab and pulling out. And you can repeat that process for the other side.So, before we can install this set of headlights, we do have a little bit of wiring that we need to run for the DRLs in this light. So, we've got three wires that we need to hook up. We've got a hot wire, a ground wire, and the DRL wire. So, to do this, we're gonna tap into the fuse box for the DRL wire, which is the gray wire, and then we're just gonna connect the red and black wires to your positive and negative terminals on the battery. So, we'll go ahead and route these wires just above the windshield washer bottle and alongside the battery. Now, just give yourself enough playroom so that everything can get hooked up right and nothing gets pinched or causes interference with anything else.So, the first wire we're gonna hook up is our gray DRL wire. And to do that, we're gonna use a fuse tap that you're gonna need to source from your local auto parts store because it does not come in the kit. So, you'll need a fuse tap and an extra 10-amp fuse in order to do this. So, once you've got your fuse tap, you're just gonna insert the end of the wire into a spade bit, depending on whether or not you get a fuse tap that has a different connector on it. Ours happens to have a spade bit. Now, once you've got your spade bit over the end of the wire, you're just gonna use your crimpers and crimp that on, making sure that it's nice and tight and it's not going to fall off. And just give it a little tug to make sure it's snug.Now we can go ahead and connect that to our fuse tap, and then we're gonna open up our fuse box and access the number 36 fuse in the fuse box to plug this into. So, we'll go ahead and remove the covers to our fuse box so that we've got access to the fuses. All right. So, the fuse we're gonna be using is the number 36 fuse, and it's actually located right here. So, if you're looking from the front of the truck, you've got a relay here and a relay here. And next to this relay to the right side, you've got two 25-amp fuses and a 10-amp fuse. So, we're gonna go ahead and pull that 10-amp fuse out using our pair of needle-nose pliers. We're just gonna go ahead and insert it into the other slot in our fuse tap like so, and then insert the fuse tap back where the fuse was originally at. Then we can just route our wires down along the side just to keep them out of the way.Now we can go ahead and hook up our red wire to the positive side of the battery and our black wire to the negative side. So, we're gonna use our 10-millimeter socket to loosen the nut on top of our terminal and hook up our red positive wiring. Slide the connector underneath the nut and then tighten it back down. And we'll do the same thing with our black wire to the negative side, and we'll tighten that down.Now we can go on to getting our lights connected. All right. Now we can go ahead and run our DRL harness across the front of the truck to the other side, leaving the short side on the passenger side to hook that up to the new light. Now we'll zip-tie this up in a little bit. I just want to get it out of the way and get it ready for the other side.Now, once we've reached this point, it truly is a plug-and-play system. So, we're just gonna connect the red wire from our DRL harness to the red wire on our light and then slide our insulation over the edge of the connector. And then just go ahead and reconnect our other connectors back in their original locations. Just push them in until they snap. And now we'll go ahead and slide our light into place and secure it with the original hardware. Now you can repeat that process for the other side, and then we'll go ahead and show you how to zip-tie that up so that the DRL harness stays out of the way.All right. Once you've got both your lights installed, just grab some small zip ties and you can zip-tie the DRL harness to the harness that's already in the truck, just here, maybe right before the latch, and then a couple more. Then once you get to the other side of the latch, you just tape it to the cable for the hood release just to keep everything out of the way. More and more over on this side here. And then just clip off the ends. Now, before we attach the grille and the radiator cover back onto the truck, it's always a good time to go ahead and test your lights, make sure that they all work. We've already tested ours. So, let's get back to installing the grille.So, we're just gonna reverse the procedure that we used to uninstall it. And then we'll reattach it using the original hardware. Nice. So, we'll install the bottom bolt here and on the other side, and we'll tighten them down with our 13-millimeter socket. Now, we'll attach the top ones again using the original hardware and we'll tighten them down with our 10-millimeter socket. Now we can go ahead and reinstall our radiator cover using the original push pins.Now we can move on to reinstalling our filler panel for the grille. So, for this, we're just gonna start on one end and just snap it into place and secure it with the original hardware. And we'll tighten those down with our 7-millimeter socket and repeat that process for the other side. Now we can go ahead and put our fuse covers back on and call it a day.And that wraps up our review and install of the PRO-Series 14th Gen G2 Style Projector Headlights with the Black Housing and Clear Lens for the '18 to '20 F-150 with Factory Halogen Headlights. Thanks for watching. And remember, for all things F-150, keep it right here at americantrucks.com.

      Product Information

      Features, Description, Reviews, Q&A, Specs & Installation

      Features & Specs

      • Projector-Style Headlights
      • Features Halogen Low and High Beams
      • White LED Daytime Running Lights
      • Amber Sequential Turn Signals
      • Clear Polycarbonate Lenses
      • Polypropylene Black Housing
      • Meets DOT FMVSS108, SAE Standards
      • Limited 2-Year Warranty
      • Easy Installation
      • Fits 2018-2020 F-150 with Factory Halogen Headlights Models

      Description

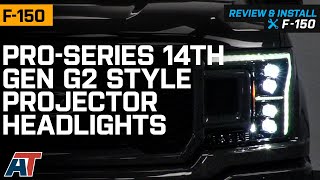
      Improved Lighting. Whether it's to fix damaged lighting or give a new look to your F-150, this PRO-Series 14th Gen G2 Style Projector Headlights; Black Housing; Clear Lens is a reliable pair that can guide your way into the night. It features H7 high and low beams for street-safe high-quality illumination to clear your path and improve your vision at night, while the Switchback White LED Daytime Running Lights and Amber LED Sequential Turn Signals provides your truck with an unique appearance with signaling to turn.

      Weather-Resistant Cover. Sporting a combination of PC and PP synthetics, it does not melt or crack easily when exposed to harsh sunlight or rough rainy weather. It sports a tough design with strong seals to keep dust and water away from the internal wiring and bulb configuration.

      Installation. This product is easy to install and should take about 1 hour.

      Warranty. There is a limited 2-year warranty on this product.

      Application. The PRO-Series 14th Gen G2 Style Projector Headlights; Black Housing; Clear Lens fits 2018-2020 F-150 with Factory Halogen Headlights Models.

      Fitment:

      Details

      CA Residents: WARNING: Cancer and Reproductive Harm - www.P65Warnings.ca.gov

      Installation & What's in the Box

      Installation Info

      What's in the Box

      • (2) Headlights
      4.6

      Customer Reviews (122)

        Questions & Answers

        10 More Questions

        Will It Fit My F-150

        • 2.7L V6 EcoBoost - 18, 19, 20
        • 3.0L V6 Power-Stroke - 18, 19, 20
        • 3.3L V6 - 18, 19, 20
        • 3.5L V6 EcoBoost - 18, 19, 20
        • 5.0L V8 - 18, 19, 20