Talk to a F-150 Sales Tech
1-888-706-1096
M-F 8:30A-11P, Sat-Sun 8:30A-9P
$20K Sweeps! 10 Chances to Win! Enter Daily >

Full LED 2 Projector Headlights with White DRL Sequential Turn Signal; Black Housing; Clear Lens (18-20 F-150 w/ Factory Halogen Headlights)

Item T572714
Verify parts fit and get product recommendations.
F-150 Sales Techs: Connect Now M-F 8:30A-11P, Sat-Sun 8:30A-9P
$0.00
Our Price

$884.99 (each)

FREE Shipping Market Price $1,018.99 You Save 13% ($134.00) Up to 10% off for Military & First Responders! See Details

Will this fit your Vehicle?

Select a different vehicle Help?
Update or Change Vehicle
Ship to: Ashburn - 20149
Sorry, please enter a valid US or CA postal code
We're sorry, zip can't be updated at this time.
Recommended Install Shops
How It Works
Install Shops are available near Ashburn - 20149

Add Local Shop Installation

Total cost of service $174.99
    Create a list
    Add to New List

    Saved - View your saved items

    We're sorry. We couldn't save this product at this time.

    or use

      Product Videos

      Noah: Noah, here from AmericanTrucks. And we're gonna check out these Full LED 2 Projector Headlights with a White Daytime Running Light Sequential Turn Signal, a Black Housing, and a Clear Lens fitting the '18 to '20 F-150 with Factory Halogen Headlights. These headlights are perfect for the F-150 owner that wants a fully plug-and-play upgrade with a bright daytime running light design that really is sure to make your truck stand out on the road as well as parked with the lights off. I have to say, I think these headlights really look incredible. There are these split-color LED daytime running lights that are meant to make your truck more visible to others on the road, and then pair that with the projector-style LED headlights that cast a beam that's focused rather than spread wide.And these things really should be seriously bright in low-light driving conditions. Then we've got black housings that give them a darker and more modern look. And then around the front, we have clear lenses, so there isn't any light restriction like you'd get with a tinted lens. Overall, it's just a modern design that boasts an OEM fit with improved lighting brightness. I will note as well that these have some of the most attention to detail as far as LEDs go, at least that I've seen on headlights in quite awhile. There's a lot going on between the cuts in the daytime running light here on the top and bottom, as well as these amber stripes between the projectors. There's also a sequential turn signal function as well, which I think is really just the icing on the cake.These headlights look awesome, but is the build quality up to par with the looks? In this case, yes. As far as construction goes, we've got automotive-grade plastic housings and lenses. Now, these guys will be resilient to road debris, moisture, heat, you name it. And then on the inside there are these projector lenses designed to intensify the light beam and make the most of those LED bulbs. Then to top it off, you get a one-year warranty. And these headlights meet and exceed ISO 9000 and 9002 quality standards. These headlights are going to cost you about $900, making them one of the lower-priced options in terms of aftermarket headlights for the '18 to '20 F-150. Now at that price point, you are getting quite a lot of features, which you normally see in $1,200 plus headlights.Installing this set of headlights on your F-150 will take you about 20 minutes or so to do on your own home with minimal tools. We're looking at an install difficulty right at one out of three wrenches. Now speaking of install, let's head over to the shop and take a more in-depth look at installing these headlights.Man: The tools you'll need for this project are a trim removal tool, a 3/8 or ¼-inch drive ratchet, a 7-millimeter, an 8-millimeter, a 10-millimeter, a 13-millimeter socket, and a T25 Torx driver. Hi, everyone. Today we're installing a set of headlights on our F-150. So let's get started with the uninstall of the stock headlights first. First thing we'll need to do is remove the upper radiator cover using the trim removal tool and remove the 13 push pins that are holding it in place. Now, we can lift it off. Now, we'll remove this filler panel that goes across the front of the grille. And to do that, there's two bolts on each side just inside the fender lip. So we're gonna use our 7-millimeter socket to remove those. And then we'll just pull the filler out.Now you remove the two on the other side, and then just pull this filler panel out. There are four bolts at the top holding the grille in. We'll use our 10-millimeter socket to remove those, and then we'll disconnect the two electrical connectors in the middle of the grille. Now to release these electrical connectors, just push in on the release tab and lift it up. Now, we'll remove the 13-millimeter bolt on this side at the lower part of the grille and one on the other side, and then we can pull the grille out. And now you can repeat that process on the other side. Now, we just pull our grille out and now we have access to the headlights. Now remove the headlight. There are two bolts on top. We'll use our 10-millimeter socket to remove those. Then there are two on the bottom, a 10-millimeter, and an 8-millimeter. So let's go ahead and get those removed. Now we'll get the two on the bottom. All right, there's a 10-millimeter here and an 8-millimeter there. All right.Now, we'll just push down on this plastic piece right below the headlight. Now we've unplugged the three connectors in the back simply by pushing on the release tab and pulling out. And you can repeat that process for the other side. Now that we've got the old light removed from the truck, we need to transfer this mounting bracket at the bottom of the light to our new light in order to install it. To do that, there are three screws at the bottom of this bracket. And you're gonna need your T25 Torx screwdriver to be able to take those out. So we'll just unscrew these. And once you've got those three screws removed, you just lift that bracket off and we'll reuse the hardware to put it under the new light.So you'll notice that there are a couple of tabs at the bottom of this light here that go into the slots on the mounting bracket like so. And then we can just screw the new bracket onto the light. Now with the bracket attached, we can go ahead and plug in our adapter harness. On the back of the light right here, just push it until it snaps tight, and then we can go ahead and plug in our original harness to these three cables right here. So let's go ahead and get that done. Now, like I said before, we'll just go ahead and reconnect our original harness to the adapter plug on the new light, and go ahead and slip our light into position. Now, we'll go ahead and secure this light with the original hardware. Go ahead and insert our two top bolts and tighten them down with our 10-millimeter socket.Now, we'll get the two at the bottom, tighten it down with our 10-millimeter. Now, we'll tighten down our 8-millimeter bolt. Now we can go ahead and repeat that whole process for the other side. Now with our lights installed, we can go ahead and put our grille back in place. And while I'm doing this, it's a good time to remind you that before you actually put the grille back in, it's a good idea to go ahead and check your lights, make sure everything is working all right. We've already done that so we know it's good to go. We'll just slide our grille back into place and secure with the original hardware. Now we'll go ahead and tighten down those four bolts at the top using our 10-millimeter socket. Now we'll go ahead and put in our 13-millimeter bolt on the passenger side. Tighten it down with our 13-millimeter socket.And now you can repeat that for the other side as well. Now we'll go ahead and put our filler panel in again, starting on one side and just snapping it into place all the way around. Now we can go ahead and secure it to the fender well using the original hardware and our 7-millimeter socket. Put our two screws in here and again, tighten it down with our 7-millimeter socket. And repeat that process for the other side as well. Now before we install our grille cover, we're gonna go ahead and reconnect our grille shutters simply by plugging the connectors back into the controllers. Now we can go ahead and install our cover and secure it with the original push pins. And there you have it. And that wraps up our review and install of the Full LED 2 Projector Headlights with White DRL and Sequential Turn Signals with the Black Housing and Clear Lens for the '18 to '20 F-150 with Factory Halogen Headlights. Thanks for watching. And remember, for all things F-150, keep it right here at americantrucks.com.

      Product Information

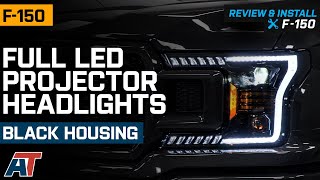
      Features, Description, Reviews, Q&A, Specs & Installation

      Features & Specs

      • Full LED 2 Projector Headlights with White DRL Sequential Turn Signal
      • Immensely Powerful Lighting
      • Custom-Design To Make Your Vehicle Stand Out
      • Easily Passes ISO 9000 And 9002 Quality Standards
      • Easy Installation; No Modifications Required
      • Has A 1-Year Warranty
      • Fits The 2018-2020 F-150 With Factory Halogen Headlights

      Description

      Full LED 2 Projector Headlights with White DRL Sequential Turn Signal. The Full LED 2 Projector Headlights with White DRL Sequential Turn Signal offers an immensely powerful lighting due to its elliptical shaped reflector which allows the LED lights to focus at a single point. It's custom-design allows your vehicle to stand out of the crowd and make people's heads turn.

      Durability And Construction. This product is created out of highly-resilient materials to ensure that it passes even the toughest quality tests such as the ISO 9000 and 9002.

      Installation. The Full LED 2 Projector Headlights with White DRL Sequential Turn Signal is easy to install and doesn't require any modifications.

      Warranty. The product has a 1-year warranty.

      Application. The Full LED 2 Projector Headlights with White DRL Sequential Turn Signal fits the 2018-2020 F-150 with Factory Halogen Headlights.

      Fitment:

      Details

      CA Residents: WARNING: Cancer and Reproductive Harm - www.P65Warnings.ca.gov

      Installation & What's in the Box

      Installation Info

      What's in the Box

      • (2) LED Projector Headlights
      4.4

      Customer Reviews (7)

        Reviews of similar Lights products have an average rating of 4.5 out of 5

          Questions & Answers

          10 More Questions

          Will It Fit My F-150

          • 2.7L V6 EcoBoost - 18, 19, 20
          • 3.0L V6 Power-Stroke - 18, 19, 20
          • 3.3L V6 - 18, 19, 20
          • 3.5L V6 EcoBoost - 18, 19, 20
          • 5.0L V8 - 18, 19, 20