FREE 1 to 3-Day Delivery on Orders $149+ Details
How to Install Curt Manufacturing Over-Bed Gooseneck Installation Brackets - 20,000 lb. Capacity on your Silverado

Shop Parts in this Guide
INSTALLATION STEPS
WARNING!! BRAKE, FUEL, AND ELECTRICAL LINES MAY NEED TO BE LOOSENED OR REPOSITIONED TO PROVIDE CLEARANCE FOR NEW HARDWARE.
ALL MODELS REQUIRE MODIFICATION OR REMOVAL OF HEAT SHIELDS
**REMOVE SPARE TIRE FOR EASE OF INSTALLATION**
1) Remove all lines from top of frame rail on driver side. Lower the brake lines by unbolting factory brake line bracket and replace with Curt supplied bracket by using existing bolts, then attach factory bracket to Curt bracket using supplied 8MM bolts and flange nuts.
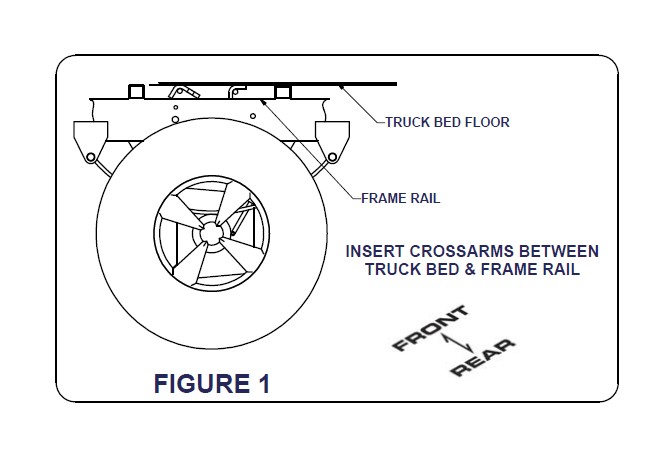
2) Install crossarms by sliding them into gap between the truck bed and frame from inside the wheel well. As shown in Figure 1.
3) Hang the side plates from 5/8" studs, which extend from the crossarms. Align the 3/4" hole in the side plate with the existing slot in the frame of the truck. On long beds, use the outer most 3/4" hole and on short beds use the inner most 3/4" hole. The u-bolt holes should be toward the front of the truck as shown in Figure 3. Fasten each plate with two 5/8" flange nuts provided. Finger tight only.
4) Align the side plate with the existing slot in the frame. Fishwire a 3/4" carriage bolt and 3/4" washer (both sides) through frame to slot in frame rail with (1) or (2) CM-SP13 spacers between the side plate and frame rail, along with a u-bolt to fasten the side plate to the frame rail as shown in Figure 3. Finger tight only.
5) Rotate the crossarms until they contact the truck bed. Center the rear crossarm studs in the side plate slots as shown in Figure 2. Use a 15/16" wrench to tighten the 5/8" flange nuts on the rear crossarm to the side plates. Repeat for both sides.
(Note: Do not tighten crossarms until center section installation is complete.)
6) Be sure the crossarms are vertical to the truck bed before drilling! With crossarms secure and evenly spaced, drill a hole through the truck bed at the center of each crossarm mounting hole.
7) From inside the truck bed, center the six pilot holes with the letter "A" on the C-52 cutting template. Fasten the template to the truck bed with tape. Once fastened, drill four 1/8" pilot holes through section lettered "B". (Be sure to check for brake lines and/or fuel lines before drilling.)
8) With the pilot holes drilled, use a sabre saw to cut out section "C". (Cutting of bed rail supports may be necessary on some models.)
9) Remove template and drill out the six holes with a 21/32" drill bit. Set your C-52 folding hitch ball into place.
10) Attach the C-52 to the crossarms using six 5/8" carriage bolts and flange nuts. Torque bolts to 115 lb-ft.
(Note: Spacers must be installed at all bolt locations to prevent truck bed corrugations from collapsing.)
11) After the C-52 has been fastened to the crossarms, torque all 5/8" hardware to 115 ft-lb, 1/2" hardware to 75 ft-lb, and 3/4" hardware to 260 ft-lb.