 FREE 1 to 3-Day Delivery on Orders $149+ Details
How to Install Dick Cepek Extreme Country Tire - 305/55R20 on your F-150
This safety alert symbol indicates important safety messages in this manual. When you see this symbol, be alert to the possibility of personal injury and carefully read the message that follows.
Congratulations. You have purchased the finest portable camping shower on the market today. This shower uses the renewable energy of the sun to heat the water. Please read this manual. With minor care, your Road Shower should give you many years of service. There are also several how to videos at www.roadshower.com that will help you get the most from your Road Shower.
Parts: Each Road Shower comes with the following parts:
• 1 owners manual,
• Mounting hardware which consists of: (4 long carriage bolts, 4 short carriage bolts, 4 locking nuts, 4 locking washers and 2 mounting brack-ets, and 2 spare pads),
• spare hose clip in case you had one break during shipping,
• LCD thermometer which you can stick onto the tank anywhere you want. Just remove the backing and stick in on.

Mounting: Road Shower comes with 2 mounting brackets. Each bracket is secured with 2 carriage bolts and 2 nylock nuts and 2 lock washers. You will find 8 carriage bolts. You will use only 4. Use either the long ones, if you have a thick rack, or the short ones if you have a thinner rack such as Yakima or Thule bars. Slide the bolts down the slot in the Road Shower so that a bolt is on either side of your cross bar. If you have a factory rack with nice paint, you should consider putting some vinyl tape or the spare sticky pads included over the bar where the Road Shower will rest, to protect the paint. Put the mounting bracket curved side up and line the bolts up through the holes in the bracket. Secure with the nylock nuts. You don't need the washers the first time. Use a 1/2" wrench or a socket wrench to tighten the nuts. They should be very tight. You can tighten them as tight as they go. Once both brackets are secure, push and pull on the Road Shower sideways, and see if it slips along the bar. If it slips, tighten more. If you reuse nylock nuts, they lose their ability to stay locked. Be sure to use your lock washers if you reuse the nylock nuts.
Be sure to mount the Road Shower securely and tightly. Check and tighten after driving on rough roads, as it could loosen. Failure to do so, could result in the Road Shower flying off your vehicle in a quick stop or an accident, causing injury to other people or vehicles. It could also cause damage to your own vehicle. Make sure nozzle and hose are secured to the hose mount prior to traveling with the Velcro straps on both ends of the tank. You can also remove the hose when you are not using the Road Shower, but do not want to remove the tank. Just turn the water supply off with the black han-dle on the elbow and unscrew the hose.
Care and Handling. Your Road Shower is built tough. If you drop it on the ground, it might scratch or dent. If you leave it full during freezing weather, it may dent or expand or rupture. However, with moderate care, it should last you a lifetime.

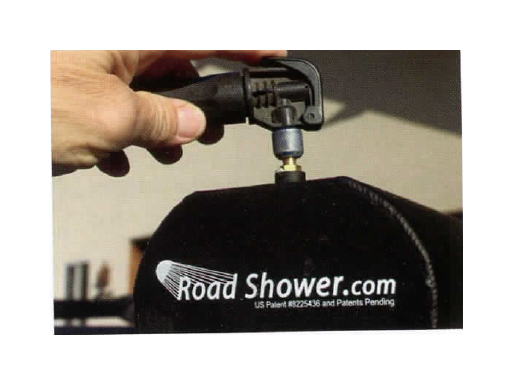
Fill Cap: Take care when opening the cap for the first time as the tank may be pressurized from testing at the factory. Be sure to open the black handle to the horizontal position and press the nozzle trigger to release any pressure before removing the cap. You can fill and pressurize the Road Shower by attaching your garden hose to hose of the Road Shower. Remove the nozzle first. Attach a female to female garden hose connector (purchased separately). Make sure the black han-dle is open. Turn on your garden hose. After a minute or so, check the pressure on the Shrader valve with a tire pressure gauge. Turn
f the incoming hose water when pressure reaches 25 PSI. You are filled up and pressurized! You may need to experiment with how long to leave the hose one. If you leave it on too long, water will start coming out of the pressure cap. No problem, but you will !need to let out a half gallon and pressurize it with a pump.
To pressurize with a pump, make sure the fill cap is on securely by hand tightening. You will need to align the little tabs on the underside of the cap with the notches in the neck. Push down evenly on both tabs to unlock it, and turn clock-wise. Press down on the top of the cap with the palm of my hand it keeps the cap even and easily turns. Use the same technique to unscrew the cap. If the cap is above your head, you may need to use 2 hands to pull down on both sides of the cap to unlock it. If the cap has a lot of pressure under it, it may pop out of your hand as you unscrew it or may be difficult to unscrew. This could be dangerous if your face is directly over the cap. Release all pressure before removing cap by using spray nozzle in the open position. The cap is equipped with a retaining chain to prevent the loss of the cap.
Fill only with clean clear water or the pressure relief valve could become clogged. Do not add other substances or other chemicals. Road Shower is not designed to contain fuel. Road Shower takes 5 gallons of water. You may fill it with a hose or a water jug. You may use Road Shower for drinking water as the aluminum and the food grade poly hose are non-toxic. Sanitize and clean prior to use.
This product could explode and cause injury and possibly death if over pressurized. This product releases pressure at 25 PSI. Due to the possibility that the relief valve could fail, you should not pressurize greater than 30 PSI. If you are checking the pressure and you reach 30 PSI. your pressure relief cap is broken or. Get it replaced. If you use a high capacity compressor such as at a gas station, the pressure relief cap may not be able to release the air fast enough to prevent a rupture or explosion. Add air slowly and check the pressure as you go.
Pumping it up. Road Shower works OK with pressure created from gravity, as long as you loosen the fill cap. In order to pressurize the tank, you will need to have at least 1/2 gallon of air space in the thank. Otherwise there will be no com-pressed air to pressurize the water. You will get about 1 minute of pressurized water after pressurizing with 1/2 gallon of air space. When it runs out, you will have about 1.5 gallons of air space. Pressurize it again and you will get about 5 minutes of pressurized water and be able to empty the tank. If you have a CO2 cartridge pump, it is easy to give it a few squirts while showering as pressure runs low. If you use an electric tire inflator, you can turn it on when pressure gets low. When pressure is adequate, turn it off. A floor bike pump takes about 15 pumps to pressurize for one shower. You can get 2-3 showers per tank full of water.
Heating the water: The Road Shower will heat water on a warm sunny day. The sun heats the black surface on the out-side. The aluminum transfers the heat to the water. The water heats up as long as the tube is receiving sunlight from any angle. The water temperature rises 10-15F degrees per hour on a warm sunny day. If your water starts at 60 degrees, it should be 90 degrees in about 2-3 hours. In general, the water will be about 20 — 30 degrees warmer than the ambient temperature if it is a sunny day. Ambient temperatures below 65F will generally not allow hot water, though it will get warm.
Burn warning.and thermometer On a really hot and sunny summer day that is 100F , on rare occasion, the water inside this product could exceed 120 degrees, which could scald you or your partner. Water in this product's reservoir may be hotter than the water in the hose. Check the thermometer or test spray water on palm of your hand for 10 seconds to check if it is too hot. You can also feel the black tank. If it is too hot to touch, then the water is too hot to shower with. If too hot, add some cool water via the fill cap or wait until later in the day when the shower cools off. The LCD thermometer may come loose in a bag. Remove backing and stick on side of Road Shower where you want it.
Road Shower 2 Owner's Manual
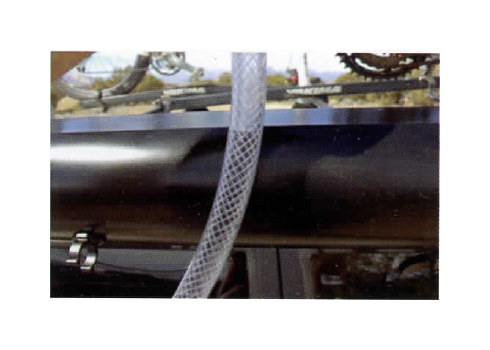
Water level: You can gauge how much water you have left by viewing the water level through the clear hose. Just loosen the fill cap. hold the spray nozzle above the tank, and release the spray nozzle trigger. The water in the hose will find the level that is in the tank and show you how much you have. Or put your finger inside the fill cap and feel the water level. If your car is parked with the front of the Road Shower in the down position, you will not be able to get the last 1-2 gallons out of the tank. To get the all the water out of the tank, you should park on a slight hill with the back of the tank or the outlet on the low end.
Spray Nozzle: The spray nozzle can be adjusted to a variety of spray patterns. Just rotate the tip of the nozzle to go from shower spray to jet setting. If the tip is completely tight, no water will come out. You may also remove the nozzle and run the shower from the hose alone. You could fill up a bucket for dishes quickly this way. Be sure to stow the nozzle away properly prior to travel, by attaching to the hose clamp and Velcro on the side of the tank. If you would like a different nozzle, you can easily change it out. You could also add a quick release to the hose and elbow.
Freeze Damage Caution: Do not leave water in the Road Shower during freezing temperatures, as the frozen water could damage the Road Shower. Do not put RV antifreeze in the Road Shower. Simply keep the Road Shower drained when you are expecting freezing temperatures. We have experienced damage to the elbow and nozzle at temperatures below 25F. The tank has been tested to 2OF and was fine, but it was not completely full.
Privacy. If you plan on using your Road Shower in parking lots, or campgrounds, consider purchasing a shower enclosure. See our website for suggestions.
Car Wash: A non-touch free car wash can rip the hose from the unit or rip your unit off the car, and damage the unit and your vehicle. It has happened. If you want to take the chance, at least remove the hose before entering the car wash. Car washes are not liable for items on your rack. We are not liable for car wash damage to your Road Shower or car.
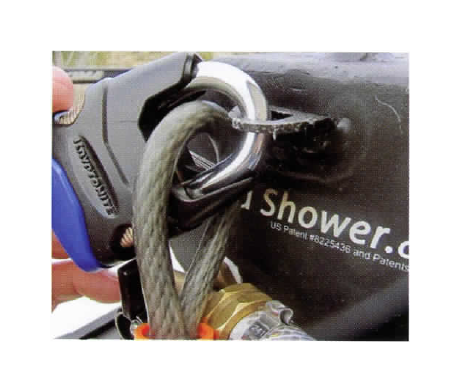
Locking Road Shower comes with a loop welded to the elbow end. You can lock your Road Shower to your rack with a cable or chain as shown in this picture.
Sanitize and clean for drinking water prior to first use. Info from the US Center for Disease Control:
• Wash the storage container with dishwashing soap and water and rinse completely with clean water.
• Fill tank with 5 gallons water. Add 1/2 cup of bleach.
• Cover the container and shake it well (or drive a few minutes) so that the sanitizing bleach solution touches all inside surfaces of the container.
• Wait at least 30 seconds and then pour the sanitizing solution out of the container.
• Rinse the empty container with clean, safe water that already is available.
• Due to the corrosive nature of bleach on the metal hose ends, remove the hose and nozzle after rinsing with clean water and spray some cooking oil spray inside the hose ends after they dry.
Maintenance:
• When storing, empty the tank completely and store with the elbow open and the hose off and the fill cap off, so it dries out and does not mold
• Tighten the little screw on the black handle of the elbow now and then.
• Tighten and check mounting hardware on a regular basis.
• Clean outside of Road Shower with soap and water. Dry off thoroughly with towel to get the factory finish look.
• Empty tank, and disconnect hose during freezing weather.
