 FREE 1 to 3-Day Delivery on Orders $149+ Details
How to Install JMS BoostMAX Performance Booster on your F-150

Shop Parts in this Guide
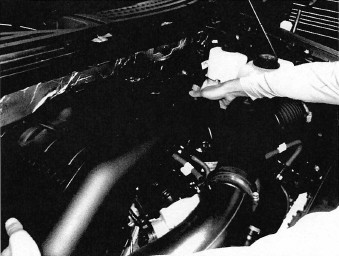
STEP 1
• Ignition key off, remove key from ignition.
• Open the vehicle's hood.
• Disconnect the negative battery terminal.
• Remove the engine oil fill cap
• Remove the plastic engine cover and set aside
• Replace the engine oil fill cap
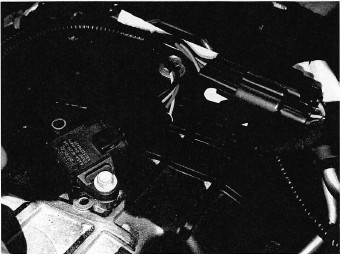
STEP 2
• Locate the MAP Sensor (on top of the manifold)
• Disconnect the OE MAP Sensor connector from the MAP sensor.
• Connect the BoostMAX Wire Harness Labeled "MAP Sensor" in-between the MAP Sensor and the OE Connector.
• Use zip-ties to secure the MAP sensor wiring.
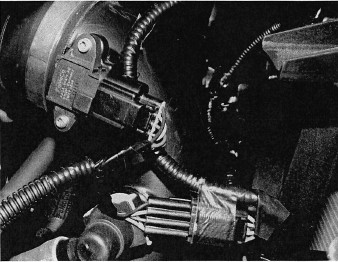
STEP 3
• Locate the TIP Sensor (directly in front of the throt-tle-body, integrated into the air-inlet tube)
• Disconnect the OE TIP Sensor connector from the TIP sensor.
• Connect the BoostMAX Wire Harness Labeled "TIP Sensor" in-between the TIP Sensor and the OE Connector.
• Use zip-ties to secure the TIP sensor wiring.
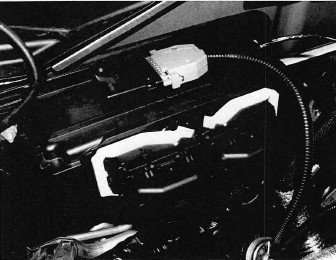
STEP 4
• Connect the BoostMAX Module to the DB-25 connector, secure the screws with the screwdriver.
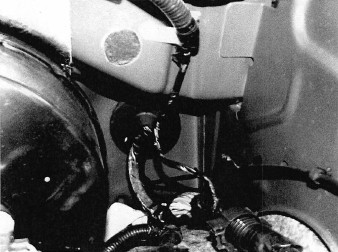
• Route the BoostMAX wiring harness alongside the factory ECU (located on the firewall).
• Use zip-ties to secure the BoostMAX Module near the factory ECU.
STEP 5
• Route the flat four pin wire harness across the back of the engine and pass it through the rubber firewall grommet. Route the four pin wire through the firewall grommet to the drivers side of the ve-hicle.
• Note: The firewall plug might be covered by in-sulation on the inside. It may help to attach the wire harness with tape to a stiff wire (coat hanger) in order to fish it through the firewall opening (use two people).
• Use zip-ties to secure the wiring.
STEP 6
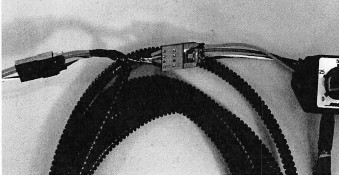
• Connect the Pedal Position Harness to the flat four position main BoostMAX Harness (via flat four pin connector, left side connector in the picture)
• Choose between connecting the Pedal Position Harness to the Remote Boost Knob OR to the "87 Octane Red Chip". (Right side connector in picture)
Note: In the picture the Pedal Position harness in the center, the main harness plugs into the Pedal Harness and then the Remote Knob Plugs into the Pedal harness.
STEP 7
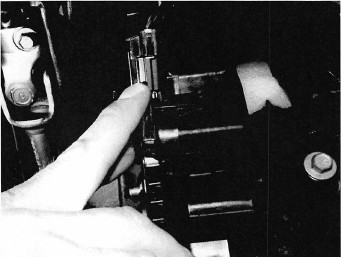
• Locate the Accelerator Pedal Position Sensor (Located on top of the Accelerator Pedal bracket)
• Disconnect the OE Pedal Position Sensor connec-tor from the Pedal Position sensor (pull the red tab out and then press the black tab to release).
• Connect the BoostMAX Wire Harness Labeled "Pedal Sensor" in-between the Pedal Position Sen-sor and the OE Connector.
• Use zip-ties to secure the Pedal Position Sensor wiring.
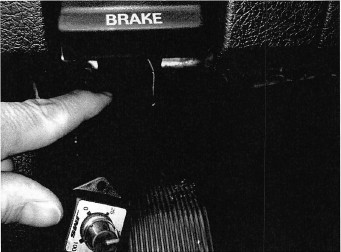
STEP 8
• Mount the Remote Boost Knob: We recommend mounting via a single OE screw near the Brake Re-lease mechanism.
• Use zip-ties to secure the Remote Boost Knob wiring.
• Adjust the BoostKnob to the desired performance level:
• Recommended knob settings: 87 octane = 50%, 91 octane = 90%, 93 octane = 100%.
STEP 9
• Reconnect the negative battery terminal.
• Start and test the vehicle, it should function like normal with additional WOT power. If the Ignition Key is "ON" the Green LED on the BoostMAX will illuminate ON.
• If the vehicle has a wrench light and no throttle: it is due to disconnecting the Pedal Position Sensor.
• Turn the vehicle off, remove the key, wait 30 sec-onds and restart the vehicle (the wrench light will automatically clear itself on restart).
Enjoy the extra plug & play BoostMAX power.


