 FREE 1 to 3-Day Delivery on Orders $149+ Details
How to Install Belltech Nitro Drop 2 Rear Shock for 2 in. to 5 in. Drop (04-13 2WD/4WD, Excluding Raptor) on your Ford F-150

Shop Parts in this Guide
- Belltech Nitro Drop II Rear Shock for 2 to 5-Inch Drop (04-13 2WD/4WD F-150, Excluding Raptor)
- Belltech Street Performance Front and Rear Shocks for +1 to -3-Inch Front / 4-Inch Rear Drop (09-13 2WD F-150)
- Belltech Street Performance Rear Shock for 0 to 1-Inch Drop (04-13 2WD F-150)
- Belltech Street Performance Rear Shock for 0 to 1.50-Inch Drop (04-12 2WD/4WD F-150, Excluding Raptor)
Belltech Shocks for truck suspensions are designed for easy installation. If not otherwise stipulated in these instructions, all suspension components are installed and removed in accordance with the manufacturer’s specifications for installing and removing standard damper components.
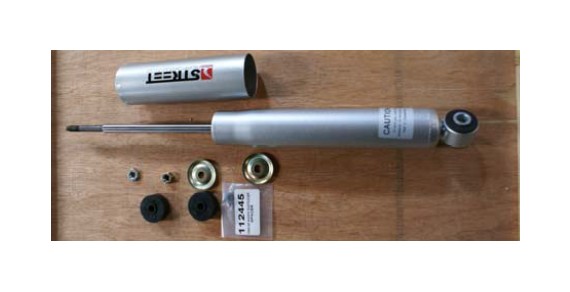
Construction Lube
When you install your Belltech Street Performance or Nitro Drop 2 Shock you may notice a slight oil drip down the side. The shock is not leaking. This is oil lubrication used in the construction assembly of the shock. Simply wipe the oil off with a damp cloth.
Nitro Drop 2 Shocks
Your Nitro Drop 2 Shock is a low pressure oil shock. If the shock is compressed the rod will not return to an extended position on its own. The shock’s performance relies on the internal Belltech valving technology which is not affected by the relative pressure of the shock.
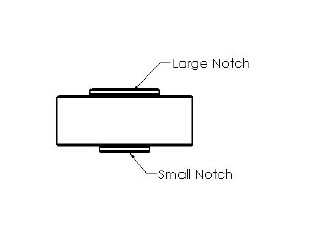
Pin Bushings
Your Belltech Street Performance or Nitro Drop 2 Shocks may be fitted with a Pin Bushing. If so it is necessary to properly fit the bushing to your vehicle by choosing the correct notch on the Pin Bushing.
1. Remove OE shock from vehicle.
2. Examine OE pin bushing and measure diameter of notch.
3. Compare to the 2 different notch sizes on the top and bottom of the supplied Belltech Pin Bushing and use the notch that most closely matches your OE pin bushing.
4. Install the shock with the selected notch sandwiching the shock mount of the vehicle.
Dust Cover
Your Belltech Street Performance Shocks may be fitted with a removable dust cover. Some vehicle applications may require you to remove the dust cover for more clearance.
1. Check vehicle to see if there is enough clearance for dust cover. If there is not enough clearance, remove the dust cover my removing the pin bushings and washers and then remove the dust cover.
2. Install included 10mm (0.39in), part number 112445, dust cover spacer.
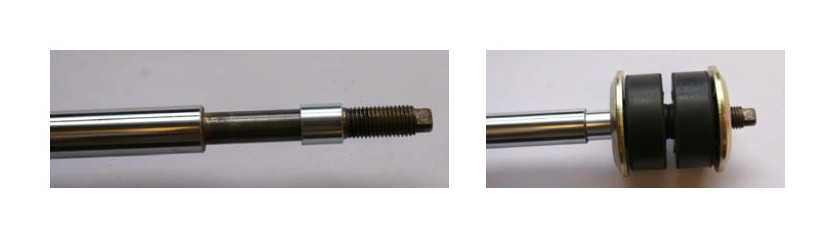
3. Install washer and bottom pin bushing, with selected notch facing up (see Pin Bushing section, above), then install on vehicle with top pin bushing, with selected notch facing down (see Pin Bushing section, above) and washer.

