FREE 1 to 3-Day Delivery on Orders $149+ Details
How to Install Barricade 5 in. Oval Straight Side Step Bar - Black on your F-150

Shop Parts in this Guide
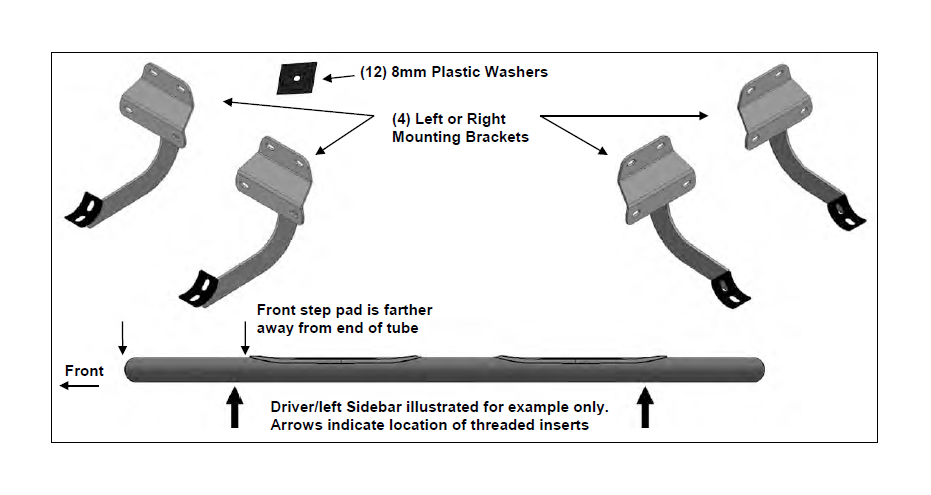
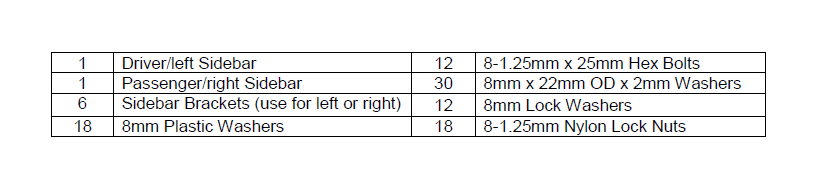
PARTS LIST:
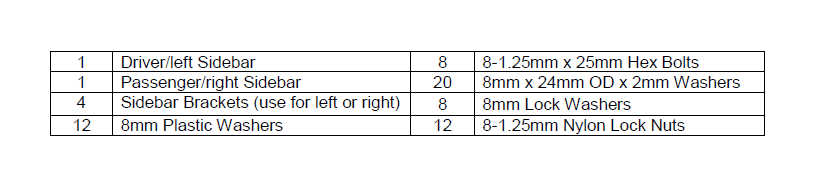
PARTS LIST:
PROCEDURE:
REMOVE CONTENTS FROM BOX. VERIFY ALL PARTS ARE PRESENT. READ INSTRUCTIONS CAREFULLY BEFORE STARTING INSTALLATION. ASSISTANCE IS RECOMMENDED.
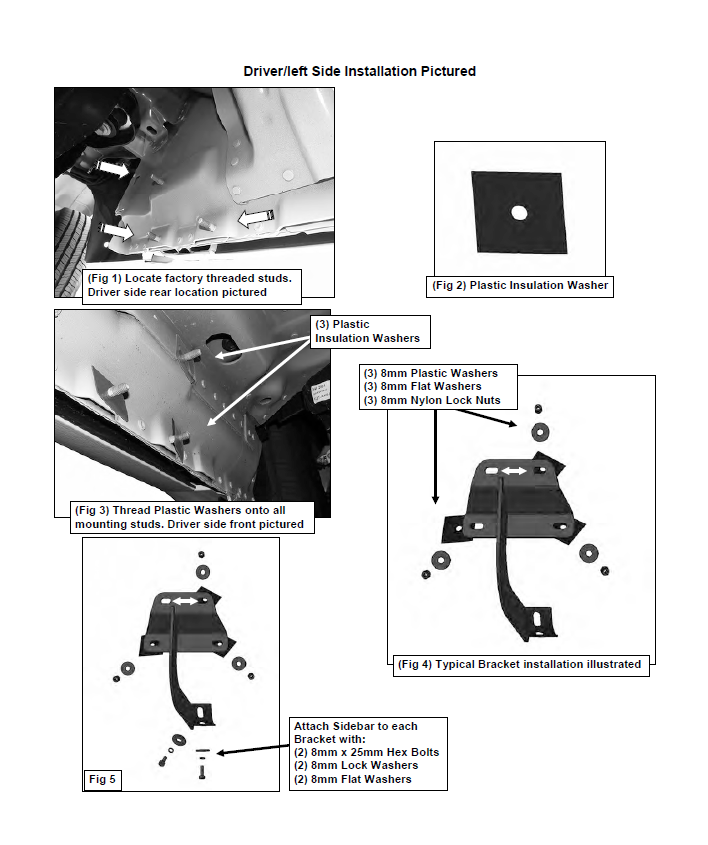
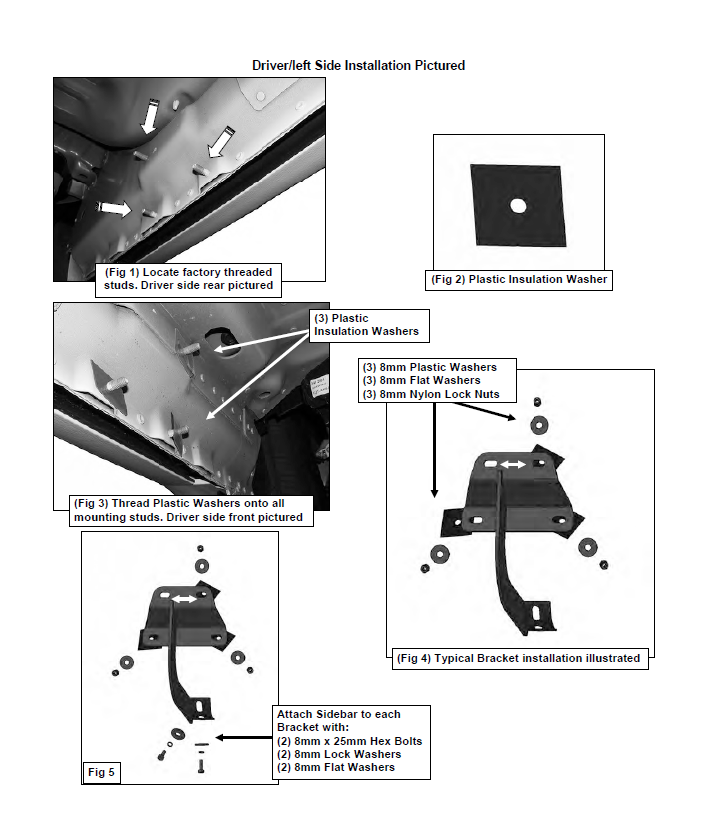
1. Start the installation under the driver side of the vehicle. Locate the front and rear factory running board mounting locations along the inner side of the body, (Figure 1).
2. Slide (1) Plastic Washer over each factory mounting stud in the body panel, (Figures 2 & 3). IMPORTANT: The Plastic Washers are designed to prevent corrosion between the aluminum body panel and the steel mounting brackets. Do not install the Brackets without the Plastic Washers.
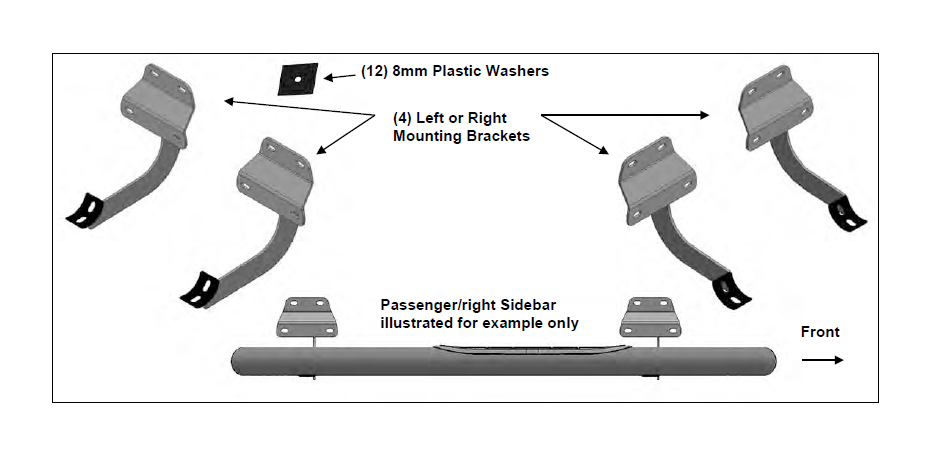
3. Select (1) Mounting Bracket. NOTE: All (4) Brackets are universal and will fit left or right side. Attach the Mounting Bracket to the (3) factory studs with (3) 8mm Flat Washers and (3) 8mm Nylon Lock Nuts, (Figure 4). Snug but do not fully tighten the hardware.
4. Repeat Steps 1—3 to install the rear driver side Bracket.
5. Select the driver/left Sidebar. Carefully position the Sidebar onto the (3) Mounting Brackets. IMPORTANT: Do not slide, (front to back or rotate), the Sidebar on the Brackets or damage to the finish on the Sidebar may result. Attach the Sidebar to the Mounting Brackets with (4) 8mm x 25mm Hex Bolts, (4) 8mm Lock Washers and (4) 8mm Flat Washers, (Figure 5). Do not tighten hardware.
6. Level and adjust the Sidebar and tighten all hardware.
7. Repeat Steps 1—6 to install the passenger/right Sidebar.
8. Do periodic inspections to the installation to make sure that all hardware is secure and tight.
To protect your investment, wax this product after installing. Regular waxing is recommended to add a protective layer over the finish. Do not use any type of polish or wax that may contain abrasives that could damage the finish.
For stainless steel: Aluminum polish may be used to polish small scratches and scuffs on the finish. Mild soap may be used also to clean the Sidebar.
For gloss black finishes: Mild soap may be used to clean the Sidebar.
PROCEDURE:
REMOVE CONTENTS FROM BOX. VERIFY ALL PARTS ARE PRESENT. READ INSTRUCTIONS CAREFULLY BEFORE STARTING INSTALLATION. ASSISTANCE IS RECOMMENDED.
1. Start the installation under the driver side of the vehicle. Locate the front and rear factory running board mounting locations along the inner side of the body, (Figure 1).
2. Slide (1) Plastic Washer over each factory mounting stud in the body panel, (Figures 2 & 3). IMPORTANT: The Plastic Washers are designed to prevent corrosion between the aluminum body panel and the steel mounting brackets. Do not install the Brackets without the Plastic Washers.
3. Select (1) Mounting Bracket. NOTE: All (4) Brackets are universal and will fit left or right side. Attach the Mounting Bracket to the (3) factory studs with (3) 8mm Flat Washers and (3) 8mm Nylon Lock Nuts, (Figure 4). Snug but do not fully tighten the hardware.
4. Repeat Steps 1—3 to install the rear driver side Bracket.
5. Select the driver/left Sidebar. Carefully position the Sidebar onto the (3) Mounting Brackets. IMPORTANT: Do not slide, (front to back or rotate), the Sidebar on the Brackets or damage to the finish on the Sidebar may result. Attach the Sidebar to the Mounting Brackets with (4) 8mm x 25mm Hex Bolts, (4) 8mm Lock Washers and (4) 8mm Flat Washers, (Figure 5). Do not tighten hardware.
6. Level and adjust the Sidebar and tighten all hardware.
7. Repeat Steps 1—6 to install the passenger/right Sidebar.
8. Do periodic inspections to the installation to make sure that all hardware is secure and tight.
To protect your investment, wax this product after installing. Regular waxing is recommended to add a protective layer over the finish. Do not use any type of polish or wax that may contain abrasives that could damage the finish.
For stainless steel: Aluminum polish may be used to polish small scratches and scuffs on the finish. Mild soap may be used also to clean the Sidebar.
For gloss black finishes: Mild soap may be used to clean the Sidebar.
PARTS LIST:

PARTS LIST:
PROCEDURE:
REMOVE CONTENTS FROM BOX. VERIFY ALL PARTS ARE PRESENT. READ INSTRUCTIONS CAREFULLY BEFORE STARTING INSTALLATION. ASSISTANCE IS RECOMMENDED.
1. Start the installation under the driver side of the vehicle. Locate the front and rear factory running board mounting locations along the inner side of the body, (Figure 1).
2. Slide (1) Plastic Washer over each factory mounting stud in the body panel, (Figures 2 & 3). IMPORTANT: The Plastic Washers are designed to prevent corrosion between the aluminum body panel and the steel mounting brackets. Do not install the Brackets without the Plastic Washers.
3. Select (1) Mounting Bracket. NOTE: All (4) Brackets are universal and will fit left or right side. Attach the Mounting Bracket to the (3) factory studs with (3) 8mm Flat Washers and (3) 8mm Nylon Lock Nuts, (Figure 4). Snug but do not fully tighten the hardware.
4. Repeat Steps 1—3 to install the rear driver side Bracket.
5. Select the driver/left Sidebar. Carefully position the Sidebar onto the (3) Mounting Brackets. IMPORTANT: Do not slide, (front to back or rotate), the Sidebar on the Brackets or damage to the finish on the Sidebar may result. Attach the Sidebar to the Mounting Brackets with (4) 8mm x 25mm Hex Bolts, (4) 8mm Lock Washers and (4) 8mm Flat Washers, (Figure 5). Do not tighten hardware.
6. Level and adjust the Sidebar and tighten all hardware.
7. Repeat Steps 1—6 to install the passenger/right Sidebar.
8. Do periodic inspections to the installation to make sure that all hardware is secure and tight.
To protect your investment, wax this product after installing. Regular waxing is recommended to add a protective layer over the finish. Do not use any type of polish or wax that may contain abrasives that could damage the finish.
For stainless steel: Aluminum polish may be used to polish small scratches and scuffs on the finish. Mild soap may be used also to clean the Sidebar.
For gloss black finishes: Mild soap may be used to clean the Sidebar.
PARTS LIST:

PARTS LIST:
PROCEDURE:
REMOVE CONTENTS FROM BOX. VERIFY ALL PARTS ARE PRESENT. READ INSTRUCTIONS CAREFULLY BEFORE STARTING INSTALLATION. ASSISTANCE IS RECOMMENDED.
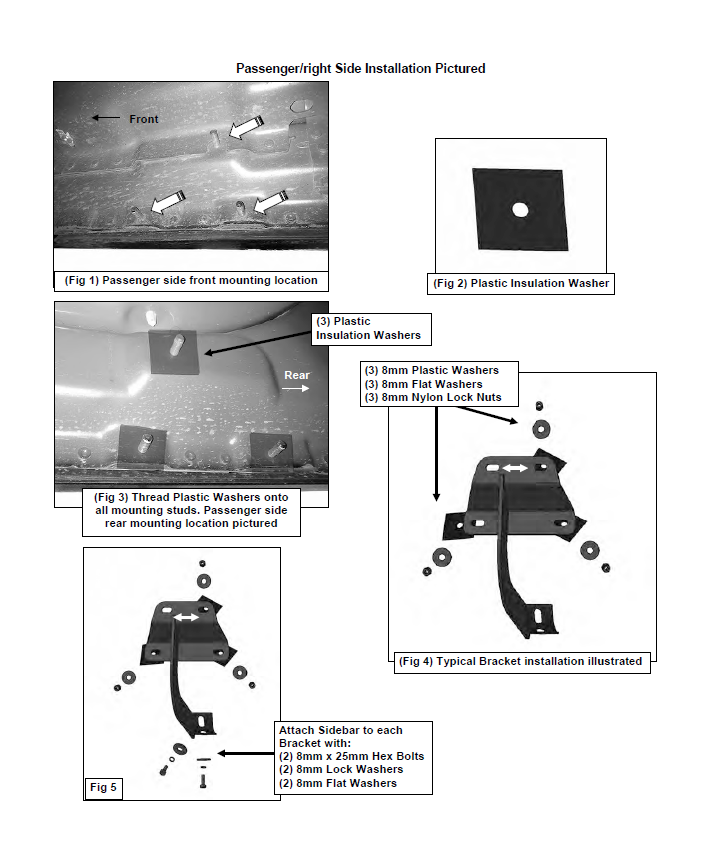
1. Start the installation under the passenger side of the vehicle. Locate the front factory running board mounting location along the inner side of the body, (Figure 1).
2. Slide (1) Plastic Washer over each factory mounting stud in the body panel, (Figures 2 & 3). IMPORTANT: The Plastic Washers are designed to prevent corrosion between the aluminum body panel and the steel mounting brackets. Do not install the Brackets without the Plastic Washers.
3. Select (1) Mounting Bracket. NOTE: All (6) Brackets are universal and will fit left or right side. Attach the Mounting Bracket to the (3) factory studs with (3) 8mm Flat Washers and (3) 8mm Nylon Lock Nuts, (Figure 4). Snug but do not fully tighten the hardware.
4. Repeat Steps 1—3 to install the (2) remaining center and rear passenger side Brackets.
5. Select the passenger/right Sidebar. Carefully position the Sidebar onto the (3) Mounting Brackets. IMPORTANT: Do not slide, (front to back or rotate), the Sidebar on the Brackets or damage to the finish on the Sidebar may result. Attach the Sidebar to the Mounting Brackets with (6) 8mm x 25mm Hex Bolts, (6) 8mm Lock Washers and (6) 8mm Flat Washers, (Figure 5). Do not tighten hardware.
6. Level and adjust the Sidebar and tighten all hardware.
7. Repeat Steps 1—6 to install the driver/left Sidebar.
8. Do periodic inspections to the installation to make sure that all hardware is secure and tight.
To protect your investment, wax this product after installing. Regular waxing is recommended to add a protective layer over the finish. Do not use any type of polish or wax that may contain abrasives that could damage the finish.
For stainless steel: Aluminum polish may be used to polish small scratches and scuffs on the finish. Mild soap may be used also to clean the Sidebar.
For gloss black finishes: Mild soap may be used to clean the Sidebar.
PROCEDURE:
REMOVE CONTENTS FROM BOX. VERIFY ALL PARTS ARE PRESENT. READ INSTRUCTIONS CAREFULLY BEFORE STARTING INSTALLATION. ASSISTANCE IS RECOMMENDED.
1. Start the installation under the passenger side of the vehicle. Locate the front factory running board mounting location along the inner side of the body, (Figure 1).
2. Slide (1) Plastic Washer over each factory mounting stud in the body panel, (Figures 2 & 3). IMPORTANT: The Plastic Washers are designed to prevent corrosion between the aluminum body panel and the steel mounting brackets. Do not install the Brackets without the Plastic Washers.
3. Select (1) Mounting Bracket. NOTE: All (6) Brackets are universal and will fit left or right side. Attach the Mounting Bracket to the (3) factory studs with (3) 8mm Flat Washers and (3) 8mm Nylon Lock Nuts, (Figure 4). Snug but do not fully tighten the hardware.
4. Repeat Steps 1—3 to install the (2) remaining center and rear passenger side Brackets.
5. Select the passenger/right Sidebar. Carefully position the Sidebar onto the (3) Mounting Brackets. IMPORTANT: Do not slide, (front to back or rotate), the Sidebar on the Brackets or damage to the finish on the Sidebar may result. Attach the Sidebar to the Mounting Brackets with (6) 8mm x 25mm Hex Bolts, (6) 8mm Lock Washers and (6) 8mm Flat Washers, (Figure 5). Do not tighten hardware.
6. Level and adjust the Sidebar and tighten all hardware.
7. Repeat Steps 1—6 to install the driver/left Sidebar.
8. Do periodic inspections to the installation to make sure that all hardware is secure and tight.
To protect your investment, wax this product after installing. Regular waxing is recommended to add a protective layer over the finish. Do not use any type of polish or wax that may contain abrasives that could damage the finish.
For stainless steel: Aluminum polish may be used to polish small scratches and scuffs on the finish. Mild soap may be used also to clean the Sidebar.
For gloss black finishes: Mild soap may be used to clean the Sidebar.