Installation Time
(approx) 2 Hours
Difficulty Level:
Light to Moderate mechanical skill required.
Installation Guides
Guaranteed Free Delivery by 12/24! available on most items - Details
$1,146.99 (set)
FREE Shipping + $149.00 Oversized Item Fee Market Price $1,679.99 You Save 32% ($533.00)Add Local Shop Installation
Saved - View your saved items
We're sorry. We couldn't save this product at this time.
Buy 2 or more Barricade items of $500+, Get $50!
Eric: Hey guys, I'm Eric with American Trucks. In this video, I'm going to give you my review and installation of this Barricade HD Winch Mount Front Bumper for all 2007 to 2013 Chevy Silverado and GMC Sierra 1500s. Now, this bumper is really going to appeal to the Silverado and Sierra owners out there who are looking to add that blacked-out, aggressive appearance to the front end of their truck while also bringing forth a lot of off-road capability that you didn't have before with your stock bumper. As you can see, this bumper answers those requirements with a very aggressive, rugged look that's pretty much a signature of all the line of Barricade HD products that we sell here at americantrucks.com. Now this bumper isn't just about its good looks and appearance. It brings a lot of functionality to the table as well. Start off with these bright LED fog lights at the front here that have a color temperature of 6k. You also have this overrider bar with mounting brackets that provide you the opportunity to mount additional off-road lighting. You have these heavy welded D-ring mounts for getting yourself out of situations where you might be stuck on a trail or snow or whatever.You also have a winch plate that is rated to take up to a 12,000-pound winch, and of course, the overall design of the bumper with the tapered up edges gives you an additional 8 inches of ground clearance towards the outer edge of your wheels. Now here at American Trucks, I work with a lot of products, making a lot of these videos. And I gotta tell you, you really notice when good designs stand out and this is one example of that. One thing I like about these LED lights is not only are they bright, they're very rugged. They're IP67 rated so they're gonna be waterproof and durable out on the trails, but they also come mounted in the bumper. We didn't have to mount these when we unboxed it from its packaging. That's gonna make setup and wiring really easy. And one last thing I wanna mention about this bumper is the durable construction. It comes with that 5/32-inch steel plate that's very thick and is gonna give you quite an upgrade to front-end protection over your factory bumper. And a little bit later in this video, we'll do a side-by-side comparison and you'll really see how that difference stands out. You also get that durable, two-stage black powder coat finish that's gonna protect this bumper against weathering and corrosion. Now this bumper is really competitively priced at just under $1200.Now, considering all the features you're getting like the included LED lighting that's already mounted for you making wiring a breeze, the winch plate rated up to 12,000 pounds, the included D-rings, and of course, better ground clearance on the front end and better front end protection, it's really, pretty much, a good deal. Speaking of installation, guys, I'm giving this a very soft two out of three wrenches on a difficulty meter. There are several steps we're gonna go through and some really basic wiring, but with some basic hand tools and an extra set of hands, you should have no problem getting this job done in less than two hours. So with that said, let's take a look at the tools we're gonna use and go ahead with the installation. Okay, guys. Tools for this installation include, an impact wrench, a socket wrench, an extension, a flat head screwdriver, 21, 18, 15, and 10-millimeter sockets, an 18-millimeter crescent, and a trim removal tool. Okay. So, at this point, another one of our team members is gonna show you how to remove the factory bumper from our truck and then I'll come back and we'll mount our brand new Barricade bumper to the front end.Sarah: All right. So once the hood is popped, the first step in your install is to remove this rod support cover by removing all the pop clips with your pop clip removal tool. Now you can go ahead and remove the cover. All right. So the next step we're gonna remove our grille by removing the four 10-millimeter bolts that hold it on at the top. Next up, we're gonna pull out the grille. It will come out just pulling straight out but if for some reason the metal clips that are holding it in hang up, you can use a needle-nose pliers to get it out. Next up, we're gonna remove these bolts holding in the bumper underneath the frame. Next, remove the bolt from the bumper support brace on the other side with a 15-millimeter socket. Next up, we're gonna remove the two nuts holding our bumper to the frame and attach on the other side with a bolt plate. Using a 21-millimeter socket, remove these. Next up, we're gonna remove the bolt plate from the other side of the frame. You may want a friend to help support the bumper while you remove this and you may want a large flathead or small pry bar to help get it loose. Repeat that on the other side.Eric: Okay. Now we have our stock bumper off. I want to set them up here to do our side-by-side comparison. Now, obviously, with your factory bumper, you're not getting a whole lot in terms of functionality or extra protection for the front end of your vehicle. This is pretty much fiberglass on a very thin, narrow metal frame. Not a lot of protection for the front end. Obviously, you've got this heavy-duty steel plate here on your Barricade bumper covered in that two-stage powder coat that's gonna protect it against weathering and corrosion. This bumper also, obviously, you're looking at this one probably because you're interested in mounting a winch on the front of your truck. One thing I do wanna say is the winch box here on the front is somewhat enclosed so you may have to mount this on before you put the bumper on your truck. That's gonna add a little bit of difficulty. This bumper is already very heavy. Heavy duty brings heavy weight along with it, unfortunately, but as you can see, the kit comes with a couple of heavy-duty D-rings we already mounted up here for this shot, and this mid-rise bar right here that goes across the middle of the bumper.You do have some brackets that are welded on so you could add a light bar there if you really want to, in addition to the LED lights that come with this kit and they're very easy to plug, almost plug-and-play really to be quite honest with you, and we'll show you more with that in a moment during the installation. So, speaking of that, let's get to work. Okay. First step, if you remember during the uninstall, you remove this bolt plate, one on each side. We're reusing that factory hardware. Go ahead and grab the mounting brackets from your kit. They're identical so it doesn't matter which side you use each bracket on. They're cut the same and just slide it in place over top of your frame rail and this bolt plate is gonna go up on these two angular holes up here. Go ahead and start the nuts on there. And using a 21-millimeter deep well socket, we're gonna go ahead and tighten these down. Now during the uninstall, if you removed tow hooks from your truck, you might have a third bolt that will go in here. This truck does not. So, right now we're going with these two. All right, guys. Now at this step of the installation, we're gonna be mounting the bumper up on the mounting brackets. This thing's quite heavy so we're gonna have two of us lifting the bumper up into place while a second set of helping hands here is gonna slide under and start a couple of bolts for us so the bumper can hang.All right. Now that we have the passenger side mounting bracket all secured and tightened down, go ahead and repeat the same steps on the driver's side. Okay, guys. As you can see, we already have one bolt and we have one on each side here just holding the bumper up. There is nothing for this bumper to rest on as is so we had to start a couple bolts just for safety reasons. So, this is the hardware we're looking at. We're gonna have a washer on each end as well as a lock washer and nut. So, go ahead and fish the rest of these through. I'm just gonna start them finger tight for now. This bumper is adjustable in its brackets both forward and back and up and down. So to get proper fitment, you don't wanna make these too tight too early. Right now just finger tight. Then go ahead and repeat these steps on the other side. All right, guys. I have it all set up here. We're gonna use an 18-millimeter deep well socket on the nut end and I have an 18-millimeter crescent on the bolt end. We're gonna go ahead and tighten these down. Then all you need to do is repeat those same steps on the other side. Okay. Next step, guys. We're gonna get some power for these nice bright LEDs that come with your Barricade bumper. Get the wiring harness out of your kit. As you can see, it's quite lengthy.You should have enough slack to pretty much run that switch anywhere you want in your cab but what we're gonna do to get started here, these plugs that plug into the back of the lights, there's a long end. That's the end we're gonna run to the driver's side, fog light and then we'll keep the short end over here and I'll show you exactly how you can run that. Okay. Right here between your air box and your radiator support, go ahead and fish this line through and just grab it until you got both plugs through, and we're just gonna run this across the lower radiator support over to the other fog light. Just go ahead and plug them in and you can kind of pull the slack tight. As you can see, there's holes along your radiator support. They're perfect for running a zip tie through and keeping this nice and tucked up out of the way. Plug in your passenger side. When you tuck this up, make sure it's behind this bracket. If you remember, this is what your grille cover clicks into so you don't want to interfere with that. Okay. Now as you can see, the wiring coming up from our airbox here comes into this bundle of stuff here. This is a relay, basically, a switch and a fuse block that's inline in your wiring here. You're gonna have two positive wires and two negatives. We're gonna go ahead and attach those to the battery right now. You should have an auxiliary post on your battery.Our truck does on both sides here. Just back the nut off just far enough. These are like u or v-shaped clips that can just slide in. You don't have to take the nut all the way off and risk dropping it down in there and never finding it again. Once you have those snugged up on, go ahead and tighten them down. It's kinda tight working in there as you probably saw guys. You really need to, you can just remove these bolts and take this piece out. It's difficult for you. Now we're gonna go ahead and plug up the, connect the positive terminals. Now we're gonna go ahead and connect the positive side. For our truck here, I'm using a 10-millimeter socket to take these nuts off. Probably not take them off, back them out. Probably something similar in your truck. Okay. Now that we have our positive and negative wiring connected to the battery, you can see a little red light comes on on your switch, and good time to also test your lights. Make sure everything is working before we go any further and that switches to green. Something to keep in mind is if you're not a daily driver with this truck, you will get a very small power draw on this and that might be something to keep in mind if you don't drive this truck every day. It's very small power draw. If you're driving it every day, you're never gonna have an issue with a dead battery.So, next thing to do is, this lead here that goes to your switch does disconnect and I'm gonna do that right now because that switch is kinda bulky. I'm gonna set that aside. And if you look closely, this is just one route, one way to do this as far as getting the wiring into the caviar truck. There is some daylight now. With the passenger door open, you can see between the fender and the end of the firewall and there's a route there you can take, feed this wiring through, down in and then you can follow the path that the wiring takes from your door into the cab. That way, that's just one way or you can try feeding it across to the driver's side. That might be a little complicated. You might run short slack in your wiring just so you know. So we're gonna demonstrate this way. It's just one way to do it. Okay. Now we're going to go ahead and plug this into the wiring coming through, and now your switch has this 3m adhesive on the back. You can go ahead and mount it anywhere you want as long as you have slack for that, and obviously, it's just a peel and stick. All right. Now we can go ahead and reinstall our grille. Then go ahead and tighten them down with a 10-millimeter socket. All right. Go ahead and put your radiator cover back on and reinsert your pop clips.All right, guys, last couple things we got is to mount these D-rings. Of course, I'm just demonstrating this. You may not want to leave these on all the time. Could be a target for a thief or they could back themselves out. All right, guys. That wraps up this review and installation of this Barricade HD Winch Mount Front Bumper with LED lighting for all 2007 to 2013 Silverado and Sierra 1500s. For all things truck, keep it right here at americantrucks.com.
Subscribe to our YouTube Channel
Features, Description, Reviews, Q&A, Specs & Installation
Brand | Barricade |
Bumper Type | Full Width |
Bumper Material | Steel |
Bumper Finish | Black |
Bumper Winch Mount | Winch Mount |
Bumper Fog Light Fitment | Aftermarket |
Bumper Location | Front |
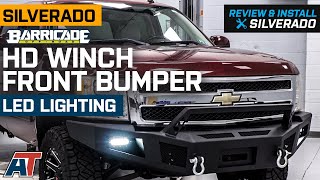
Aggressive Front-End Protection. An excellent way to add rugged off-road styling to your 2007-2013 Chevrolet Silverado is by installing a Barricade HD Front Bumper. Designed with the frequent off-roader in mind, this Bumper features a built-in winch plate that is capable of supporting a 12,000 pound winch. Additional features include an integrated grille guard hoop, LED fog lights and two high strength D-Ring mounts (D-Rings not included). Loaded with all these great features, this Barricade HD Front Bumper is ideal for both street and off road use.
Integrated LED Fog Lights. This Barricade HD Front Bumper includes two LED Fog Lights. The fog lights are equipped with high output LEDs to provide an intense 6000K light temperature. Each light has a IP67 rating providing reliable waterproof performance, thanks to a tough aluminum housing sealed with a polycarbonate lens.
High Quality Construction. Manufactured from heavy duty 5/32-inch steel plating for strength, this Barricade Front Bumper is cold formed into shape. After trimming and final finishing, Barricade then completes their Bumper in a two stage finish using epoxy pre-coating and high-grade textured black powder coating for durability and long lasting corrosion resistance.
Direct Bolt-On Installation. Barricade engineered their HD Front Bumper to be a direct bolt-on replacement for the original stock bumper reusing the factory hardware and mounting points. There is no cutting or modifications required for a clean straight forward installation. Installation can be completed in about 2 hours with just basic hand tools and the help of a friend.
Application. This Barricade HD Winch Front Bumper with LED Fog Lights was designed for use on 2007-2013 Chevrolet Silverado 1500 models.
Freight Notes. Freight items can only be shipped within the continental 48 states, no expedited methods. What is freight shipping? Your Answers are Right Here!
Shop All Truck Parts And Accessories
Shop All Truck Bumpers
Shop All Front Truck Bumpers
Fitment:
Barricade S112234
CA Residents: WARNING: Cancer and Reproductive Harm - www.P65Warnings.ca.gov
Installation Info
Installation Time
(approx) 2 Hours
Difficulty Level:
Light to Moderate mechanical skill required.
Installation Guides
What's in the Box
10 More Questions