Talk to a Silverado 1500 Sales Tech
1-888-706-1096
M-F 8:30A-11P, Sat-Sun 8:30A-9P
$20K Sweeps! 10 Chances to Win! Enter Daily >

Raxiom Axial Series Headlights with LED Bar; Black Housing; Clear Lens (07-13 Silverado 1500)

Item S138003
Verify parts fit and get product recommendations.
Silverado 1500 Sales Techs: Connect Now M-F 8:30A-11P, Sat-Sun 8:30A-9P
$0.00
On Sale

$289.99 (pair)

FREE Shipping Market Price $358.99 You Save 19% ($69.00) Up to 10% off for Military & First Responders! See Details

Will this fit your Vehicle?

Select a different vehicle Help?
Update or Change Vehicle
Ship to: Ashburn - 20149
Sorry, please enter a valid US or CA postal code
We're sorry, zip can't be updated at this time.
Recommended Install Shops
How It Works
Install Shops are available near Ashburn - 20149

Add Local Shop Installation

Total cost of service $174.99
    Create a list
    Add to New List

    Saved - View your saved items

    We're sorry. We couldn't save this product at this time.

    or use

      Product Videos

      Noah: Noah here from AmericanTrucks, and we're gonna take a closer look at these Axial Headlights With LED Bars, Black Housings, and Clear Lenses for the 2007 to 2013 Silverado 1500. These headlights are perfect for the Silverado owner that wants a fully plug-and-play upgrade with a super bright LED daytime running light design and a darker housing for that sleek aftermarket headlight look.The two main things to consider when shopping for aftermarket headlights are the style and the improved visibility. Now, everybody wants the best of both, and sometimes it is definitely tough to navigate all those options that are available out there. Now, these headlights in particular, I think, do a great job balancing visual appearance and improved visibility. These guys are super sleek and even top to bottom and are pretty subtle with just that LED daytime running light contrasting the housing. The daytime running light that hugs the outside of the headlights really grabs other people's attention, whether they're distracted drivers or just people admiring. Then the housings themselves are black for a dark base behind the lens with chrome reflectors and then the lenses are clear. These headlights do utilize factory halogen bulbs, which keeps the design nice and simple.OEM-grade build quality is something that all aftermarket manufacturers strive for, and Raxiom headlights always meet those goals. We have sealed ABS housings, which will withstand the elements and any beating your truck might encounter, whether it's from mud or water. The lenses around the front are polycarbonate, which is great for impact resistance. As I mentioned earlier, these do use the factory halogen bulbs. You can just use them but, if you're in need of something even brighter, you can grab a set of LED drop-in bulbs off our site and install them at the same time while you have these headlights out.These headlights fall right around the $350 mark, putting them right in the middle of the price range. They really are a perfect choice for someone looking for something LED but on a budget or you just don't want something super flashy, these would be a great middle-ground choice for you.Installing this set of headlights on your Silverado is gonna take you about an hour and it really shouldn't be too much of a hassle to get them on. So, we're looking at an install difficulty of one out of three wrenches. As far as install goes, I'm gonna hand you over to one of the guys in the shop and he's gonna walk you through the process step by step.Tools you'll need for this install are gonna be a 3/8 ratchet of some kind, or an impact. In this case, I used a 3/8 power ratchet, a push clip removal tool, a 10-millimeter ratchet wrench, and a 10-millimeter 3/8 socket.Hey, guys. Today we're gonna be installing a set of headlights on our Silverado. Before we jump right into that install, go ahead and check out this video, which is gonna walk you through the uninstallation process and then meet me right back here and we'll start getting these new ones on.Woman: Okay. So, the first step in our uninstall is to grab a pop clip removal tool and remove all the pop clips that hold in our rad support cover. At this point we can remove the rad support cover. All right, so, the next step is to remove the four 10-millimeter bolts holding on our grille. Go ahead and grab a 10-millimeter socket and get these removed.All right. At this point, with the bolts removed out of the top of our grille, you can grab the grille itself and pull back straight towards you. All right, next up, now that our grille is removed, we can remove the two bolts holding on the top of our headlight. You may want an extension for this one here, so, grab your extension and a 10-millimeter socket and let's get this removed. And then grab your 10-millimeter socket and remove the other bolt up top on the headlight. All right, so, there is one more bolt that's holding the headlight in, and it's right in between the bumper and the fender. Peel back your wheel well liner and you can get to this bolt. It's a 10 mil, it's right in here. And you don't need to remove this, all you need to do is loosen it so the bracket can slide forward. Grab your 10-millimeter ratcheting wrench or a small ratchet and go ahead and loosen this up.All right. Now that all the bolts are removed and the one in the wheel well is loosened up, go ahead and grab your headlight and wiggle it out. Now that your headlight is removed, you can see this large factory connector. And what we're gonna do is pull back on this tab. This gray tab here. And then press down on the black tab and remove the connector.Noah: So, jumping right into the install, what we need to do is transfer the factory bulbs that came in your old headlight into the new headlight. One of the nice things about this headlight is it just uses all those factory bulbs, and we can transfer them right over. So, what you're gonna find on the new headlight, first of all, is there's these stickers here to keep moisture out during shipping. We're just gonna get rid of those, put them to the side and peel them off just like that. That one didn't peel off too nicely there. Good enough.Now, on the original headlight, all I need to do to unplug these bulbs is just push down on the tab, pull them off just like that. And then this upper one here, you just lift the tab up, put some pressure back, pull it off like that. Once you have those broken free, all we need to do is just rotate them. You'll hear them release. We can lift them right out. And when you're transferring bulbs, it's always a good idea to never touch the bulb with the oils on your fingers, that can ruin the bulb. And I'm just gonna transfer it right over so we don't risk leaving this around on the table and breaking it. So, I'm just gonna drop it right in, line up those feet through the holes, and spin it tight until it stops. Then I can go ahead and plug that one in. So, that's gonna be that connector, that's the same on the other side, which has those two plugs on the side just like that. And then all we're doing on the other one is just doing the same thing, rotating it until it releases, transferring it right over so we don't break it. I'm taking that other plug, plugging that guy right in.So, there we have the low-beam and the high-beam bulb. Now we gotta do the turn signals and the marker lights. So, that's gonna be these guys on the side. They have these two wings, all you need to do is just rotate it like that and pull it out. Now, these are gonna be a little tricky to get out without really touching that bulb too much. You just put your fingers down at the base, put a little pressure out, they pull straight up and out, and all we need to do is just do the reverse of that to put it in, using my fingertips, pushing on the base, not the bulb, just like that. And we can just stick that guy right in where it goes, line it up, spin it tight. And then the exact same process for that upper one here, no big deal. Pull it out. Try not to touch it. [inaudible 00:08:40] where he goes. Drop it in the hole, and then spin it shut.Now that we have all of our bulbs transferred into the new headlight, we're good to go ahead and put the headlight on the truck. Now we're good to go ahead and kinda get this headlight into position a little bit. Before we get too far ahead of ourselves and try to put it in its spot, we're gonna wanna plug it in now while it's accessible. So, there is this large plug right here, at the bottom, the only one we didn't use. Just take that factory harness plug and push it right on there. Now we're good to set the headlight into position. Now, I'm gonna be really careful with this because I don't wanna scratch anything. It needs to fit in pretty precisely. And you're gonna remember that there are these two bolts up at the top but there also is that bolt down here on the side that you saw in the uninstallation. Remember, we need to put that little foot that's attached to the headlight onto that bolt down in the side there. Just take your time, make sure you're not pinching anything. Like, in this case, I just realized that the plug is up against that rad support rail, to make sure that's out of the way, because it's gonna keep you from sliding that headlight into place all the way. Just take your time, don't break anything, make sure everything's lined up okay. Just like that.Now that you got the headlight just about where it's gonna sit, you can hold it in place, you can take one of those 10-millimeter bolts that we took out, put it in by hand on that top bracket there. You're gonna do the same thing for the lower one that's on the face of the headlight. Then I have my 10-millimeter socket on my 3/8 impact ratchet and I'm just gonna zip these guys in. Never finish with the gun, tighten it down like this and get it there. Please don't strip anything out. Make sure your headlight's lined up and pushed back as far as it needs to be, just like that, and take this guy the last bit of the way.Now that we have these two done on the top, I'm gonna take my 10-millimeter ratchet wrench and we're gonna tighten down that bolt on the side of the headlight. I'm just taking that ratchet wrench, 10-millimeter, reaching in there, and I wanna make sure I have the headlight pulled back where it needs to go, up against that fender, just tightening that bolt down. Now that you finished that up, you're good to tuck that fender liner back in behind the bumper.Now that we've got this headlight secured, before we move on to the rest of the install with the grille and putting everything back together, all you need to do to get the other headlight in is just do the exact same process but for the other side. Now that we've got that other headlight into place, we're good to go ahead and put the grille back on. Now, remember, all they are are just some push clips that push in these brackets here on the front of the rad support. So, we're just gonna set it into place, making sure we've got them lined up with where they go. Then really, as simple as that, you just kinda push just like that. All right. Now that we have the grille into place, we do have 4 bolt hole locations here across the top, remember we pulled four 10-millimeter bolts out of those. So, I'm just putting some pressure on the front of the grille to hold it into place. And then, taking my 10-millimeter, my 3/8 impact ratchet, zipping them down. And I'm gonna tighten them by hand. I'm not going too tight because we don't wanna damage the plastic.Now that we have one in, we're good to go ahead and put the other three in because the grille should stay in place where we want it. And then the last one, all the way over here in this corner. Now I'm gonna go ahead and set that top cover over everything.So, I'm just setting this guy right on top here, making sure to line up those holes so we can put our push clips back through. Almost kind of rests nicely in its place, you feel it when it drops in. And I'm just taking my push clips that we took out, putting them back in starting here, on this side. Put them in first, then push the head down like that. Nice and simple. Going all the way across the top. There are quite a few of them. Last one. Now, all you have left to do is make sure you didn't leave any tools under the hood, and you're good to go ahead and close it, and that's install complete.Those were the Axial Headlights With LED Bars, Black Housings, and Clear Lenses for the 2007 to 2013 Silverado. For all things Silverado, remember to keep it right here at americantrucks.com.

      Product Information

      Features, Description, Reviews, Q&A, Specs & Installation

      Features & Specs

      • One-Piece Headlights
      • White LED Daytime Running Light Accents
      • Clear Polycarbonate Lenses
      • Black ABS Plastic Housings
      • Clear Corner Reflectors
      • Multi-faceted Chrome Reflector
      • Reuses Stock Bulbs
      • Simple, Straight Forward Installation
      • Sold as a Pair, Driver and Passenger Side Included
      • Fits 2007-2013 Chevrolet Silverado 1500 Models

      Description

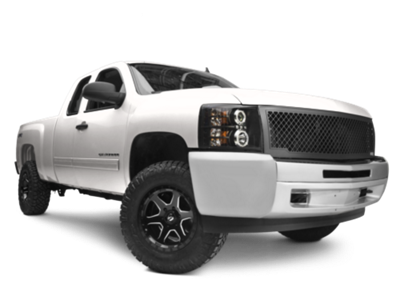
      Improves Appearance and Visibility. Improve the appearance and nighttime driving visibility of your 2007-2013 Chevrolet Silverado 1500 just by replacing your old weathered, worn out, and yellowing factory headlights with a brand new pair of Axial Headlights that feature black housings and clear lenses. With an impressive LED Daytime Running Light (DRL) design, these Headlights will give your Silverado 1500 a whole new look.

      Quality Construction. Manufactured from OEM grade materials, these Headlights are assembled to precise standards for long-lasting quality. These Headlights feature durable, black ABS plastic housings with multi-faceted chromed reflectors, clear polycarbonate lenses, and modern LED lighting. Each housing is weather-sealed to prevent dirt and moisture from harming the state of the art electronics found inside.

      Straight Forward Installation. These Headlights were designed to be a direct plug and play replacement for your vehicle's original factory housings. The DRL light bar portion of the headlight will require splicing into your running lights for operation. Please be sure to have your headlights properly aimed/aligned before driving at night.

      Application. These Axial Headlights with LED Bar; Black Housing; Clear Lens are designed to fit 2007-2013 Chevrolet Silverado 1500 models. Driver and passenger side included. Reuses factory bulbs

      Fitment:

      Raxiom S138003

      CA Residents: WARNING: Cancer and Reproductive Harm - www.P65Warnings.ca.gov

      Installation & What's in the Box

      Installation Info

      What's in the Box

      • (1) Right Hand/Passenger Side Headlight
      • (1) Left Hand/Driver Side Headlight
      4.3

      Customer Reviews (27)

        Questions & Answers

        10 More Questions