FREE 1 to 3-Day Delivery on Orders $149+ Details
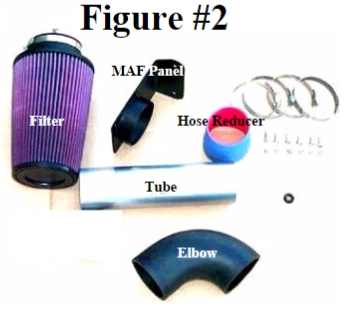
How to Install Airaid Black Classic Performance Cold Air Intake - SynthaFlow Oiled Filter
Installation Time
1 hours
Tools Required
- ½” & 10mm Wrench
- 5/16” Wrench or Nut Driver
- Flat Head & Phillips Screwdriver
Thank you for purchasing the Airaid Intake System. Please read the instruction manual carefully before proceeding with the installation. Contact Airaid @ (800) 498-6951 8:00 AM - 5:00 PM MST weekdays for questions regarding fit or instructions that are not clear to you. Your Airaid Intake System was carefully inspected and packaged. Check that no parts are missing, or were damaged during shipping. If any parts are missing, contact Airaid. The air filter element is protected from direct exposure to water and debris; care should be taken not to drive through deep water. WATER INGESTION IS THE DRIVERS RESPONSIBILTY! The air filter is reusable and should be cleaned using the Airaid Filter Tune-Up Kit periodically.
Thank you for selecting Airaid.
Included with your Airaid Intake System is a sticker with a California Air Resources Board (C.A.R.B.) Executive Order (EO) number. This sticker must be placed in plain view inside of the engine compartment. Failure to do so may prevent you from passing a smog inspection.
Installation Instructions. Read Me!
I) DISCONNECT NEGATIVE (-) BATTERY CABLE.
II) Remove the Factory Air Intake Assembly.
a) Loosen the clamp at the throttle body with a screwdriver.
b) Loosen the clamp at the factory air filter housing.
c) Remove the crankcase breather hose from the air cleaner assembly.
d) Disconnect the air intake temperature sensor wire from the sensor in
the factory air tube.
e) Lift the factory air intake tube out of vehicle.
III) Remove the Factory Air Cleaner Assembly
a) Un-plug the Mass Air Flow (MAF) meter harness from the engine
harness.
b) Remove the factory air cleaner assembly from the engine
compartment. Simply “pull up” to release.
c) Remove and set aside the rubber grommets for the air cleaner mounts.
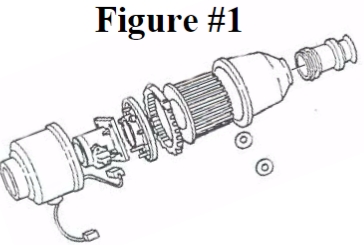
IV) Disassemble Factory Air Box
a) Remove the factory wire loom first, then slide back the grommet on
the MAF sensor wires. See Fig#1
b) Locate the notch on the flat side of the factory air cleaner and pry the
flat side out. Reach in and unplug the MAF harness.
c) Carefully remove the MAF from the flat lid – four 10mm nuts. See
Fig#1
d) The MAF sensor is located inside the factory air box. See Fig#1
V) Assemble & Install the Airaid MAF/Filter Adapter
a) Mount the factory MAF to the black Airaid filter adapter panel with
four nuts, bolts, and washers provided.
b) Plug the MAF wire harness back into place and slide down rubber
weather seal to connector.
c) Mount the black Airaid filter adapter in place of the factory air
cleaner. Use supplied backing plate and two long bolts with two nuts
and four washers.
d) Plug MAF harness back into engine harness.
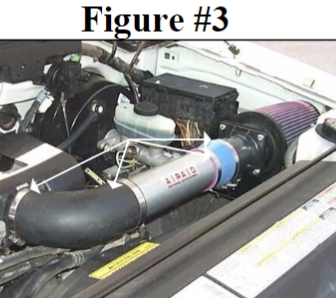
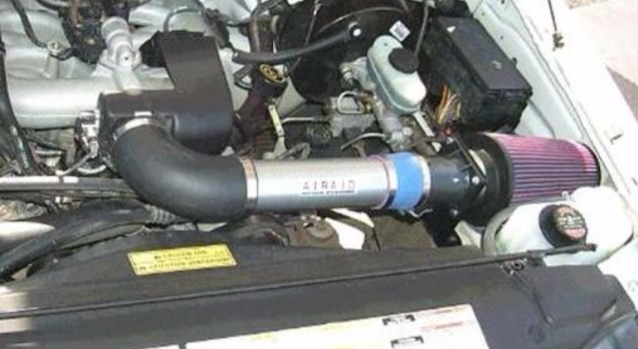
VI) Install the Airaid Intake Tube.
a) Mount the rubber elbow onto the throttle body using the rubber
elbow. See Fig#3
b) Mount the black silicone hose onto the MAF Adapter. See Fig#3
c) Install the 7/16 rubber grommet supplied into the Airaid tube. Then
insert the saved Air Intake Temperature sensor into the grommet.
d) Slip the Airaid tube into the hose ends and secure using the four hose
clamps provided. See Fig#3
e) Install the factory crankcase breather hose into the hole in the rubber
Airaid hose/elbow.
f) Mount the Airaid Premium Filter and tighten clamp. See Fig#3
VII) Finishing Up
a) Check for any foreign objects or debris in the intake path.
b) Reconnect the negative battery cable & double-check your work.