 FREE 1 to 3-Day Delivery on Orders $149+ Details
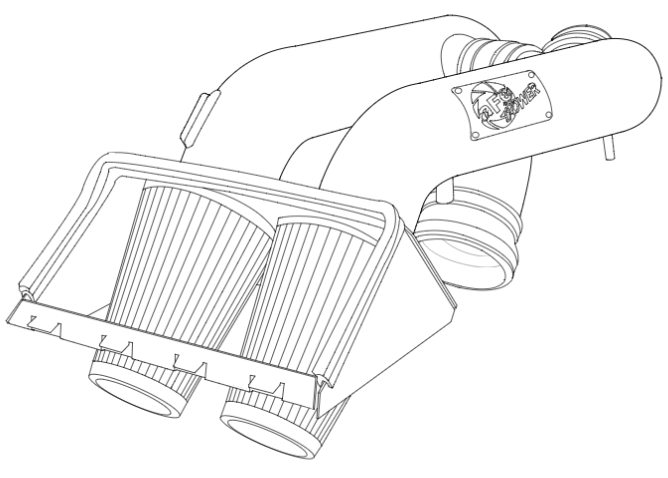
How to Install AFE Magnum Force Stage 2 Pro 5R Cold Air Intake - Black on your F-150

Shop Parts in this Guide
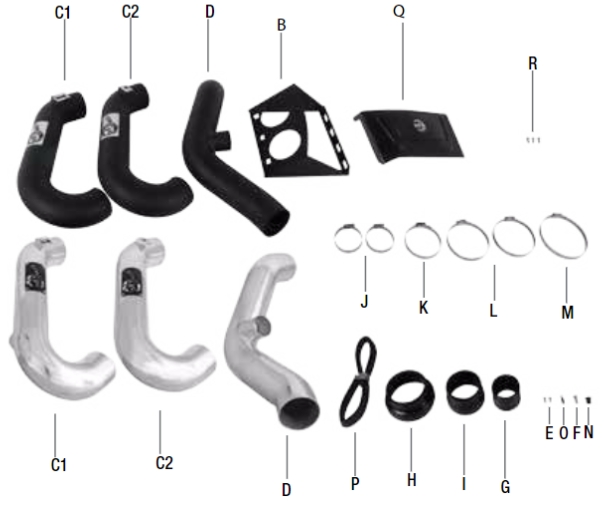
| Label | Qty. | Description | Part Number |
|---|---|---|---|
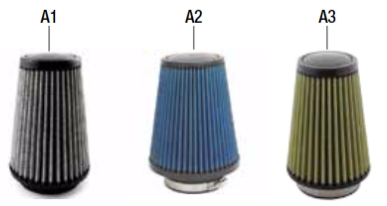
| A1 | 2 | Pro DRY S Air Filter | 21-90069 (Gray Media) (51-12182/192) |
| A2 | 2 | Pro 5R Air Filter | 24-90069 (Blue Media) (54-12182/192) |
| A3 | 2 | Pro-GUARD 7 Air Filter | 72-90069 (Gold Media) (75-12192) |
| B | 1 | Housing | 05-12182B3 |
| C1 | 1 | Tube | 05-12182B1 /P1 (51/54-12182 Only) |
| C2 | 1 | Tube | 05-12192B1 / P1 (51/54/75-12192 Only) |
| D | 1 | Tube | 05-12182B2/P2 |
| E | 2 | Screw, Cheese head | 03-50034 (51/54-12182 Only) |
| F | 1 | Screw, M6 | 03-50052 (51/54/75-12192 Only) |
| G | 1 | Coupling, Straight | 05-01242 |
| H | 1 | Coupling, Reducer | 05-01224 |
| I | 1 | Coupling, Reducer | 05-00636 |
| J | 2 | Clamp #32 | 03-50016 |
| K | 1 | Clamp #52 | 03-50008 |
| L | 2 | Clamp #60 | 03-50002 |
| M | 1 | Clamp #72 | 03-50010 |
| N | 1 | Cap | 03-50119 |
| O | 1 | T-20 Torx | 03-50066 |
| P | 1 | Seal Trim (24.5 Inches) | 05-00072 |
| Q | 1 | Cover | 05-12188-B (54-12193 Only) |
| R | 3 | Screws | 03-50113 (54-12193 Only) |
Installation will require the following tools:
8mm Nut Driver, Flat Head Screwdriver
Note: Legal in California for use on race vehicles only. The use of this device on vehicles used on public
streets or highways is strictly prohibited in California and others states that have adopted California
emission regulations. (51/54-12182, 51/54-12192 and 54-12193 CARB exempt: EO D-550-15)
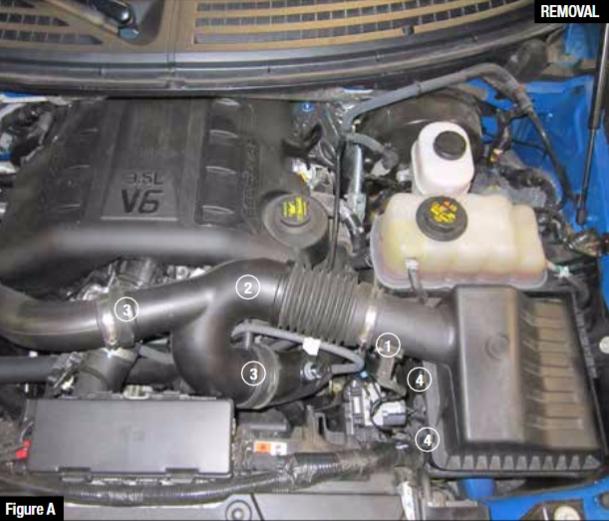
Refer to Figure A for steps 1-5
Step 1: Disconnect the Manifold Air Pressure (MAP) sensor plug from stock air box. 1
Step 2: For 51/54-12182 only unplug the vacuum line from the underside of the OE intake tube. 2
Step 3: Loosen the OE intake clamps using an 8mm nut driver from the left and right side runners. 3
Step 4: Uncalmp the top portion of the OE air box. 4
Step 5: Remove the OE intake and the top portion of the OE air box by pulling straight up and out of the
vehicle.
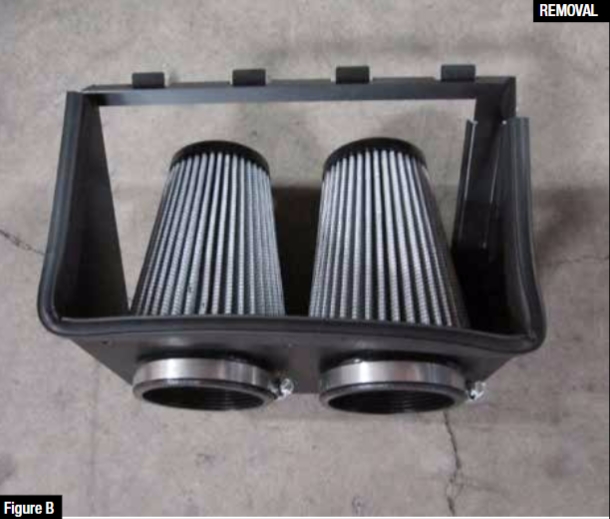
Refer to Figure B for steps 6-8
Step 6: Pre-assemble the aFe housing; insert both aFe filters through the housing.
Step 7: Pre-assemble the filter clamps but do not tighten.
Step 8: Install the seal trim around the edges of the housing.
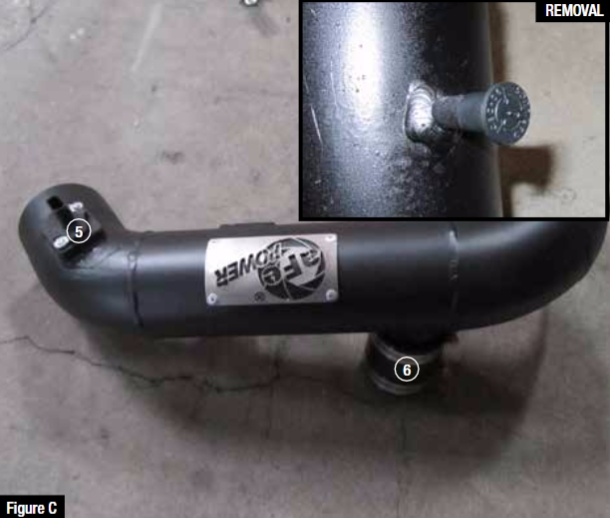
Refer to Figure C for steps 9-11
Step 9: Remove the MAP sensor from the OE intake using the provided T-20 torx bit.
Step 10: Install the MAP sensor on the front aFe intake tube using the provided hardware. 5
Step 11: Install the small straight coupling on the cross over tube, install clamps but do not tighten. 6
For 51/54/75-12192 install the 3/8" vent plug on the rear tube.
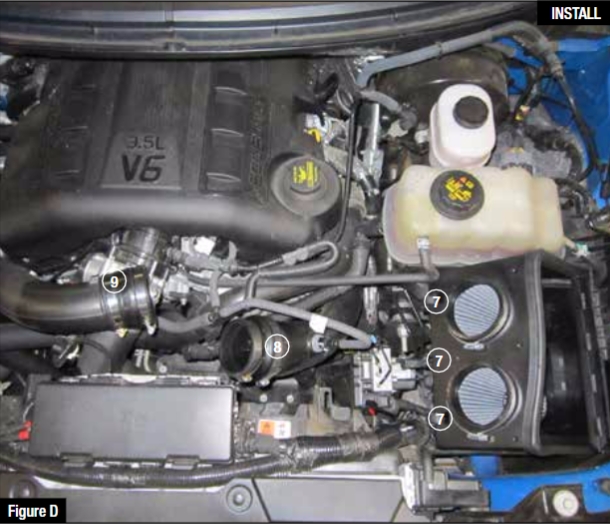
Refer to Figure D for steps 12-14
Step 12: Install the aFe housing on top of the lower portion of the OE housing. Clamp down using factory air box clips. 7
Step 13: Install the larger reduction coupling (05-00612) on the driver side runner. Clamp down but do not tighten. 8
Step 14: Install the smaller reduction coupling (05-00636) on the passenger side runner. Clamp down but do not tighten. 9
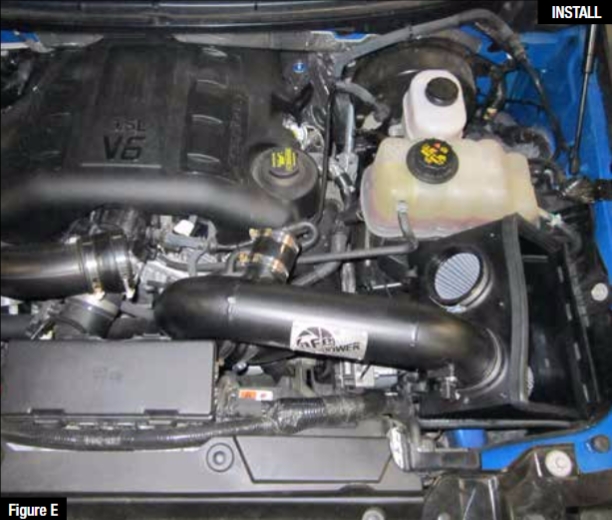
Refer to Figure E for step 15
Step 15: Install the front aFe intake tube with the MAP sensor. (Slide into coupler side before installing the filter side). Do not tighten clamps.
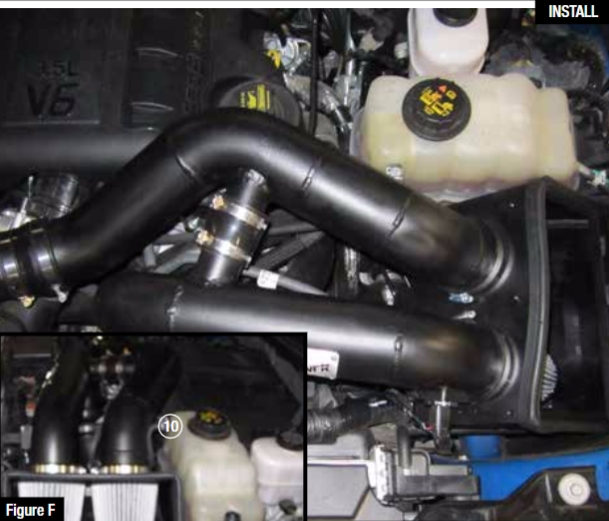
Refer to Figure F for steps 16-18
Step 16: Install the rear aFe intake tube. (First install into coupler side before installing the filter side). Do not tighten clamps.
Step 17: Slide the small straight coupling from the front aFe intake tube to the rear cross over tube.
Step 18: Adjust both intake tubes if needed then tighten down all clamps with an 8mm nut driver.
Note: If there is contact with the coolant reservoir vent hose, this hose can be trimmed 1/4" for
extra clearance. Reconnect after trimming. 10
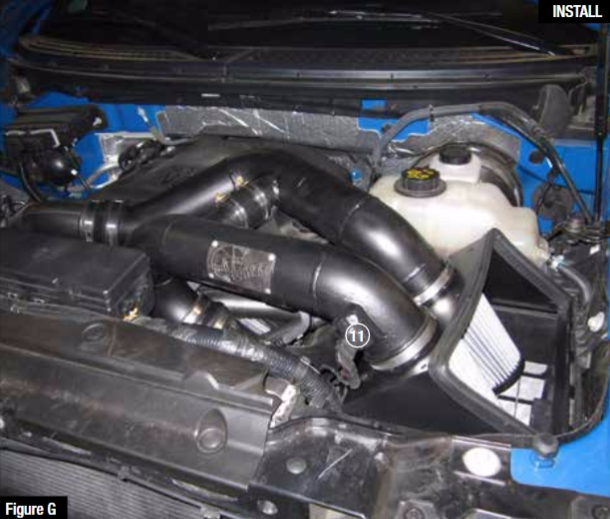
Refer to Figure G for steps 19-20
Step 19: For 51/54/12182 reconnect the vacuum line to the rear aFe intake tube.
Step 20: Reconnect the MAP sensor harness. 11
NOTE: Retighten all connections after approximately 100-200 miles.
Place enclosed CARB EO sticker on or near the device on a smooth, clean surface.
EO identification label is required to pass smog inspection, (51/54-12182, 51/54-12192 and 54-12193
CARB exempt: EO D-550-15)
Warranty
General Terms:
• aFe warrants their products to be free from manufacturer’s defects due to workmanship and material.
• This warranty applies only to the original purchaser of the product and is non-transferrable.
• Proof of purchase of the aFe product is required for all warranty claims.
• Warranty is valid provided aFe instructions for installation and/or cleaning were properly followed.
• Proper maintenance with regular inspections of product is required to insure warranty coverage.
• Damage due to improper installation, abuse, unauthorized repair or alteration is not warranted.
• Incidental or consequential damages or cost, including installation and removal of part, incurred due to failure of aFe
product is not covered under this warranty.
• All warranty is limited to the repair and/or replacement of the aFe part. To request Return Goods Authorization
(“RGA”), email [email protected] or call (951)493-7100. Upon receipt of the RGA, you must return the product
to the address provided in the RGA, freight prepaid and accompanied with a dated proof of purchase and the RGA.
Upon receipt of the defective product and upon verification of proof of purchase, aFe will either repair or replace the
defective product within a reasonable time, not to exceed thirty days.

