 FREE 1 to 3-Day Delivery on Orders $149+ Details
How to Install Addictive Desert Designs Venom Front Bumper w/ Winch Mount (10-14 Raptor) on your Ford F-150
Tools Required
- Ratchet
- 3/4” Socket and Wrench
- 7/16” Socket and Wrench
- 21mm Socket
- 15mm Socket
- 10mm Socket
- Drill
- 5/8” Drill Bit
PREPARATION
1. Disconnect the negative terminal on the battery. Park the vehicle on level ground and set the emergency brake.
2. We recommend reading through the installation instructions in whole before performing the work.
3. You will need the following tools:
a. Ratchet
b. 3/4” Socket and Wrench
c. 7/16” Socket and Wrench
d. 21mm Socket
e. 15mm Socket
f. 10mm Socket
g. Drill
h. 5/8” Drill Bit
Note: this installation requires 2 people for best results
4. Included in Kit:
6 – Hex Head Bolts – 1/2”-13 x 1 1/2”
12 – Flat Washers – 1/2”
6 – Nylon Locking Nuts – 1/2”-13
2 – Aluminum Valance Brackets
2 – Hex Head Bolts – 1/4”-20 x 1 1/4”
4 – Flat Washers – 1/4”
2 – Nylon Locking Nuts – 1/4”-20
REMOVAL
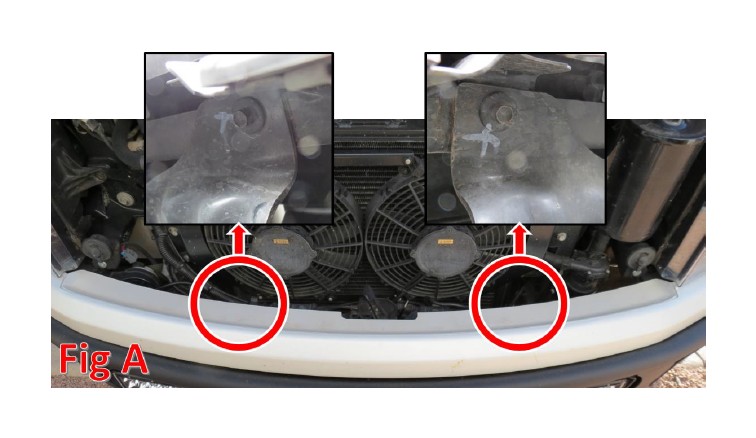
1. With the hood popped, come from the top and remove the two 10mm bolts that are on the backside of the top (painted) part of the bumper. The locations of the bolts are circled in Fig A. The bolt heads are faced towards the rear of the truck.
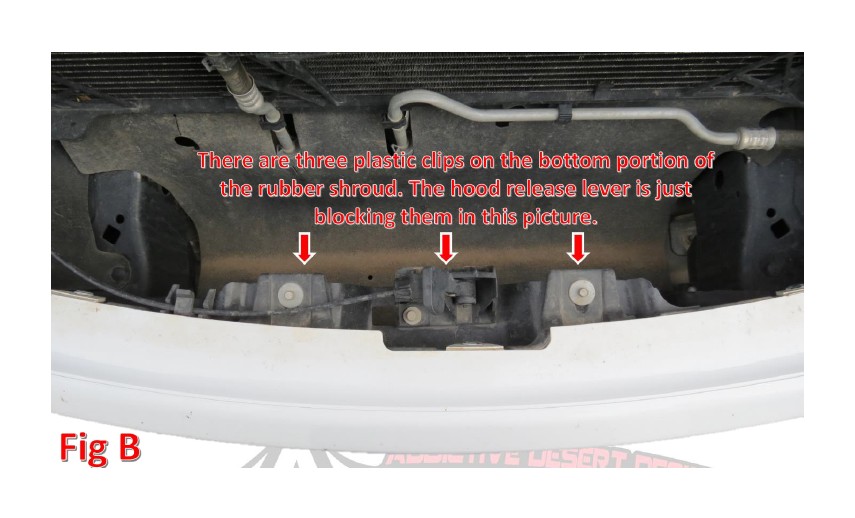
2. From the top, remove the three plastic clips holding the bottom portion of the rubber shroud to the front bumper. (Fig B)
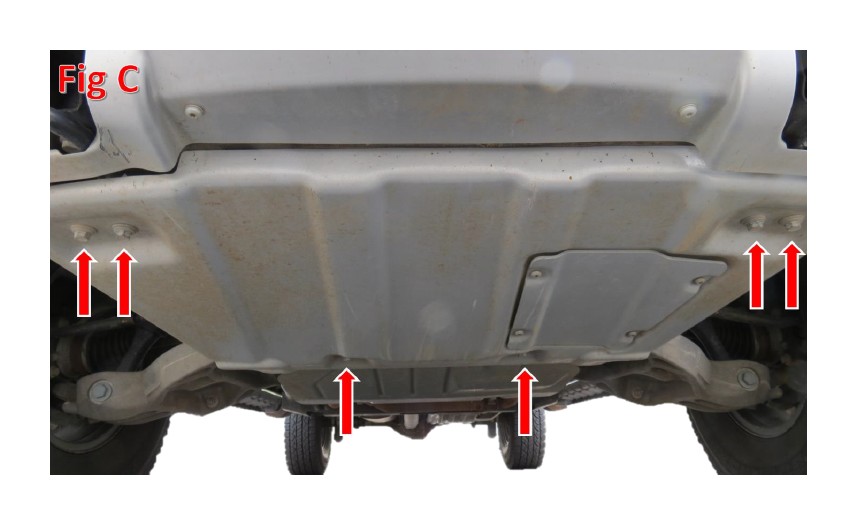
3. From the bottom, remove the 15mm bolts (x6) that hold on the front skid plate and remove this plate. There are two bolts under each tow hook. The remaining two bolts are located at the rear of the front skid plate. (Fig C) Save two of these bolts for reuse.
4. From the bottom, remove any fog light connectors if your vehicle is equipped with fog lights.
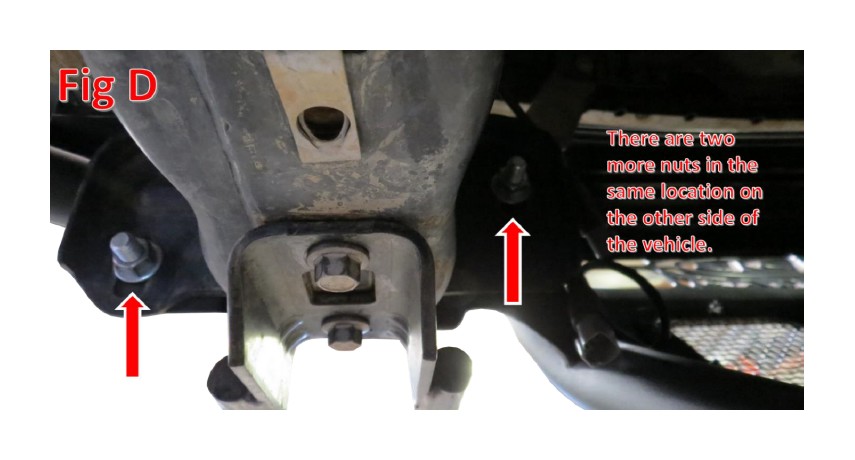
5. From the bottom, remove the four 21mm nuts on the back side of the mounts that hold the bumper to the frame horns. There are two per side. (Fig D)
6. Your bumper is ready to be removed, and you are ready to install your new ADD Front Bumper.
INSTALLATION
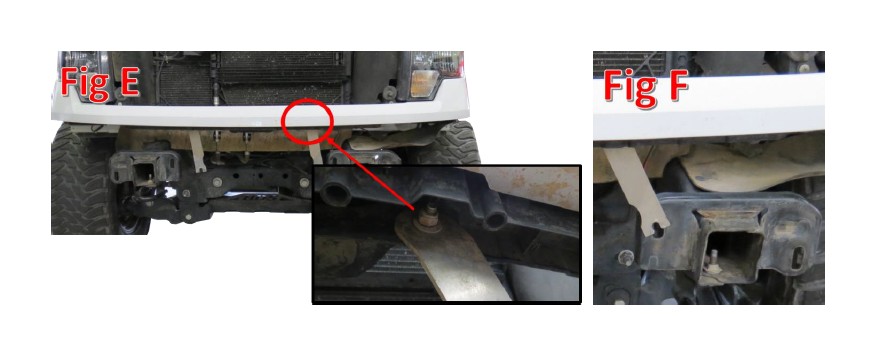
1. First, Install the Aluminum Valance Brackets.
a. There are 2 holes that are now empty after the stock bumper removal that will be used to hold the top half of the Valance Brackets.
b. Push the ¼” Hex Head bolt with a ¼” Flat Washer through the once empty hole referred to in Fig E as well as the top hole of the Valance Bracket. We arrange them so that the valance bracket sits behind the valance, as shown in Fig E.
c. Install a ¼” Flat Washer and a ¼” Nylon Locking Nut on the bolt once it is pushed through. Leave these bolts finger tight for now.
d. Make sure the cutout faces towards the center of the truck, and also ensure the Brackets are positioned so that they will be sandwiched by the bumper mounting bolts as the bumper is installed. (Fig F)
2. Install any lights on your bumper at this time using the Light Manufacturers Installation Instructions.
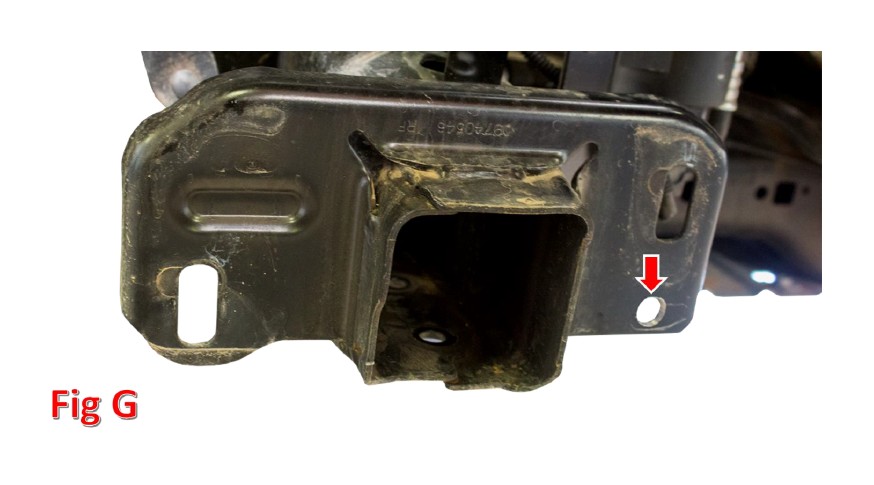
3. IF YOUR BUMPER HAS A WINCH MOUNT, THIS STEP IS HIGHLY RECOMMENDED, BUT STILL OPTIONAL. You may drill out another hole in each of your frame horns to allow for the use of 6 mounting bolts. Use your bumper’s mounting plate as a guide to mark for the remaining holes to be drilled. We recommend using a 5/8” Drill Bit. We have provided the extra bolts. Refer to Fig G.
4. Install your ADD Bumper onto your truck.
a. Line the Mounting Holes in the front bumper up with the Mounting Holes in the front frame horns of the truck (Fig H). Use the supplied ½” Bolts (Either 4 or 6), ½” Washers (8 or 12), and ½” Nylon Locking Nuts (4 or 6) to hold the bumper in place (Leave these finger tight for now). Be sure the Valance Brackets have been sandwiched between the mounting bolts and the bumper (Fig I).
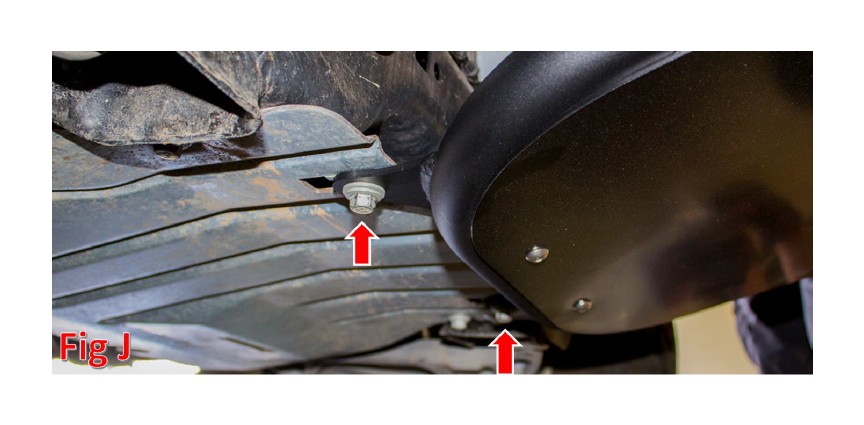
b. Secure the lower bumper tabs to the skid plate holes they line up with using the bolts you saved in Removal Step 3. Leave these bolts loose for now. (Fig J)
c. Line the bumper up so that it sits straight and lines up with the valance (This is where a second person might be necessary), then tighten all the mounting bolts except the ones that sandwich the valance brackets to 70 foot pounds.
d. Line the valance up for the final time so that it looks straight with the top of the bumper, then tighten the two inner bumper mounting bolts (that also hold the valance supports in place) to 70 foot pounds. (Fig I)
e. Tighten the top Valance Bracket bolts (x2) that you installed in Installation Step 1 to 10 foot pounds.
f. Tighten the bottom two skid plate bolts to the manufacturer’s torque specification.

5. Stand back and enjoy your new ADD Venom Front Bumper.
6. Check and re-tighten if needed, all mounting bolts after 100 miles and periodically thereafter.


