Talk to a Ram 1500 Sales Tech
1-888-706-1096
M-F 8:30A-11P, Sat-Sun 8:30A-9P
$20K Sweeps! 10 Chances to Win! Enter Daily >

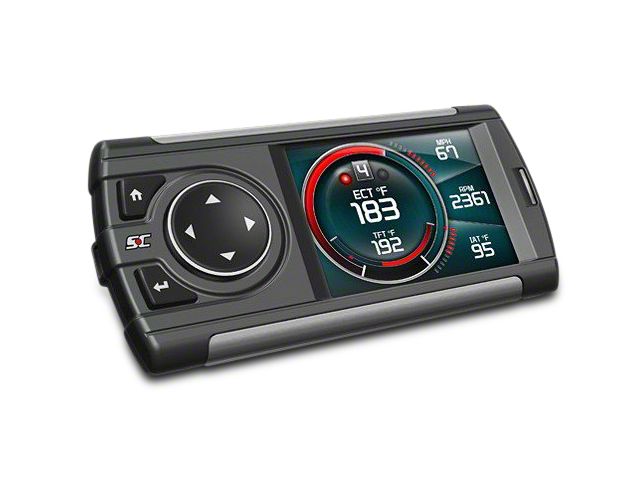
Superchips Dashpaq In-Cabin Controller Tuner (09-14 5.7L RAM 1500)

Item R01G09-57
AmericanTrucks no longer carries the Superchips Dashpaq In-Cabin Controller Tuner (09-14 5.7L RAM 1500). Please check out 2002-2008 Dodge Ram 1500 Performance Chips & Tuners for an updated selection.
Verify parts fit and get product recommendations.
Ram 1500 Sales Techs: Connect Now M-F 8:30A-11P, Sat-Sun 8:30A-9P
$0.00

    Product Videos

    So, if you own an '09 to '14 5.7-liter powered Ram, and you're looking for one of the tuners that includes the most tunes and most features of all the available options, you should be checking out the Dashpaq in-cabin controller tuner from Superchips. Now, yes, this one is more expensive than the other options available on the page if you've been looking. However, this one comes with a total of five tunes, whereas most others only come with three pre-loaded tunes. One of the other reasons why I really like the in-cabin controller tuner is because you can customize those pre-loaded tunes. So if you're familiar with doing any Dyno or speed shop work or familiar with changing air and fuel mixtures, you can squeeze even more horsepower out of this device without needing an actual custom tune. One of the other reasons why I really like this device is because on top of the real-time data logging and the gauges and all that other cool stuff, this thing will actually benchmark your truck. You can record 0 to 60 times as well as quarter-mile times. And even though it might not be as accurate as a Dyno, it will actually provide pretty accurate horsepower and torque numbers once calibrated properly. Now, if you were curious about what kind of performance you could expect, well, we actually ran our truck on the Dyno bone stock, and it made 290 horsepower and 273 pound-feet of torque. We then installed the 91 octane performance tune available on this device and our truck made 306 horsepower and 305 pound-feet torque. That makes for peak gains of 16 horsepower and 32 pound-feet torque. But if you look at the graph, you get some really nice curve gains all the way from idle to redline. Those curve gains are really nice because that's what you'll feel when you're driving around on the streets. Now, besides numbers and performance gains, the Dashpaq does offer some other features that many other tuners do not. Besides data logging and the ability to read and clear trouble codes, this thing does stand out because it provides you with the opportunity to record your 0 to 60 times and your quarter-mile times. It's pretty cool and it's pretty easy to use and there are a ton of other available features on this device. So if you like those performance gains you like the way this device looks, and I'm personally a fan with the layout, you should stick around. I'm going to show you how to use this device and tune your truck from start to finish. It's not really an install, but if I had to give it a difficulty rating, it'd be very a soft one out of three wrenches on my difficulty meter, shouldn't take us more than 15 minutes to go through everything. So without further ado, let's go ahead and get started. So setting up the Dashpaq for use is pretty straightforward. You're going to grab the tuner itself and the provided cable, plug the HDMI end on the back of the tuner, and then set it up in your windshield mount. Once you've done that, you're going to plug in the OBD-II cable into the OBD-II port. In the case of the Ram, it's located directly underneath and to the left of the hood release latch.All right, once you've got the Dashpaq plugged in and set up, you're gonna go ahead and click Okay to the safety disclaimer. Once you've done that, it's gonna let you know it's going to pop up that annoying, little disclaimer a couple more times and then it's going to bring you to the main screen. If this is the first time using the Dashpaq, you want to select the appropriate vehicle make. Obviously, we're working with our Dodge Ram so we want to select Chrysler and Dodge. It's going to ask you to confirm that the ignition is in the on position, that way the Dashpaq is properly connected to the ECU. Once you've made sure that your ignition is on, go ahead and click Okay. Now once the Dashpaq has connected to your ECU and it's recognized your vehicle, it's going to ask you to select whether or not your vehicle is equipped with a manual transmission. Obviously, on our Ram 1500, it does not. So, we're going to select the home button for now. Now once the device is fully connected to the ECU, it's gonna bring you to the home screen which, in this case, is the gauge screen. You can see here, you have one primary tachometer-style gauge displaying some basic engine information and you have some available gauges on the right-hand side in a numeric value. You can actually change the layout of the gauge screen and you can select different parameters for each of these gauges to monitor. To do that, you're going to navigate each of the gauges using the arrow keys, it's gonna allow to change the layout of the screen itself as you can see. And if you want to actually select a different parameter on any of the gauges, you're going to select the Okay button which in this case looks like the return icon so go ahead and click that. It's going to let you highlight one of the available gauges. You can navigate between all the available gauges and you can change those gauges to your liking. Let's go ahead and change this temperature gauge to something else. It's gonna bring you to a option dropdown here. It's going to make some changes to gauge information, you can set alerts, and you can view the PID information which is basically just information about the gauge that you have currently selected. But if you want to select a new gauge, pretty straightforward, go ahead and click on Select new PID.Once you've done that, it's going to bring up all the available gauges that you can monitor in real time while driving around. We're going to use our air intake temperature sensor. Once you've selected that, you can click Exit menu and it's going to display that new gauge. And again, if you want to change any of the other gauges, go ahead and click the Okay button to highlight them. Go back into the drop-down menu to Select new PID. And again, you can change any of those different options. We're going to select a torque monitor. And you can see that that new value is being displayed on the gauge. Now, let's go ahead and get into the actual main screen of the device itself. To do that, you're going to select the home button. First things first, we're gonna go over programming, AKA tuning your truck. That's what everybody wants to see, right? So, if we want to load a new tune on our truck, let's go ahead and select Programming.There are a couple available tunes on this device. One's for towing. One's for economy. One is a basic 87 octane tune for regular pump gas. And if you want to up the octane to 91 or 93, you can do so. We're going to select a middle of the road performance 91 octane tune since our truck currently has 91 octane fuel in it for the Dyno. It's going to ask you to confirm that this is the tune that you want. Go ahead and click the Okay button. And it's going to begin the tune installation process. First, it's going to save a stock ECU file. This is a fail-safe in case anything happens during the tuning process and if you ever want to revert your truck back to stock, the Dashpaq will use this saved file to revert your truck back to a stock configuration. While it's loading all this and saving all this information, it's very important that you do not unplug the device. You also do not want to turn your key to the off positionNow, once the device has saved your stock file, it's ready to install your new tune. It's going to bring you to this screen where it's going to ask you if you want to program a custom tune. There are a lot of parameters that you can adjust but you should not make any adjustments to those parameters unless you are familiar with how to actually adjust the ECU itself. If you make any adjustments that are not safe for the truck, you could actually cause some damage to your drivetrain. We're only interested in what the pre-loaded tune can offer so we're going to click the home screen for no. Once you've opted out of the custom tuning option, it's going to begin building the tune file. Once it's finished building the file, it's going to install it. Now, once it's begun installing the tune file, it's going to ask you to cycle through the ignition occasionally. Just follow the on-screen instructions, turn the ignition off, press the Enter button to continue the install. Now, once it's asked you to turn the ignition off and it's done some work, its gonna ask you to turn the ignition back on to continue.Now, once the tuner has finished installing the file, it's going to quickly clear any diagnostic trouble codes that might have been tripped falsely. Once it's done so, it's going to give you that little confirmation screen saying programming is complete. Once the tune has been successfully installed, it's going to bring you back to the tune drop-down options and it's going to confirm what your tune level is in the top up to the screen right here. You can see it says current level 4. In that case, that's our 91 octane performance tune. To exit out of the tuning screen, simply click the home button. Now, once you click the home button again, it's going to bring you back to your gauges. If you want to go back to the drop-down menu, click the home button once again. Now, if you want to change the gauge layout in more detail, you can do so from the main menu. To do that, simply select the screen layout function and click Okay.It's gonna allow you to change the background on the device itself. They decided to throw in some cool little backgrounds. We're going to keep ours the same for now. The functions that matter most for the gauges are layout 1 and layout 2. As you saw earlier on the gauge screen, you have one primary gauge and you have a few secondary gauges that are smaller. You can actually change the layout of all those gauges using layout 1 and layout 2. We've already made some changes to ours. We've selected digital for both. If you want to change either of those, you have the options here. You can set the master gauge with secondary gauges. You can change all the gauges to digital ones. You can make them retro gauges that look like tachometers and you can select needle gauges, which are a more visual representation of the data being displayed. We're going to keep ours as digital gauges because they are the easiest to read. Once you've made those changes, simply press the home button again and it's going to bring you to the new gauge screen. You can see here, we have all digital gauges now. The functions for the gauges remain the same. If you want to change any of them, simply select the Okay button to highlight any of them and you can select any new gauges to your liking.Now, staying on the topic of gauges a little bit longer, if you want to view any of the last recorded data from your gauges and you're no longer driving, you can do so using the records function. To view those, simply click the Okay button. It's going to show you the last values that were recorded when you were driving. If you want to clear those records, simply select Clear all. Ours, obviously, are already at their default values because we have not driven around at all. Now, the next function on the Dashpaq is pretty cool, it's the performance tests. This allows you to benchmark your truck using different measurements. So you can record your 0 to 60 time and also record your quarter-mile time. And it is pretty fairly accurate from what I've seen, you can actually record horsepower across your power band. To select any of these tests, simply click the Okay button. Now, we can't actually run any of these tests at the moment. However, if you are on the open road, you can simply select the test, follow the instructions on the screen, and when the device it is ready, you just simply mash the pedal and it will record those values once you've hit the appropriate distance.Now, next function available is data logging. Data logging is very useful for troubleshooting your truck or if you want to make it any changes to the parameters on the pre-loaded tunes, this will allow you to optimize your truck. The data logs will be saved on the device itself. You cannot view them on the device. However, once you're done data logging, you can plug the device into your computer and you can download those data log files. If you want to save a file, you're going to simply select one of the available save slots and select Okay. Once you've done so, it's going to let you know the data logging will begin when you go back to the gauge display. Simply select enter to continue. And you can see that we now have one of our save files on. Once you're done driving and you have turned off the device or you have left the gauge screen, it will automatically stop data logging for you. And again, you can save that file and download it on your computer for later use. Another cool function of the Dashpaq is the ability to read and clear trouble codes. If you ever get a check engine light, you've probably brought your truck to the shop to have them scan it. You no longer have to do that. You can actually do that using the Dashpaq. To do that, it's going to bring you to this trouble codes option under diagnostics. Simply click Okay. It's going to allow you to read those diagnostic trouble codes. Select the function to view the codes that you might have on your dash. Now, our truck is running perfectly fine so we do not have any codes currently. However, if you did have any check engine lights or any other lights on your dash, it would display the code on here. Basically, you can pop that code into Google or ALLDATA if you have the subscription and it'll tell you what the issue is. If you want to turn the light off on the dash, you can select Clear DTCs. Now, if you do not actually remove the mechanical issue underlying that code, it will probably turn the light back on shortly after. It's going to let you know that the engine cannot be running while you're clearing the code so make sure your key is in the on position and select Okay. The device will clear all the diagnostic trouble codes and the lights on your dash should turn off. Once it's cleared all those codes, it's gonna let you know that those codes have been cleared successfully. Another cool function of the Dashpaq is the Mileage Coach. This is a pretty cool way to track the cost of your fuel consumption as well as your overall fuel economy. Your truck might be equipped with a fuel economy gauge, however, that gauge really only displays your average MPGs and your mileage range. Mileage Coach takes it a step further. Basically, the Mileage Coach is going to use your average MPG values in order to determine the cost of your driving habits. This is a nice way for you to optimize your driving habits, if you will, and it's going to allow you to save some money at the pump as you continue to use the Mileage Coach. To get into the Mileage Coach, go ahead and click Okay on this little disclaimer screen. Before you do that, it's going to let you know that you need to input your average MPGs manually. Now, once you've entered the Mileage Coach screen, you can go ahead and enter your last MPGs. We already set ours to 3 MPGs because we like to drive our truck hard. Once you've input that, you can also select your trip odometer for the amount of miles that you've driven. And you can also input your fuel price, that's going to lie to calculate your mileage costs and your trip costs. It's pretty simple function, but it's a nice way for the device to do the math so that you don't have to. Now the next vehicle function that the Dashpaq offers is Maintenance Manager. I've never actually seen this on any other tuners and this is a pretty cool way for you to make sure you're staying up on general maintenance on your truck. First things first, you're going to change the Maintenance Manager on, then you're going to select maintenance items. There are a bunch of different options on here. Basically, the Dashpaq is going to remind you when it's time to do any of the listed maintenance items. Obviously, changing the oil is one of the most critical and most common, so we're going to select that Maintenance Manager alert. Go ahead and click Okay. It's going to bring you to the screen for that maintenance item. You're going to change the alert so that it is on. You can also select the interval at which you want to receive the alert. Let's go average with conventional oil and we're going to say 4000 miles.All you need to do is select the alert and the interval. Once you've done so, select Exit menu and we're going to go back to the Maintenance Manager screen, and we're going to input our current odometer reading. Now, once you've input your current odometer reading, the device will automatically calculate when it is time for you to do the next maintenance item as long as the alert is on. So, now that we've set up our change oil alert, we will get an alert on the device at 44,000 miles. There are a bunch of other maintenance items that you can select, as you can see from the drop-down option here. We're not going to get into too much detail with each one. It's pretty self-explanatory. Now, that we've gone over all the vehicle features and functions, we're going to quickly go over the Dashpaq's device settings. Go ahead and click Okay to enter the settings screen. First option is Alert settings, this basically allows you to make changes when you get alerts on the device itself. Specifically, I'm referring to the Maintenance Manager alerts as well as any alerts you might select on the gauge screen. It's gonna let you know that alerts are on since we did select one of our maintenance items and you can select alert options for any of the other values that you want an alert to trigger for. Again, there are many options listed here so we're not going to go into too much detail for each one. But basically, you can select a value for each of these listed options. Once the device measures one of those values and goes past that threshold, it will give you an alert. Now, besides individual alert settings, you can change the sound duration for the alert itself. If you select this option, it's going to let you decide how long you want the alert to beep at you for. We're gonna keep ours default and say three seconds. Now, besides alert settings, there are some other settings for the device itself. You can change the backlight auto dim on the device for when you're driving at night, or if you don't want the screen to be very bright. You also change the background color and you can change how long you want the device to idle with the screen on before the screen turns off automatically. Besides that, you can also input vehicle weight. This might be important for certain measurements, parameters or gauges. You can also select units, depending on whether you want to see English units or metric units. Now, the most important feature on the settings screen is the factory reset. The factory reset is going to erase any changes and any inputs you've made on the device itself. We're not going to reset everything that we've just done. But just know if you want to return the device to a factory setting with no inputs whatsoever, you can simply select factory reset and it'll undo everything for you.And last but not least, we have the help functions. I'm not going to get into too much detail on the help functions. You're really only going to need this information if you ever have issues with your device or with the tunes themselves. It's going to provide some basic product info for the device including firmware, hardware versions, and serial number. It's also going to give you some basic vehicle info including your VIN as well as the ID number for your PCM or ECU. It's gonna give you the contact information for Superchips if you ever run into any problems. And last but not least, you have tech support tools. You'll really only ever need to go in here if tech support from Superchips requests you to do so. So, as you can see, the Dashpaq is very user-friendly, makes tuning your truck a breeze, you do get some pretty good performance gains out of it even still. And that also wraps up my review of the Dashpaq in-cabin controller tuner from Superchips fitting your '09 to '14 Ram 1500. I'm Travis. Thanks for watching. For all things Ram, keep it right here at americantrucks.com.

    Product Information

    Features, Description, Reviews, Q&A, Specs & Installation

    Features

    • Full Color High Definition Screen
    • Easy-to-Use Graphic Interface
    • Pre-Configured SuperChips Tunes
    • Includes Performance, Tow and Economy Tunes
    • Improves Horsepower, Torque, Overall Performance, and More
    • In-Cab Monitoring with Digital Gauges
    • Data Acquisition
    • Reads/Clears DTC Trouble Codes
    • Alerts and Records
    • Performance Tests
    • Compatible with Expandable Accessory System (EAS)
    • Internet Updateable
    • CARB EO Number: D-330-22
    • Fits 2009-2014 5.7L Dodge RAM Models

    Description

    Increase Horsepower and Torque. When your 2009-2014 RAM rolled off the assembly line, Dodge programmed the truck to cater to the needs of a daily driver and not a performance enthusiast. After loading one of Superchips pre-configured strategy tunes, even a bone stock, unmodified 5.7L RAM will experience gains in Fuel Economy, Horsepower, Torque and Towing Performance. The Dashpaq includes SuperChips own Performance, Towing and Economy Tunes to get the most out of your Dodge RAM.

    In-Cab Monitoring. With a full color high definition screen, the Dashpaq will allow you to keep a close eye on critical engine parameters. By simply plugging the supplied connector into the OBD2 port below the steering wheel, you will be able to read your vehicles data in real time. With the Dashpaq you can monitor parameters such as coolant temperature, air intake temperature (AIT), spark timing, battery voltage, throttle position and much more.

    Diagnostics. The Superchips Dashpaq can also be used as a diagnostic code reader. Save yourself hundreds of dollars each year by reading and clearing your own computer codes rather than paying a dealer to do the same. Its as easy as a few simple steps.

    Internet Updateable. This Dashpaq In-Cabin Controller Tuner includes a USB cable to enable quick updates or upgrades over the internet. It is recommended to update your Dashpaq before installation to ensure you have the latest software updates and calibration files. Updates are available through Superchips.

    Easy to Load; Easy to Restore. When you load a Superchips Pre-Configured Strategy Tune on your Dodge RAM, the tuner automatically stores your vehicle's factory settings. To return the vehicle to its factory settings, just plug the tuner back in, select the option to restore the factory settings, and you're done.

    Limited Warranty. Superchips is confident in the quality of their device and tunes, they back it with a 2 Year Limited Powertrain Warranty. You will have the reassurance that when you purchase this device, your Dodge RAM and device will be protected by Superchips. Some exclusions apply, please see manufacturer's warranty for full details.

    Adjustable Parameters. The Superchips Dashpaq Tuner features end user adjustable parameters so you can customize the tune and maximize the performance of custom modifications you've made to your Dodge RAM. These parameters can be adjusted on the Superchips Dashpaq Tunes and/or the stock tune. Please note not all adjustments are available on all models/vehicles.
    • Calibrate Speedo for Gear Ratio
    • Calibrate Speedo for Tire Size: 22.5"-42"
    • Shift Points
    • Shift Firmness
    • Rev Limiter
    • Speed Limiter

    CARB Certified. Best of all, this Superchips Dashpaq In-Cabin Controller Tuner is 50-state smog legal under Carb EO# D-330-22. This makes the Superchips Dashpaq Tuner legal for use in California or any other state adopting California emission standards.

    Application. This Superchips Dashpaq In-Cabin Controller Tuner is designed for use on 2009-2014 Dodge RAM models equipped with the 5.7L engine.

    Shop All Truck Parts And Accessories

    Shop All Truck Tuners

    CA Residents: WARNING: Cancer and Reproductive Harm - www.P65Warnings.ca.gov

    Installation & What's in the Box

    Installation Info

    What's in the Box

    • (1) Dashpaq Tuner
    • (1) USB Cable
    • (1) ODBII Cable
    • (1) Mount
    • Instructions
    4.4

    Customer Reviews (71)

      Questions & Answers

      10 More Questions

          Related Ram 1500 Categories