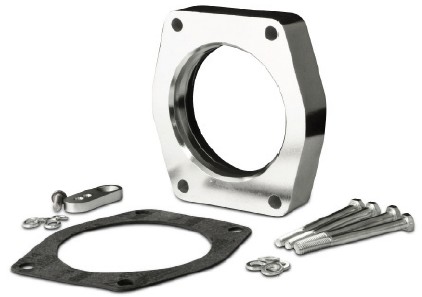
How to Install Spectre Throttle Body Injection Spacer on your Sierra

Parts List
1 - Spectre Power Plate
1 - 1” Extension bracket
4 - M6-1.0 x 70mm hex bolts
4 - M6 flat washers
4 - M6 lock washers
1 - M6 flat screw
1 - Gasket
Step 1
Disconnect the negative battery cable.
Step 2
Remove the engine cover.
Step 3
Separate the upper radiator hose clip from the intake tube. Remove the breather tube on the back of the intake assembly. Loosen the hose clamps securing the intake tube to the throttle body and Mass Air Flow Sensor (MAFS). There is a ball stud on the intake manifold supporting the rear of the intake assembly. Lift the intake assembly off of this stud and remove the assembly.
Step 4
Remove the two 10mm bolts & two 10mm nuts which secure the throttle body to the intake manifold. Leave the wiring harness connected, and move the throttle body off to the side.
Step 5
Using a 4mm socket, remove the two studs that previously held the throttle body to the intake manifold.
Step 6
Using the supplied bolts, washers, and gaskets, install the Spectre Power Plate. Make sure that the surface marked “11256” is facing the throttle body. The factory O-ring on the intake manifold will be reused. Place the supplied gasket between the Power Plate and the throttle body. Ensure that the throttle operates freely and that the blade doesn’t make contact with the Power Plate before fully tightening the bolts. Torque the bolts to factory specifications – Do Not Over-Tighten.
Step 7
The ball stud (from step 3) must be relocated. Remove it from the intake manifold and install the supplied 1” extension bracket using the supplied M6 flat screw. Position the bracket so it is pointing toward the radiator. Reinstall the ball stud into the forward hole in the extension bracket.
Step 8
Reinstall the intake assembly by placing it over the throttle body, MAFS, and the ball stud. If necessary, loosen the flat screw securing the extension bracket to allow the ball stud to be repositioned to accept the grommet on the intake assembly. Once it’s been positioned in the proper position, fully tighten the flat screw.
Step 9
Fully tighten the clamps securing the intake assembly to the throttle body and MAFS. Reinstall the breather tube on the back of the intake assembly.
Step 10
Install the C.A.R.B. exemption label near the factory emissions label.
Step 11
Reconnect the negative battery cable.
Step 12
Start the engine and let the vehicle warm up. Shut the vehicle off and recheck your installation, making sure that all bolts and hose clamps are fully tightened.


