 FREE 1 to 3-Day Delivery on Orders $149+ Details
How to Install N-Fab Wheel 2 Wheel Bed Access Nerf Side Steps - Gloss Black on your Ram

Shop Parts in this Guide
Hardware Kit Contains
(14) 3/8" x 1" Hex Bolts
(14) 3/8" Washers
(14) 3/8" Threaded Clips
PLEASE READ EACH STEP THOROUGHLY BEFORE INSTALLATION
Step 1: Locate the driver's side Nerf Step by matching the shorter tail bend to the front of the vehicle.
NOTE: Some models have a straight cut end with a cap; on these models the capped end goes to the rear of the vehicle.
Step 2 Beginning with the driver's side; locate the six sets factory mounting hex holes (3 on each side of the vehicle). These are positioned on the vertical sides of the floor pan beneath the doors, with one set of holes each in the front, middle, and rear of the vehicle cab.
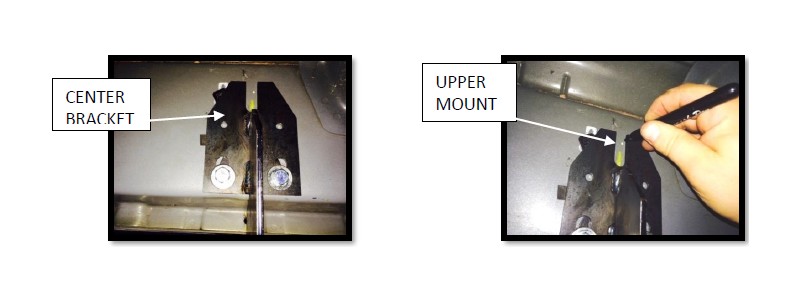
Step 3: Using the 3/8" threaded clips, slide two clips in the upper rectangular hole, and align one clip in each hex hole so the clip threads are visible. Figure 1
Step 4: Align the Nerf Step brackets with the three mounting locations on the underside of the vehicle. Start all six 3/8" x 1" hex bolts with washers and hand tighten.
Step 5: Using a sharpie, outline the upper “U “shaped mount in the center bracket.
Step 5: Remove Nerf Step and set aside. Next, slide the additional 3/8 threaded clip from the upper rectangle hole and align with the “U” shaped mark from step 5. Make a mark through the threaded part of the clip.
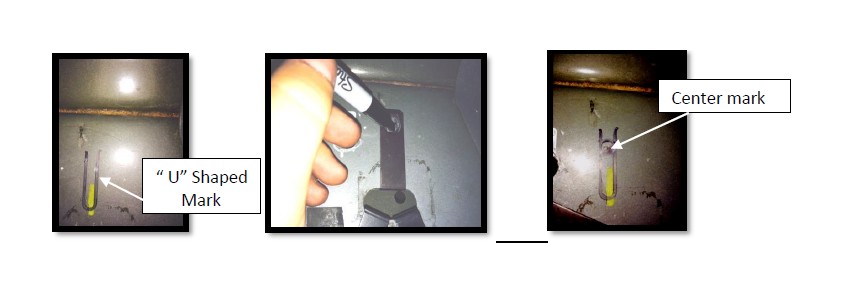
Step 6: Remove clip. Use a ½” drill bit and drill out the center mark. Slide the 3/8 clip back into position so the threaded part is aligned with the hole.
Step 7: Reapeat Step 4 with the additional upper clip. Starting with the rear Bracket, raise the Nerf step into positon and torque the bolts to 15-20 ft./lbs. Move to the front bracket and torque bolts. Then to the center brackets and torque down bolts. ( NOTE: There are two additional mounting points in each bracket for a 5/16 self tapper or rivet for upper impacts situations. Self tapper and rivets not included.)
Step 8: Repeat Steps 1-7 for passenger side.
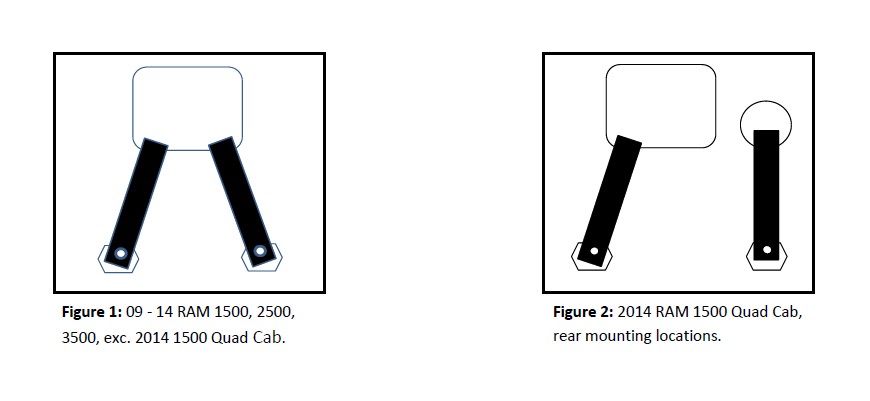
NOTE: On 2014 Quad Cab models in the rear mounting location, the hex holes are offset and only the forward mounting hole and clip are used. If desired, the rear clip may be used by cutting a 1" hole directly above the rear hex hole, and level with the lower edge of the upper rectangular as shown by the dotted diagrams in figure 2.


