 FREE 1 to 3-Day Delivery on Orders $149+ Details
How to Install T-REX Stealth Metal Series Upper Grille Insert w/ 20 in. LED Light Bar - Black (07-13 Sierra 1500) on your GMC Sierra
Installation Time
1 hours
Tools Required
- 10mm Socket and Ratchet
- Flat/Phillips Screwdrivers
- Die Grinder or Jig Saw
- Drill and 1/8” Drill Bit
TOOLS REQUIRED:
10mm Socket and Ratchet
Flat/Phillips Screwdrivers
Die Grinder or Jig Saw
Drill and 1/8” Drill Bit
PARTS LIST:
(7) #10x1” Screws
(7) #10 Flat Nuts
(2) 6/32” Nylon Lock Nuts
(2) #10 Flat Nuts
(2) L-Brackets
PLEASE READ AND UNDERSTAND ALL INSTRUCTIONS BEFORE INSTALLATION. Auto makers offer varied models to each vehicle and occasionally manufacture more than one body style of the same model. To assure your part is correct; our tech department can be contacted at [email protected] to verify fitment or assist with tech questions. All other inquires can be directed to [email protected]. In the event you do not have internet access please call 1-800-287-5900.
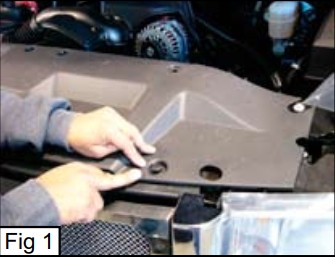
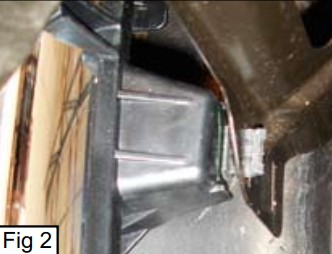
Step 1
Remove plastic rivets securing the radiator cover; on top of the grille (Fig 1). Now
remove the four 10mm bolts along the top of the grille. The grille has six metal clips
that clip into the core support (Fig 2); two behind the GMC logo and four along the
bottom. Pull the grille forward; use a slotted screwdriver to release the clips and
remove the grille.
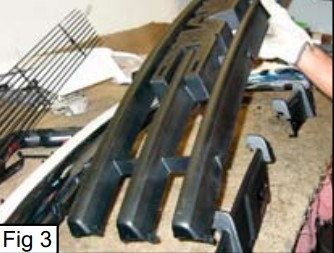
Step 2
This step cuts the bars from factory grille. Apply masking tape to the chrome or painted
perimeter of the grille. The plastic bar along the top that bolts to the core support must
be retained to install the grille. Do not cut this bar from the factory grille. Cut the four
vertical bars ½” below the upper cross bar. Now cut the center cross bars from the
grille; make three cuts on each end. Make your last four cuts along the bottom. The
center bars securing the GMC logo will now separate from the grille (Fig 3).
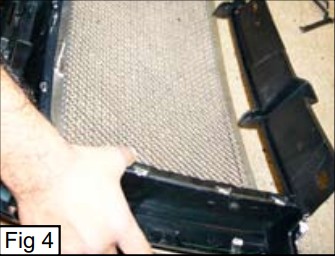
Step 3
Use a die grinder or fle to smooth any rough edges around the opening. Test ft the
grille in place; smooth any remaining rough edges (Fig 4).
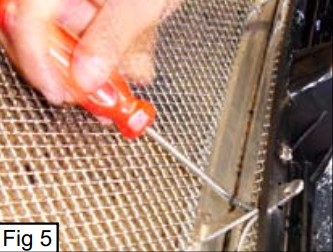
Step 4
Center the mesh grille into the factory grille surround (4). Make sure the grille is
centered; mark the mounting holes in the mounting tabs to the chrome factory grille.
Drill a 1/8” hole at each mark. Use the screws and flat nuts to secure the grille to the
surround (Fig 5). Attach the short end of the L brackets to the two studs on top of
the mesh grille using the 6-32 nuts and washers (snug the brackets but do not fully
tighten).
Step 5
Re-install the grille assembly onto the vehicle; attach the clips along the bottom. Align
the L brackets on top to the factory mounting 10mm bolt mounting holes in the center
of the core support. Tighten the lock nuts securing the brackets to the grille. Re-install
the grille and radiator cover onto the vehicle. Installation complete.


