


Installation Time
(approx) 1 Hour
Difficulty Level:
Simple installation for anyone.
Installation Guides
No guide available for this part yet.
 FREE 1 to 3-Day Delivery on Orders $149+ Details

$379.00 each
CONFIRM THIS FITS YOUR VEHICLE!
Saved - View your saved items
We're sorry. We couldn't save this product at this time.
or use

Features, Description, Reviews, Q&A, Specs & Installation
| Brand | S&B |
| Cold Air Intake Type | Cold Air Intake |
| Tuning Requirements | No Tune Required |
| Cold Air Intake Tube Material | Plastic |
| Cold Air Intake Filter Type | Oiled |
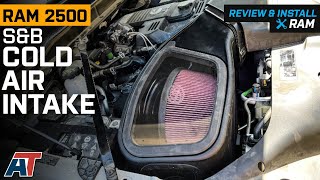
Maximum Performance. The S&B Cold Air Intake with oiled cleanable cotton filter enhances engine airflow by reducing restriction through a fully enclosed airbox, which shields the filter from contaminants and engine heat. This system improves power and efficiency for diesel engines, ensuring better combustion and performance under demanding conditions.
Construction and Appearance. This cold air intake system incorporates high-quality silicone components for the air filter, coupler, lid seal, and box plug, offering durability and heat resistance up to 400°F. The enclosure and tubing are engineered for robust sealing and long-term reliability, finished with a clean, professional look suited for performance vehicles.
Installation. Installation is straightforward and requires no drilling, making it suitable for both enthusiasts and professionals. The kit is designed for direct bolt-on application, simplifying the upgrade process without modifying stock components.
Warranty. The product includes a manufacturer’s limited warranty covering defects in materials and workmanship.
Application. Designed specifically for the 2019 to 2024 Dodge Ram 2500 with the 6.7L Cummins diesel engine, ensuring precise fitment and compatibility with this engine configuration.
S&B 75-5132
CA Residents:  WARNING: Cancer and Reproductive Harm - www.P65Warnings.ca.gov
Installation Info
Installation Time
(approx) 1 Hour
Difficulty Level:
Simple installation for anyone.
Installation Guides
No guide available for this part yet.
What's in the Box
Tech Guides:
Sponsored