Talk to a Ram 1500 Sales Tech
1-888-706-1096
M-F 8:30A-11P, Sat-Sun 8:30A-9P
$20K Sweeps! 10 Chances to Win! Enter Daily >

Fender Flares; Matte Black (09-18 RAM 1500, Excluding R/T & Rebel)

Item R111295
Verify parts fit and get product recommendations.
Ram 1500 Sales Techs: Connect Now M-F 8:30A-11P, Sat-Sun 8:30A-9P
$0.00
Our Price

$169.99 (set of 4)

FREE Shipping Market Price $196.99 You Save 14% ($27.00) Up to 10% off for Military & First Responders! See Details

Will this fit your Vehicle?

Select a different vehicle Help?
Update or Change Vehicle
Ship to: Ashburn - 20149
Sorry, please enter a valid US or CA postal code
We're sorry, zip can't be updated at this time.
Recommended Install Shops
How It Works
Install Shops are available near Ashburn - 20149

Add Local Shop Installation

Total cost of service $349.00
    Create a list
    Add to New List

    Saved - View your saved items

    We're sorry. We couldn't save this product at this time.

    or use

      Product Videos

      Justin: The Matte Black Flares that we're talking about here today will hands down, guys, be the most affordable way to get a set of four on your '09 to '18 RAM 1500 while also delivering an aggressive look and additional tire coverage at the same time. Now, this kit does include, of course, a set of four flares along with the hardware and rivets for right around 120 bucks. Again, making this super affordable in the land of flares. The install might involve some small drilling depending on your truck, but even with that being said, the site's going to stick with a strong one out of three wrenches on the difficulty meter, and maybe a couple of hours of your time to complete from start to finish.So, again, the big story here no doubt is the affordable price point for the matte black flares, but at the same time, it's also going to be a great way to add some more tire coverage for RAM owners who might be running a combination of a wider wheel in a more aggressive offset. Now, listen, guys, I know a lot of owners out there, myself included, enjoy the look of some poke, but some states require that those tires be covered at all times, otherwise, you might get pulled over or get a warning or even a ticket. And on top of that, uncovered tires on an aggressive stance or lower offset wheel can result in a very dirty and very scratched up truck. That's because the smallest mud puddle or water puddle, whatever is going to sling all that junk down the side of your rig, and if you go off-roading a whole lot, well, then small pebbles and rocks can kick up and scratch the side of your truck. Trust me, I know. Now, obviously, some people might not really mind because yes, it's a truck after all, but some folks might be a little bit more OCD about keeping their rigs cleaner and not want to scratch things up all the time.Now, the flares that we have here, guys, will provide you with roughly 2 inches of additional coverage for those lower offsets, and again, at that entry-level price. Speaking of which, materials are going to be a molded and very durable polypropylene. I know some of you guys thinking 100 bucks for a set of flares, how cheap are they? Well, the materials, listen, I've handled a lot of flares, they are on par with some of the other more expensive options that you will encounter here in the category. Now, that durable polypropylene will incorporate the look of those rivets around the edges here for all four flares. I know I only have two on the table, little space limited, but just know you are getting four flares. Now, if you're not a big fan of that hardware in the flares themselves, well, you can always check out some of our smooth options available here on the site as well. In fact, we have a couple smooth options that you can grab for roughly the same price point as these options here. So, I know some guys dig the look of the hardware, maybe some don't, but ultimately, that is up to you.'' But going even further with the appearance here, guys, again, these are the matte black options, as you can see, but that poly material is paintable. So, if you ever wanted to change up the look, maybe go with a paint-matched option, get these things sprayed, I think it will deliver more of a factory look or appearance. On the other hand, if you just dig that contrast, the matte black finish will certainly deliver that right out of the box.But what do you say we switch gears and cover that installation as promised earlier, guys? Now, the site does say you might encounter some small drilling here depending on your truck. That wasn't the case for us with our 2014 RAM, we did not need a drill. But to give you a better idea of how this install will go down, check out our detailed walkthrough and tool breakdown right now.Man: The tools used for this install are: a ratchet, T45 Torx bit, 13-millimeter socket, 8-millimeter socket, a Phillips head screwdriver, and a razor knife or scissors. So, the first step of this install is actually going to take place on the workbench. There's a little bit of assembly required for these fender flares. We need to install the weatherstripping and hardware. The tools for this are very minimal and I'm going to walk you through the whole process. So, let's get started.So, the first thing I'm going to do actually is going to lay out and measure my weatherstripping, and then I can cut it to length. So, I'll just follow along my fender flare on the outer edge to make sure that I have enough weatherstripping to cover the whole thing. Then once I haven't measured out, I can make my cut and install it onto the flare. Now that I've got my length determined, I can make a cut right where it needs to be. So, there's a 3M backing that adheres the weatherstripping to the fender flare. I'm just going to peel back the first couple inches of the backing and stick it on here at the corner. And then I'll work the rest of it around the fender flare and peel it off once I've got it all stuck on. Now, I can very carefully start going back and peeling off the 3M backing for my weatherstripping. I just want to make sure that my weatherstrip does not come out of place while I'm peeling this off. Now, just apply some light pressure to make sure you have good adhesion.The next thing I'm going to do is start installing the provided bolts along the empty holes in the edge of the fender flare. The kit provides you with a T45 Torx bit that you can use to hold the head of the bolt and you'll need a 13-millimeter socket or wrench to tighten down the nut. Once you've completed the hardware and weatherstripping installation on the first flare, you can repeat the process for the remaining three.The next thing I'm gonna do is use my 8-millimeter socket to remove four screws along this inner wheel arch, as well as this plastic trim piece. The last thing I'm gonna do before installing my new fender flare is installing one of the provided screw clips that's going to go right here on the front of the two holes on the inner wheel arch, and I'll just slide this into place over the metal. Once I have this situated, I can start installing my flare and the provided hardware.Now, I can get my fender flare positioned into place, and install the provided Phillips head screws. I've got one screw holding this into place so that I can get the other screws aligned and started. And I'll just work my way around the fender well, and install my hardware. It might be helpful for you to turn your steering wheel so that you can get a little bit more clearance so that you get your screws into place. Just makes it a little easier to get things lined up. Once you have all your screws started, you can go ahead and tighten them up with your Phillips head screwdriver.So, just like I did in the front, there are a few screws that I have to remove from the inner wheel arch, six in total, there are three here in the rear, as well as three in the front. I'm just gonna use my 8-millimeter socket once again to pull those screws out and they're going to get replaced with the Phillips head hardware that's provided with the kit. So, once you have these screws out, you can remove the plastic trim piece that was held in with the two screws at the rear of the arch. At the top of the wheel arch here in the very center, there is a vacant hole that you're going to be installing a provided screw clip, just like you did in the front, and just slide it into place. And now, we're ready to position our flare. Now, I'll install my flare, line up all my bolt holes, and get all my screws started before tightening them down. I've got all my screws started, now I can take my Phillips head screwdriver bit and tighten down all my screws.And that's gonna wrap up this review and install of the Fender Flares in Matte Black, fitting your 2009 to 2018 RAM 1500. Thanks for watching, and for all things RAM, keep it right here at americantrucks.com.

      Product Information

      Features, Description, Reviews, Q&A, Specs & Installation

      Features & Specs

      • Sleek Fender Flare Styling
      • Made From Durable Polypropylene
      • Paintable Matte Black Finish
      • No Cutting or Trimming Needed; Some Drilling may be Required
      • Sold in a Set of 4
      • Fits 2009-2018 RAM 1500s, excluding R/T & Rebel Models

      Description

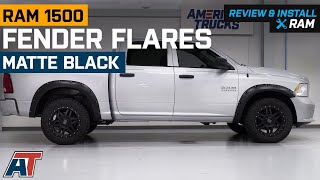
      Provides Incredible Protection and Style. If you’ve fashioned your RAM 1500 to tackle various off-road environments, now’s a good time as any to install these Matte Black Fender Flares. With these Flares installed, you can rest assured that your vehicle’s exterior is shielded from rocks, dust, and other debris that’s being flung by its tires. Additionally, they come in a sleek matte black color, giving your truck a more aggressive appearance.

      Sturdy Fender Flare Construction. Each of the fender flares is made from high-quality polypropylene and secured by heavy-duty mounting hardware. As a result, these fender flares can stand up to the harshest driving conditions and keep up with your vehicle’s heavy-duty applications.

      Paintable Upgrades. These Fender Flares come with a rich, matte black finish, which gives them a rugged look. If you’re not into the all-black look, you can have it painted to your desired color to complement your vehicle’s appearance.

      Installation May Require Drilling. Installing these fender flares calls for moderate mechanical expertise. This is because some drilling might be required to ensure that each component is properly secured to your vehicle. Fortunately, the task will take no more than 2 hours to complete since all their necessary hardware is included in the kit.

      Application. These Matte Black Fender Flares fit 2009-2018 RAM 1500 models, excluding R/T & Rebel models.

      Shop All Truck Parts And Accessories

      Shop All Truck Exterior Accessories

      Shop All Truck Fender Flares

      Fitment:

      Details

      CA Residents: WARNING: Cancer and Reproductive Harm - www.P65Warnings.ca.gov

      Installation & What's in the Box

      Installation Info

      What's in the Box

      • (2) Front Fender Flare
      • (2) Rear Fender Flares
      • Installation Hardware
      4.5

      Customer Reviews (172)

        Questions & Answers

        10 More Questions

        Will It Fit My Ram 1500

        • 3.0L V6 EcoDiesel - 14, 15, 16, 17, 18
        • 3.6L V6 - 13, 14, 15, 16, 17, 18
        • 3.7L V6 - 09, 10, 11, 12
        • 4.7L V8 - 09, 10, 11, 12, 13
        • 5.7L V8 - 09, 10, 11, 12, 13, 14, 15, 16, 17, 18