FREE 1 to 3-Day Delivery on Orders $149+ Details
How to Install PIAA 510 Series 4 in. Round Ion Yellow Halogen Lights - Fog Beam - Pair on your Dodge Ram
Tools Required
- Vinyl electrical tape
- Diagonal cutters
- Phillips driver (medium)
- Pliers
- Phillips driver (short)
Please give this Installation Manual to customer after installing.
• Lighting laws vary state to state, check your local laws before use.
• The lamps get very hot when they have been in use. Do not touch them as they may cause burns.
• After the lights have been on do not place them near flammable objects.
• Do not splash water directly on the hot lamps, as this may cause cracking of the lens due to dramatic change in temperature.
• Do not look directly into the light of the lamps as the bright light may cause eye damage.
• This light system may be used only as high beam auxiliary lighting. • The lamps and relay harness are to be used only with 12 volt automotive electrical systems.
• Using this light system while the engine is not running will drain the battery. • Do not repeatedly turn the light system on and off as it will shorten the life of the system.
• Some automobiles generate high voltage at start up and when it is turned off, do not have lights on as you start or turn off your vehicle.
• Using the wrong bulbs may cause a malfunction, use only specified PIAA bulbs.
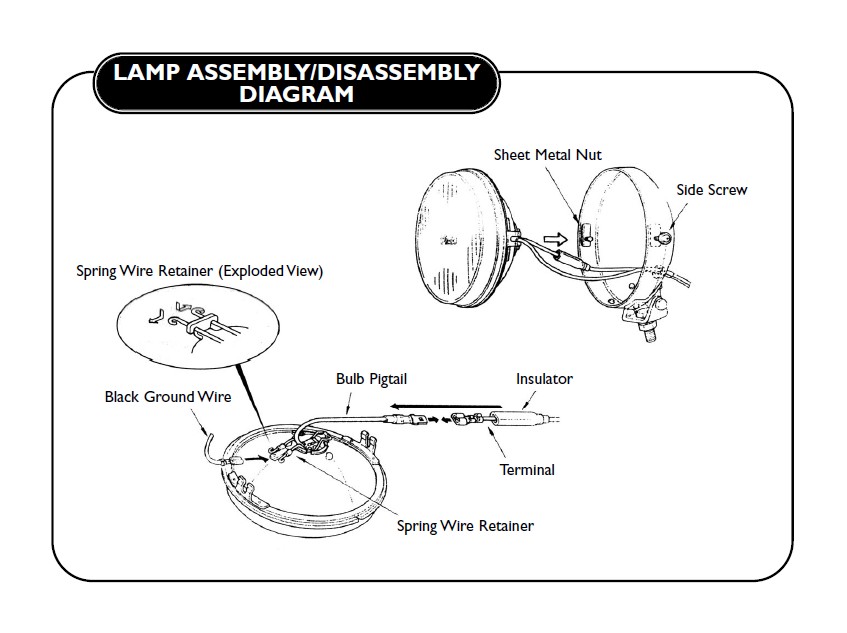
• When changing bulbs or lenses follow the lamp assembly/disassembly diagram.
• Leave at least 1/8” clearance between the lamps and the front spoiler, as the heat may damage the spoiler.
LAMP INSTALLATION
• The installation area must be clean, and level with enough working space to do the job without distractions.
• The PIAA 510 lamps may be mounted upright or hanging down. It is very important that you make sure that the “PIAA” etched in the glass reads right side up. If it is not you must follow the “Lamp assembly/disassembly diagram” to flip the lens over.
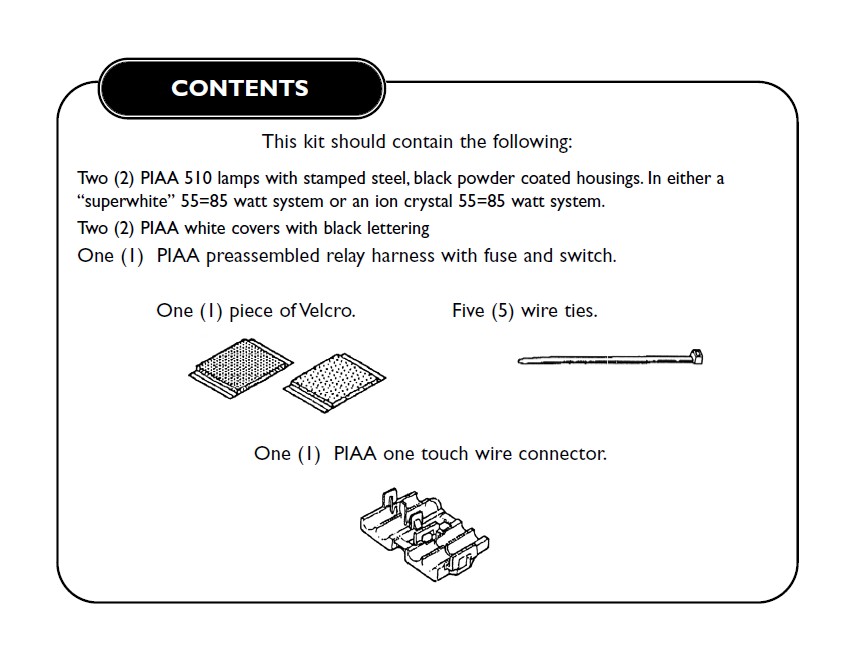
• For the lamp system to function properly the supplied PIAA harness must be used.
• When mounting the lamps mount them in such a place that they are free of obstructions.
• Do not modify the lamp system in any way or it will void the warranty.
• Do not mount the lamp system in a place that may obstruct an existing automotive function.
• Do not mount the lamps in a place that they will come in contact with the road or curbs.
• When a mounting location is decided upon a 10mm hole will be needed to mount the lamp with the supplied mounting hardware. If a hole is not available one will have to be drilled. (Contact your local PIAA dealer for custom installation kits for many vehicles.)
• When lamp is mounted make sure to leave at least 1/8 inch clearance around the lamp to avoid heat damage to front spoilers and/or grills.
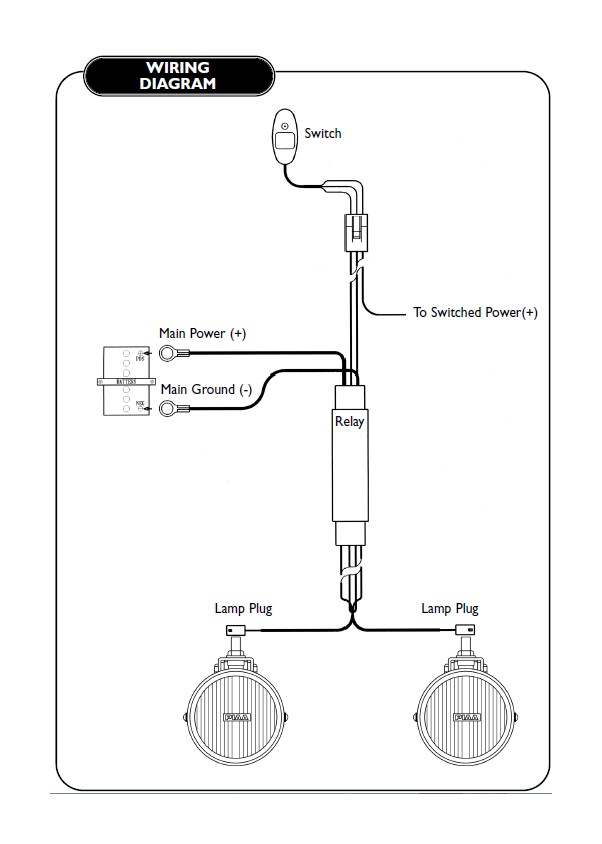
HARNESS INSTALLATION
• Before connecting any wires the negative (-) battery terminal should be disconnected.
• When connecting the wires on the harness follow the wiring diagram and connect them as in the diagram.
• For proper lamp operation it is recommended that you connect the positive ( ) and negative (-) power supply wires directly to the corresponding battery terminals. Do not take power directly from the alternator.
• As in the harness diagram you may connect the switch power ( ) to the parking lights or any other switched power. An alternate power supply for the switch may be the high beam headlight.When you do this your PIAA lights will only turn on when your high beams are on.They will turn off when you turn off your high beams, and the PIAA lights will not work any other time.
• Do not connect lights to turn signals or to lights that flash with an automotive alarm.
• When running the wires through the engine compartment be sure to keep them securely away from moving parts and systems, such as the fan and the throttle cable and away from hot parts such as the exhaust manifold.