FREE 1 to 3-Day Delivery on Orders $149+ Details
How to Install Mopar 3-3/4 in. Pedestal Tachometer w/ Shift Light - Black on your Ram
Read instruction throughly to verify all required parts are there before installing this product.
For Shift-Light Tachometer
2 – Self Tapping Screws - #10 x 5⁄ 8"
1 – Shift Light Cover
Contents:
Mounting Assembly
1 – Pedestal Mount Base
1 – Metal Spacer
2 – Lock Washers
1 – Shock Strap
1 – Rubber Strip For Shock Strap
2 – Button Head Cap Screws - ¼-20 x 7⁄ 8"
Configuration
The tachometer is configured at the factory for 4 PPR. (8 CYL) To change the PPR, follow the steps below:
1. With no power applied to the tach, press and hold the RIGHT “-” button.
2. While holding the “-” button, apply power to the tach by turning the ignition switch to the “Accessory” or “On” position. Do not start the engine! Release the RIGHT “-” button. The pointer will move to a position on the dial which indicates the default configuration of 4 PPR.
3. Press and release the LEFT “ ” button to change the PPR setting. This will cause the pointer to indicate 5 PPR, then 6 PPR, then down to 0.5 PPR, then 1, 1.5, 2, 2.5, 3, and back to 4 PPR. See the table below to find the pointer reading that corresponds to the desired PPR.
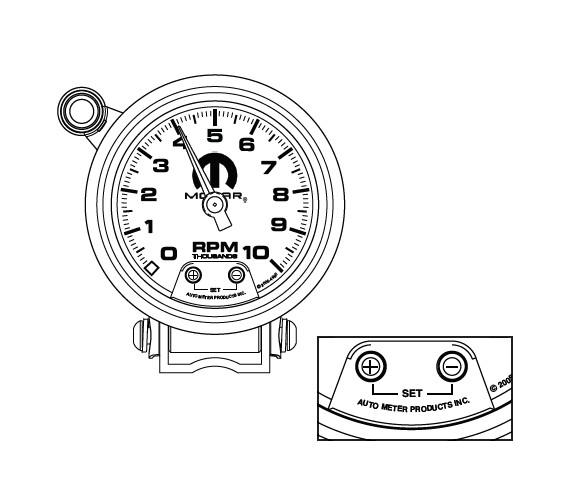

4. When the pointer indicates the desired PPR, press and release the RIGHT “-” button to permanently store the settings and exit Configuration mode.
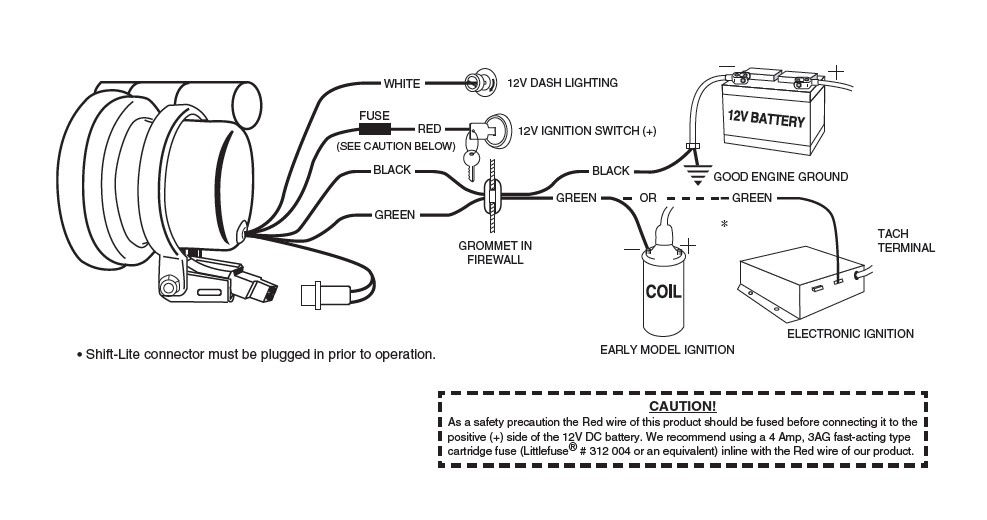
Mounting
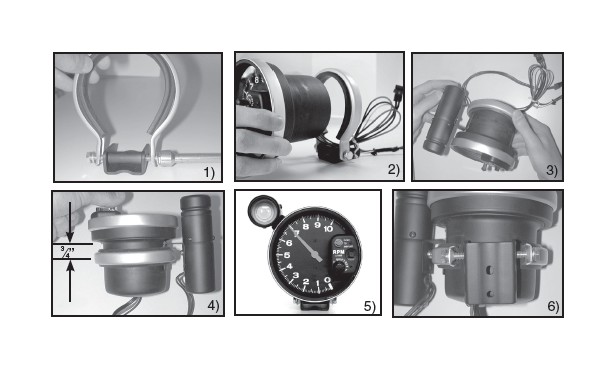
1) Loosen both bolts holding the shock strap to the mounting foot. Back both bolts (5⁄32” allen wrench) out until each is only one or two turns into the spacer.
2) Pass tach wires through shock strap assembly and slide tach casing into shock strap assembly.
3) Position Shift-Lite mounting bracket under shock strap as shown in image. Adjust Shift-Lite, tach, and mounting base to desired positions (see figure 4 for recommended shock strap position), and tighten bolts (5⁄32” allen wrench) holding mounting foot to shock strap to secure the assembly.
4) Make sure rubber section of shock strap seats properly to ensure proper fitment. Check to make sure shock strap is approximately 3⁄4” (0.750”) between center line of strap and step of tachometer casing for best mounting. Plug shift light into tachometer connector. Plug is directional, do not force fit!
5) Recommended placement of external Shift-Lite is at 10 o’clock position. It is possible to place Shift-Lite in other positions in accordance with driver preference and vehicle mounting requirements.
6) The special design of the tachometer base allows for a variety of mounting possibilities. Attach the base using screws provided or use a pop rivet tool.
Operation
1 Shift-Lite Set Mode
1.1 To enter this mode, apply power to the tach by turning the ignition switch to the “Accessory” or “On” position. Do not start the engine! Press and release both the LEFT “ ” and RIGHT “-” buttons at the same time. The pointer will indicate the current Shift-Lite set point.
1.2 Using the RIGHT “-” and LEFT “ ” buttons, move the pointer to the desired RPM for the new Shift-Lite Set Point. Pressing the LEFT button will cause the pointer to move up (CW), pressing the RIGHT “-” button will cause the pointer to move down (CCW).
1.3 Press and release both the LEFT “ ” and RIGHT “-” buttons at the same time to save the setting and exit Shift-Lite Set Mode.