FREE 1 to 3-Day Delivery on Orders $149+ Details
How to Install Husky QuadCaps Bed Rail Protector (07-13 Sierra 1500 w/ Short or Standard Box) on your GMC Sierra

Shop Parts in this Guide
Contents
Bed Rail Caps (4 pieces total)
• Driver Side Front (DS-F)
• Driver Side Rear (DS-R)
• Passenger Side Front (PS-F)
• Passenger Side Rear (PS-R)
(Please note that the Rear Pieces install toward the tailgate of the truck and the Front Pieces install toward the Cab).
Stake Pocket Covers (4 pieces total)
• Driver Side Front Cap (DS-FC)
• Driver Side Rear Cap (DS-RC)
• Passenger Side Front Cap (PS-FC)
• Passenger Side Rear Cap (PS-RC)
(Please note that the Stake Pocket Covers come pre-installed in each Quad Cap).
Test Fit Before Installation
Dry fit the Quad Caps without removing the adhesive tape liner to verify the correct position of each piece. Make sure that each piece fits snug against the bed rail and that there is no interference with a bed liner or bed cover.
Vehicle Preparation
1. Clean the bed rails where the Quad Caps are to be installed. Remove all dirt and debris and do not leave a residue. We recommend a Prep Sol or similar type
cleaner, a wax and grease remover or a 50/50 blend of isopropyl alcohol and water.
2. Dry using a lint free cloth and inspect application area to be sure all moisture and residue has been removed.
Installation of Quad Caps
1. Installation temperature should be between 60°F and 95°F.
2. Install the rear pieces first (DS-R, PS-R).
3. Turn one of the Rear Caps over and remove the tape liner (red), exposing the grey acrylic tape. See Fig 1.
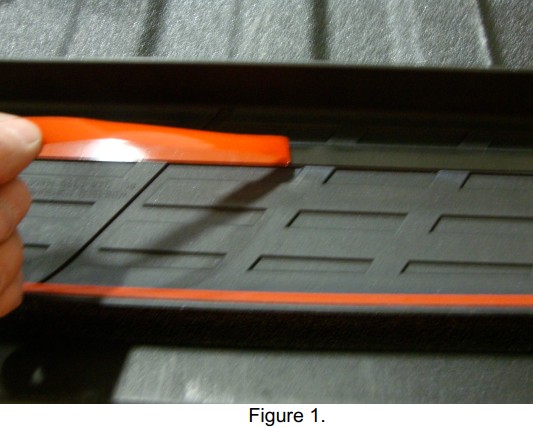
Caution: This is pressure sensitive tape and will adhereaggressively to any surface in which it contacts.
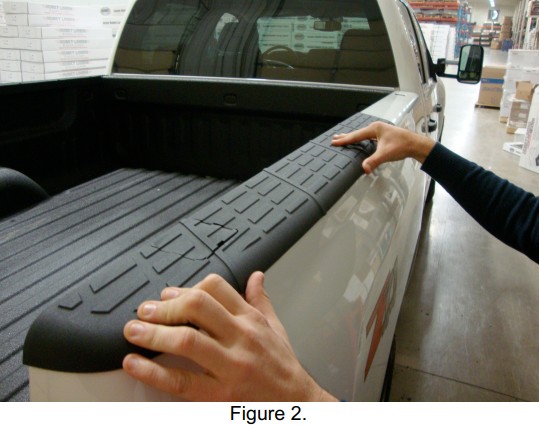
4. Lightly place the cap on the back end of the bed rail making sure that the back end and the inside of the Quad Cap is flush with the back end (tailgate side) and the inside (bed side) of your vehicles bed rail.
5. Once you are satisfied with the placement, press down firmly on the Quad Cap moving from the back end to the front end of the bed rail making sure that all
of the pressure sensitive tape is in contact with the bed rail. See Fig 2.
6. Repeat steps 3 thru 5 for the other Rear Cap.
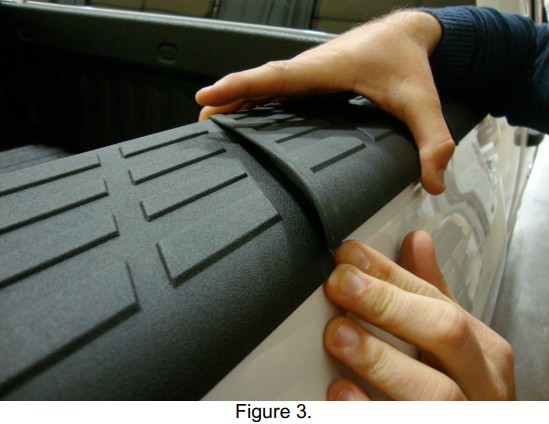
7. Turn one of the Front Caps over and remove the tape liner (red).
8. Starting from the front end of the installed Rear Cap, lightly place the Front Cap over the Rear Cap making sure to align and seat the last rib of the Front Cap over and flush with the end of the installed Rear Cap. Also, make sure the inside of the Front Cap is flush with the inside of the bed rail. Fig 3.
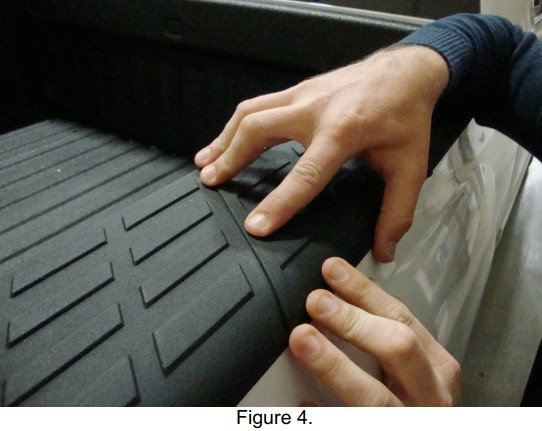
9. Once you are satisfied with the placement, press down firmly on the Quad Cap moving from the back end to the front end of the bed rail making sure that all of the
pressure sensitive tape is in contact with the bed rail. See Fig 4.
10. Repeat steps 7 thru 9 for the other Front Cap.
Stake Pocket Removal
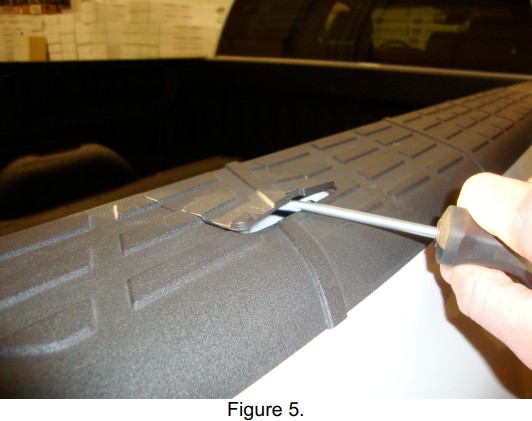
To remove a stake pocket cover simply install the end of a flat head screwdriver into the stake pocket removal slot and lightly pry upwards until one end of the stake pocket cover pulls free of the Quad Cap. Fig 5.
Stake Pocket Installation
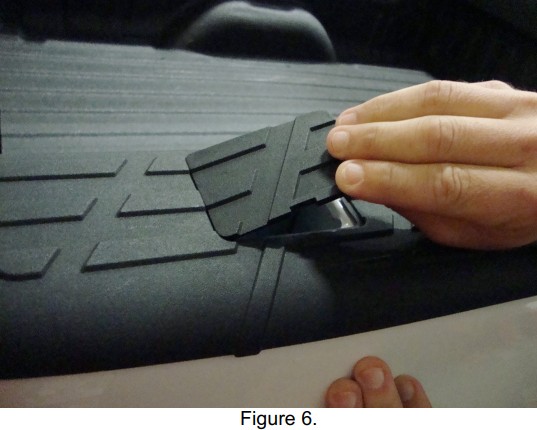
1. To install a stake pocket cover, make sure that the cover and cap rib patterns align… DS-FC installs in the Driver side-Front position, etc. Insert one of the stake
pocket cover tabs into the corresponding slots in the Quad Cap, lightly bend the cover and insert the tab on the other side of the stake cover into the corresponding Quad Cap slot. Fig 6.
If you have any questions or concerns about the application or
installation please call us at 1-800-344-8759.
Best Sellers
-
 J&L 3.0 Oil Separator; Black Anodized; Passenger Side (11-26 2.7L/3.5L EcoBoost F-150)
 (500+)
$152.10 $169.00
(500+)
$152.10 $169.00