 FREE 1 to 3-Day Delivery on Orders $149+ Details
How to Install Putco Boss Mesh Upper Grille Cutout - Black on your Sierra
Installation Time
1 hours
Tools Required
- 7mm, 10mm Wrench
- T15 Torx
- 7/16" Wrench
- Flat Head Screw Driver
- Saw- Recommended: Oscillating Hand Tool
- 1/4" Drill bit

Shop Parts in this Guide
Please read all instructions before installation and to check to see that all parts are included.
Insert Grille Installation
1. Remove Grille from packaging. Check to see if all parts from above table of kit contents are included.
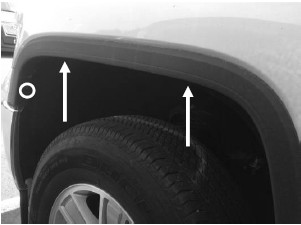
2. Remove (2) T15 Head Bolts(shown by arrows) and (1) 7mm bolt (shown by circle) from the front fender trim of truck. Driver side is shown. Repeat on passenger side.
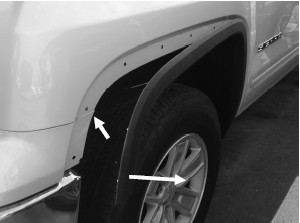
3. Pull front of fender trim away from truck. Remove (1) 7mm bolt from inside of upper bumper, location indicated by arrow. Driver side is shown. Repeat on passenger side.
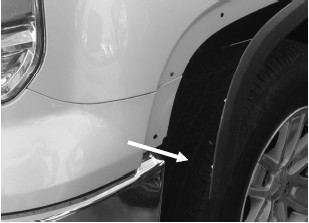
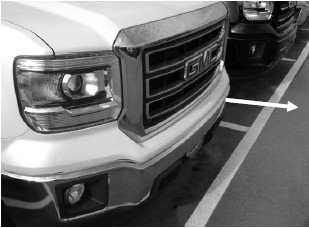
4. Pull out upper bumper end. Driver side is shown. Repeat on passenger side.
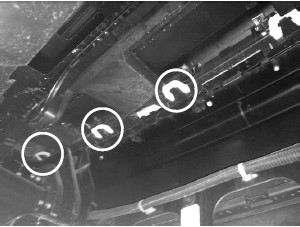
5. On back side of bumper, use a flat headed screw driver to unclip (total 6) clips. Driver side locations shown above. Repeat on passenger side
6. Pull upper bumper piece off of truck.
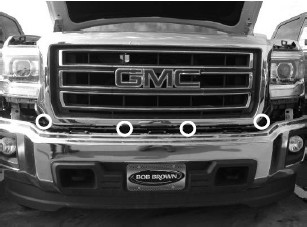
7. Remove plastic cover by removing 12 retaining clips with flat head screw driver (locations shown above).
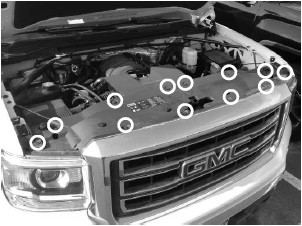
8. Remove (8) 10mm bolts from the grille. Locations shown above. Once bolts are removed pull grille straight off of truck.
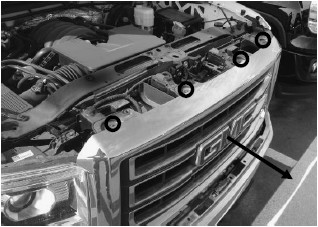
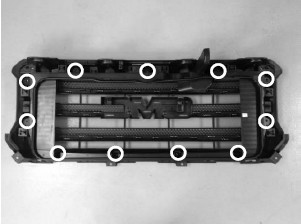
9. Remove shroud from behind grille. Use 7mm wrench to remove 11 bolts.
After Step 9, instructions vary according to the type of LightDuty GMC Sierra you have.
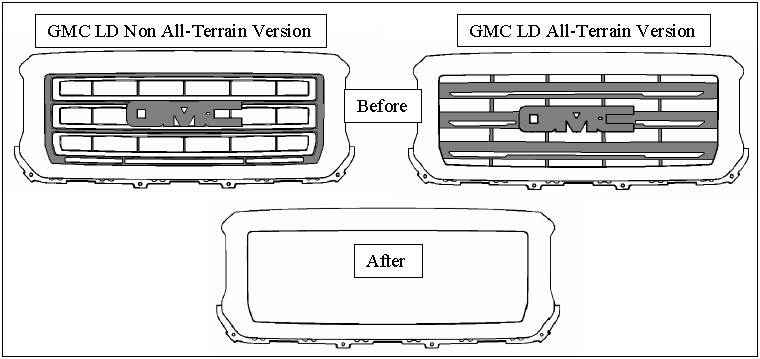
10. Cut inner portion of grille out. Part to remove from grille is shaded above
GMC LD Non All-Terrain Version
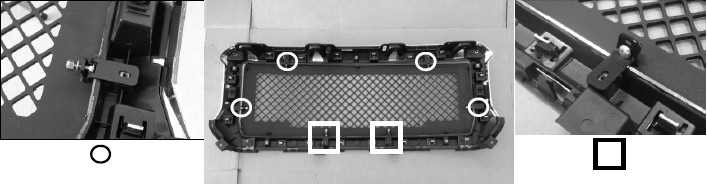
11. Insert Putco grille into the grille shell. Bolt on brackets to all the tab locations on back of Putco grille. Locations marked with a circle above match to orientation of the picture to the left. Locations marked with a square match the orientation of the picture the right. Hardware shown in pictures are included with the grille kit.
12. Tighten brackets to grille using 7/16" wrench. Use factory 7mm bolts that held the shroud on to grille to bolt Putco grille to grille shell through L-Brackets. (Optional: The original shroud can also be reinstall in this step, just bolt shroud over L-Brackets using factory 7mm bolts) Tighten Bolts.
For Lighted grilles, refer to Wiring Installation on Light Bar Installation Instructions for wiring instruction.
13. Once Putco grille is tightened in grille shell, bolt assembly back in truck and reassemble.
GMC LD All-Terrain Version
11. Insert Putco grille into the grille shell. Position grille in grille shell and mark holes through brackets for drilling. Removed Putco grille and drill 1/4" holes in locations marked.
12. Reinsert grille into grille shell and bolt in using supplied hardware. Bolt head goes against bracket on the back of the Putco grille. Tighten Down bolts using a 7/16" wrench
13. Optional: The original shroud can also be reinstall using factory bolts.
For Lighted grilles, refer to Wiring Installation on Light Bar Installation Instructions for wiring instruction.
14. Once Putco grilles is tightened in grille shell, bolt grille assembly back in truck and reassemble truck.


