Installation Time
(approx) 2 Hours
Difficulty Level:
Light to Moderate mechanical skill required.
Installation Guides
Guaranteed Free Delivery by 12/24! available on most items - Details
$939.95 (kit)
FREE Shipping Market Price $1,080.99 You Save 13% ($141.04)Add Local Shop Installation
Saved - View your saved items
We're sorry. We couldn't save this product at this time.
or use
Hey guys, Adam here with americantrucks.com. And today, we're taking a closer look at, listening to, and installing the Flowmaster Outlaw Dual Exhaust System with Black Tips and the Side and Rear Exit, available for the 2019 and newer 5.7 RAM 1500. As you just heard from our sound clips, I'm giving this one four out of five on our loudness meter. Now, typically, the Flowmaster Outlaw is the loudest of the loud, but as a matter of fact, it's not really the case here on the RAM. It is extremely loud, louder than most in the category, but it's still pretty tame, to be honest. From red light to red light, it gives you a loud aggressive deep bark, but it's not going to blow your ears out. I will say, however, the Outlaw is for the guys out there who want a little bit more interior sound, not necessarily drone that's going to really give you that headache that you get at highway speeds, but you do hear it a lot more on the inside compared to some of the more mellow options that don't have much interior sound at all.So, if you're riding around with the family, taking a lot of long road trips, keep in mind, guys, at the low RPM range, as soon as you're starting to accelerate and upon deceleration, there is some of that hum inside the car. Again, not too overwhelming, but it is there. Now, this particular kit from Flowmaster comes with two different exit styles, which honestly is pretty unique in the category. You have the side exit and the rear exit all in one, so you guys can swap the tips as you see fit. Right now, what you see here is the dual rear exit that comes in the kit. There's just basically straight pipes that come off of the back that push it right out where the factory dual exhaust was. But you have the option to swap those tips out for the side exit, which just basically turns them at a 90-degree, right out the sides behind both of the rear tires. Typically, the exhaust that comes from the factory as a single exhaust would dump out behind the passenger side tire, and with the side exits here, it would duplicate that on the driver side as well. Now I'm gonna show you guys when it comes time for the install how to swap those tips. But it's pretty simple, just two clamps, one for the tip, one for the pipe, swap it out, reinstall. Super simple.This particular option from Flowmaster comes again with the Outlaw muffler which is what gave you that sound you heard earlier on. I'll compare that to stock later on in the video. Aside from that, you basically get 3-inch mandrel-bent tubing for the entire thing, 409 stainless steel so it's that middle-of-the-road option, black powder-coated 4-inch tips, those look really good compared to stock. I know the stock tip is pretty nice from the factory, those polished chrome, but the black here just gives you that stealthier look. Now, I'm a big fan of the rear exit here with those black tips because it still utilizes the cutouts under the factory bumper. If you're going to use the side exit, keep in mind, guys, that your factory bumper cutouts would be empty. Some guys might not like the look of that, but the fact that this gives you both exit styles allows you to switch it up as you see fit. As far as the price is concerned, it comes in right around 950 bucks here, which keeps it under the $1000 mark. So, it's a little bit more affordable than some of the more premium options in the category.Install-wise, guys, I'm giving it three out of three wrenches on our difficulty meter because our cab size and bed length, the crew cab with the longer 6.5-foot bed does require cutting 9 inches off of the inlet pipe included in the kit. Some cab size and bed length models do not require cutting, in which case, the install I would give two out of three wrenches because that extra step wouldn't be involved. So, you want to have a cutting tool of your choice on deck depending on your cab size and bed length. Again, crew cab with the longer bed is going to require some cutting like ours did. And I'll show you guys what that looks like. Overall, it'll take you about two, maybe three hours from start to finish. What do you say we get started? Tools used in the install include an impact gun, ratchet, 14, 15, and 17-millimeter deep sockets, 16-millimeter swivel socket is recommended, 14 and 17 wrenches, a hanger removal tool, and a cutting tool of your choice.First step here, we're going to grab our hanger removal tool and pop the hanger off right above our resonator on our passenger side tailpipe. The driver-side tailpipe is one piece all the way back to the muffler inlet, so we're going to attack that later. So, for right now, we're going to do this. And I've lubricated it with WD-40, it makes life a little bit easier.All right. Next step, grab your ratchet and your 15-millimeter deep socket and we're going to loosen up the clamp holding the tailpipe to the rest of the exhaust assembly. All right. Hanger's out of position, clamp is loosened up, let's get this exhaust pipe off. All right. So, at this point, we're going to focus on our driver-side tailpipe. Now, like I said, it's all one piece, I have a pole jack here right behind the resonator just to give it some support once we start disconnecting things. I am going to remove this tip, however. Removing this tip gives you another foot, maybe a foot and a few inches of extra space that you don't have to worry about feeding out of the frame. So, we're going to take this guy off with a 13-millimeter socket.Next, we can pop the hanger out of the isolator using our hanger removal tool right above that resonator. All right. So, now we can disconnect the hangers right above the muffler outlet. There's one on each side, grab your hanger removal tool and get these guys off. Now, as you can see, I have a pole jack here supporting this as well, so we have two different points of support for this exhaust. Now for this one, it's tough to get the hanger removal tool in here, so I'm gonna use my pry bar to get this guy off.All right. So, next up, we're going to focus on this flange here. Now, you could bypass this and go straight back to the cat, but that's a lot of exhaust to take off in one piece, so I'm going to separate it here. Now, once we have this taken care of, there is one more hanger to remove. But for now, grab your 16-millimeter socket and disconnect these two bolts.All right. Now, when you pop this guy out of the hanger isolator, this is all going to come loose. So you want to be prepared for that. Before we do so, there's a ground strap here, I'm just going to disconnect that from the factory tubing. All right. So that way it dangles here and we can reconnect it to our new exhaust later. So, now we can grab our hanger removal tool and pop that guy off. All right. Now you can take this exhaust off.So, we've got our factory exhaust off of our 2019 5.7 RAM and it's on the ground here next to our Flowmaster Outlaw. Now I want to take you through some similarities and differences between the two kits, and I know there's a lot going on right now, but I'll explain it to you right now. Starting at the front of the vehicle, you can see that the extension pipes are very similar. The factory exhaust does have what appears to be somewhat of a resonator. It's just a smaller pipe there, but it is going to restrict airflow. So, it's nice to know that our new exhaust here is a straight pipe that doesn't have any airflow restrictors. Moving up, you can see an absolutely massive difference in muffler size, so much so that it looks like they're in two completely different locations. This Outlaw muffler from Flowmaster is by far their loudest muffler available in their category of series of mufflers.Typically, the way Flowmaster mufflers go is the lower the number for the series, the louder going to be. Flowmaster Outlaw typically involves a super 10, so a low number, really loud bark. And that's what you heard from our sound clip earlier on. Compare that to the factory muffler that looks like an air compressor tank. It's absolutely massive. And that's going to muffle a lot of that sound and it's going to muffle a lot of the airflow. Muffling that airflow is going to choke it up and it's going to rob you of some of the power. So, opening that up is going to help boost some numbers just a little bit. Now, what you'll notice here is that the factory exhaust has one outlet pipe that splits off into two. So it's more of a Y-pipe. Your Outlaw muffler and your Outlaw exhaust is two true dual exhausts. Coming out of that Outlaw muffler, there are two outlets splitting off of the driver and passenger. So, a little bit different than the factory one. Now those pipes there are 3-inch mandrel-bent tubings, the 3-inch tubing and mandrel-bent are going to help reduce any of the kinks that you get in the exhaust. The factory exhaust is riddled with kinks as it bends around corners, so it's going to be a lot smoother here. You'll also notice there's a ton more pipes toward the tips compared to the factory one which looks a lot cleaner. Now, the new Flowmaster Outlaw gives you two options, you have the side exit and you have the rear exit. So, we'll show you guys both of them when it gets to the install, but either way, it's going to exit out with the same tips 4-inch slash-cut powder-coated black 304 stainless steel tips.Now those look, in my opinion, a lot better than the factory tips. Now, typically, an exhaust from the factory would have almost no tip at all and it would just be bare material. But the dual exhaust RAMs come with pretty nice chrome tips. They're a little bit dull compared to some of the other chrome tips that you get in the aftermarket, but swap it over to the black powder coating, I think it looks a lot stealthier, a lot more aggressive, and in my opinion, a lot more attractive. But, if you're interested in more of the traditional chrome, there is a traditional chrome version of this or polished in the category for you to pick up as well. Today, we're doing the black. So, with that said, let's start with the install up at the front, we'll work our way back to the side exit, and then we'll show you guys how to swap it over to the rear exit.So, let's get started. All right. First step here, we want to look at our factory flange. This flange has two pressed-in studs. Pressed-in studs have these grooves on the inside so it really holds it in place, which means we have to grab our hammer and tap them out to replace them with the longer ones. So, what I'm going to do is actually take the factory nut and put it on backwards so we have a flat surface to hit, so we don't damage the threading on the factory studs. So, put that backwards on both of them. Just enough so that you can get on there, grab your hammer and punch them out.Just like that. Take those nuts off. Pull the studs out. I'm just going to put the factory nut back on that stud. Now we're going to replace them. So we can pull our new inlet pipe, put it up against it with the new flange, and tighten them down using the new bolts. Next, pull your flange pipe up, make sure the flange is actually on there. And I'm going to have my buddy hold this guy in place and I'll angle it this way so it's angled away from the vehicle. All right. Helping hand goes a long way. Pull the flange up, take the new bolt, put it through. Do the same thing on the upper corner. Follow it up with a washer and nut on the backside. Now when you tighten these two down, you want to make sure it's even so you don't want one side pulling to the other. So you may have to tighten one at a time and then keep going back and forth until they're even, and it's got a complete seal. All right. I'm gonna use my 17 deep socket and wrench to tighten those down.All right. First things first, of course, is determine whether or not you need to cut your inlet pipe. We do. We have to cut 9 inches in from the end of the inlet pipe. So you wanna grab a tape measure and a Sharpie. Measure 9 inches from the end that connects to your muffler, make your mark. I've already done that. It's a really simple job to do. Grab a cutting tool of your choice, I'm gonna use this table saw here and I'm going to cut right through.Next up here, let's do our extension pipe and, of course, once you have your cut pipe on depending on whether or not you did have to cut it, you may not even need this extension pipe. So, you want to refer to the manual to see for your cab size and bed length. Once you have that on, make sure you have a clamp on there, bring this up and connect it to the hanger on the frame. Grab your 15 deep socket and tighten down that clamp. Let's just continue down the line here, muffler's up next. Make sure you have a clamp on the single inlet side, connect it to your extension pipe or your inlet pipe, depending on how you have it set up for your vehicle. Make sure you seat it all the way. If you need to, you can grab a mallet and just tap this guy on. Just be careful not to dent the outlet. All right. Make sure that guy's even. Now we can start putting on our tailpipes that go over the axle. Next up, we're going to put a clamp over the muffler outlet on our passenger side. We're going to start there. Once you have that on, grab the over axle pipe, slide that guy over the axle. First step is to connect it to that muffler outlet, and then we're gonna hang it up.Next, what we can do is lift up the exhaust and connect it to the red isolator right above the muffler. All right. Next up, we're going to do the same thing to the other side of the muffler. Make sure you have a clamp on there first. Feed the pipe over the axle, connect it to the pipe, and then the hanger. Once it's seated, lift it up and hang it up. All right. Come back and get that clamp snug. So, next up, what we're going to do is basically replace the factory hanger on the driver side, where the tailpipe is going to come through. Now, the reason we have to replace this is it's not facing the right direction as the hanger from our new kit needs it to be. So, I actually have a modified hanger here that's going to replace it. And I know it looks the same, but we have a hole facing this direction because the new hanger it needs to be facing the rear of the vehicle and wouldn't fit here.Now, yours is going to look a little bit different. In the kit, you should have a red isolator or red hanger isolator that's more of about a 90-degree angle, and that's going to be what you're putting here. We're just going to use this modified one, but it does the exact same job. So, first things first, we'll pop off the old one, pop on the new one, again, you should be using the red 90-degree one in the kit. All right. Grab your hanger removal tool and pop that guy off. Easy-peasy. Again, super easy if you lubricate it as well, so WD-40 or PB B'laster is your friend.From here, pop this guy in place. Just like that. And our new hanger is going to come right through this hole facing the opposite direction. Next up, we're going to connect that pipe to the hanger we just installed. Again, yours should be red, but similar circumstance. You're just going right through just like that. Then bring it up and connect it to the other pipe.Now, of course, you want to make sure you have a hanger on that pipe before you insert it. And then once you do, you can go back and tighten that clamp down. All right. So I have the clamp in place, grab your 15 socket, and tighten that guy down.All right. Next step here, we're basically going to mimic that on our passenger side. We're going to pop off this hanger here and do the exact same thing. Again, yours should be red. We're going to pop ours off and use a black one, but it's the same process. All right. Let's pop this guy on and we can connect our pipe. All right. And when you put this pipe on, I had it here just to make sure we had the correct size, but what we're going to do is basically put a clamp on this, slide this back on, and connect it to the hanger. I'm actually going to do the hanger first and then pop it into the pipe. That bring it up here. Perfect. Now we can tighten down this clamp. All right. Now we can tighten that guy down.All right. Next up, we can do our side exit tips. Again, if you want to do the rear exit, we're going to show you guys that in just a little bit. I want to show you both styles. First, side exit, I'm going to put a clamp on here, slide that pipe on, make sure it's seated properly. And the key here is to make sure it's not angled up into the rear bumper. You want to make sure it's angled just underneath of it so that when the tip is on, it comes up under it and doesn't contact the bumper itself. So, that looks like a pretty good spot, so let's tighten this down. All right. Rotate your clamp up in position and tighten that down. All right. Next up, we have our side exit already installed on our passenger side. Let's start our tip on. Tip's a little tight, especially because it's got that powder coating on there. You basically want to get that guy on, make sure it seats properly, make sure it's angled properly. Ours looks pretty good. Grab a 14 socket and wrench and tighten it down, 14 socket and wrench, tighten it down. Repeat on the other side. All right. Again, same thing on the other side.Next up, guys, I want to show you how to swap the tips. Now, if you don't want to go from the side exit and you want to go for the rear exit, I'm gonna show you how to do that. And, of course, it's the same way going back the other way around. Grab a 14 socket and wrench to loosen up the tip. And obviously, what you do on one side, you're going to do on the other. But the black powder coating, it can be a little bit tricky to get off, especially after you've started it and it's heated up, so you might have to just do the twisting until you get it off. All right. Now let's remove this exit-style pipe and replace it with the rear. All right. Grab your 15 deep socket and take this clamp off.We're going to need this clamp for the new exit style, so I'm actually just going to slide it back to keep it on there. I'm going to take this guy off. So that'll stay there. Now, the exit style is basically the same installation process, just going in a different direction. I'm going to pop that pipe on, make sure the clamp is in position. And then at this point, you just want to rotate it so that it lines up with the cutouts on your bumper where the tips should be coming out. Once you have that aligned, tighten it down.All right. Now we can reinstall our tip. Once you have that seated all the way and you like the positioning, tighten it down. Make sure that all of the rest of the clamps are tight as well. Repeat that on the other side.That's gonna wrap up my review, sound clip, and install for the Flowmaster Outlaw Dual Exhaust System with the Side and Rear Exit along with the Black Tips for the '19 and newer 5.7 RAM. Get yours right here at americantrucks.com.
Subscribe to our YouTube Channel
Features, Description, Reviews, Q&A, Specs & Installation
Brand | Flowmaster |
Exhaust System Type | Cat-Back System |
Exhaust Tip Finish | Black, Black Chrome |
Exhaust Tubing Diameter | 3.00 Inch |
Exhaust Material | Stainless Steel |
Exhaust Tip Outlet Style | Dual |
Exhaust Exit Location | Rear - Dual |
Exhaust Loudness | Loud |
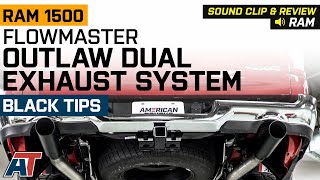
Deep Powerful Sound. Catch the attention of everyone with this Flowmaster Outlaw Dual Exhaust System with Black Tips and Side/Rear Exit. This exhaust system lets your truck deliver a deep and powerful roar, thanks to its chambered muffler style.
Power Gains. If you want to add more power to your truck, then equip it with this Flowmaster Outlaw Dual Exhaust System. Built with a 3-inch main tubing, this exhaust system guarantees to provide a free-flowing route for your exhaust gases. This allows your engine to take more cooler air for combustion, giving your truck immediate horsepower and torque gains.
Stainless Steel Construction. To tough it out against your truck’s demanding off-road drives, this exhaust system is made of stainless steel. With this material, the exhaust system is able to withstand impacts, as well as the damaging effects of various weather elements. Furthermore, it is built with large black ceramic-coated tips for aggressive good looks.
Bolt-On Installation. This exhaust system is designed to be a bolt-on process. You can fasten and secure this exhaust system to your truck’s factory hanger locations using the stainless band clamps and hardware. Light to moderate mechanical skills is required to ensure proper installation. Please note, depending on your truck's cab and bed length, some cutting to the piping may be required.
Application. This Flowmaster Outlaw Dual Exhaust System with Black Tips and Side/Rear Exit is designed to fit 2019-2023 5.7L RAM 1500 models. However, it is not designed for 2019+ RAM 1500 Classic models.
Shop All Truck Parts And Accessories
Shop All Truck Exhaust
Fitment:
Flowmaster 817936
CA Residents: WARNING: Cancer and Reproductive Harm - www.P65Warnings.ca.gov
Installation Info
Installation Time
(approx) 2 Hours
Difficulty Level:
Light to Moderate mechanical skill required.
Installation Guides
What's in the Box
10 More Questions