FREE 1 to 3-Day Delivery on Orders $149+ Details
How to Install Flowmaster American Thunder Aluminized Steel Cat-Back Exhaust - Split Side/Rear Exit (03-08 5.7L RAM 1500) on your Dodge RAM

Shop Parts in this Guide
Removal:
1) Raise the vehicle up on a hoist or rack to working height. If you do not have access to a hoist or rack raise the vehicle and support securely with jack stands.
2) To make removal of the stock system easier, you may choose to cut the stock tailpipe off where it exits the muffler. This can be done using a hacksaw or sawsall. After cutting, remove the hanger at the rear of the tailpipe from the rubber mount on the vehicle and set aside. This step is not mandatory, but makes removal easier.
3) Support the muffler with a stand and remove the two hangers at the rear of the muffler along with the hangers in front of the muffler from the rubber mounts on the vehicle. Then loosen the ring clamp at the muffler inlet connection. Once loose, slide the muffler off of the front pipe and set aside.
Installation:
1) Before installing anything, prep the clamps supplied in the hardware kit by removing the nuts, and applying a thick lubricant such as white grease or anti-seize to the threads.
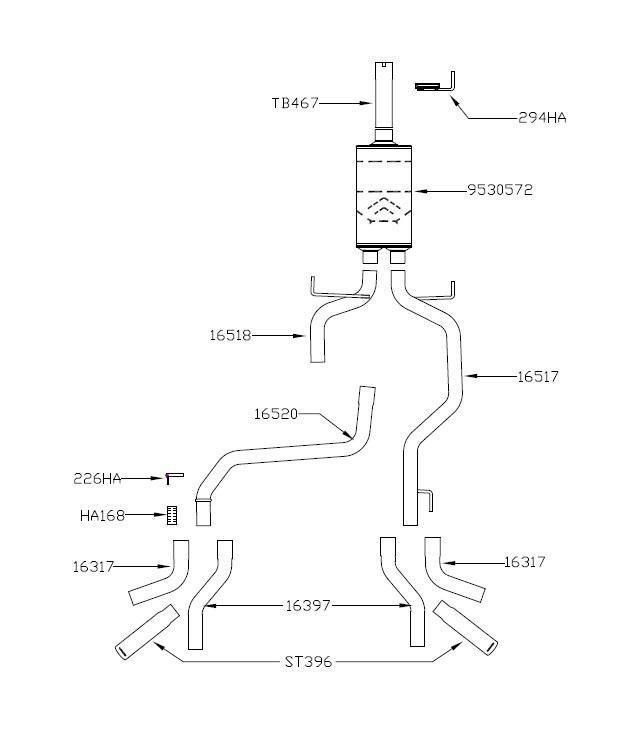
2) Connect adapter pipe #TB467 to the factory inlet pipe; line up the notch in the adapter with the tab on factory pipe. Then slide a 3” clamp #MC300G onto the inlet pipe slip fit. Slide muffler #9530572 onto adapter pipe #TB467. Use a stand to support the muffler and install the provided clamp hanger #294HA onto the inlet of the muffler and the rubber mount on the vehicle.
3) At the rear of the frame on the drivers’ side of the vehicle (next to spare tire) there is an oversized slotted hole that goes through both sides of the frame. Using this hole, connect frame hanger #226HA to the outside of the frame using the 3/8”x 4” bolt, nut, washer and the HA566 as a backing plate on both sides of the frame. Make sure the hanger is straight up and down, tighten securely.
4) Place rubber hanger #HA168 onto the bottom of frame hanger #226HA.
5) Place the right side tailpipe #16517 into position over the rear axle and into the right side muffler outlet. Connect the hangers at the front and rear of the pipe to the rubber mounts on the vehicle. Install a provided 2 1/2” clamp onto the muffler outlet and tighten enough to hold but still allow for adjustment.
6) Place the front section of the left side tailpipe #16518 into the left side muffler outlet and connect the hanger on the pipe to the rubber mount on the vehicle. Place a provided 2 1/2” clamp onto the muffler outlet and tighten enough to hold but still allow for adjustment.
7) Connect the rear section of the left side tailpipe #16520 onto the back of the front section by sliding the two sections together at the slip-fit connection over the rear axle. Place the hanger at the rear of the tailpipe into the rubber mount installed in step 3 above. Install a provided 2 1/2” clamp onto the over-axle slip-fit connection. Tighten enough to hold but still allow for adjustment.
8) Slide the desired exit pipes (side or rear) onto the ends of both over-axle pipes. Place a 2 1/2” clamp onto the slip-fit connections and tighten enough to hold in place. Place the two stainless tips onto the exit pipes and tighten the pinch bolts enough to hold in place. Rotate the exit pipe and tip to the desired position.
9) After the system is secure, slide the 7/16” hanger keepers onto the end of the hangers at the rear of the vehicle on the drivers’ side. These will prevent the hangers from slipping out of the rubber mounts.
10) For a cleaner appearance and more secure installation, we highly recommend welding all slipfit connections. If you live in a geographical area that has harsh winters or sees a great deal of precipitation, the use of high temperature paint over the welded areas can help to prevent surface rust and premature corrosion.
PACKING LIST