 FREE 1 to 3-Day Delivery on Orders $149+ Details
How to Install Putco Boss Mesh Upper Replacement Grille on your Ram
Installation Time
1 hours
Tools Required
- 10mm, 9/32”, 7/16” Socket and Ratchet
- Drill
- Pliers
- 5/16” Drill Bit
- Needle Nose Pliers
- Dremel or Side Cutter
- Small Flat Blade Screwdriver
- Marker

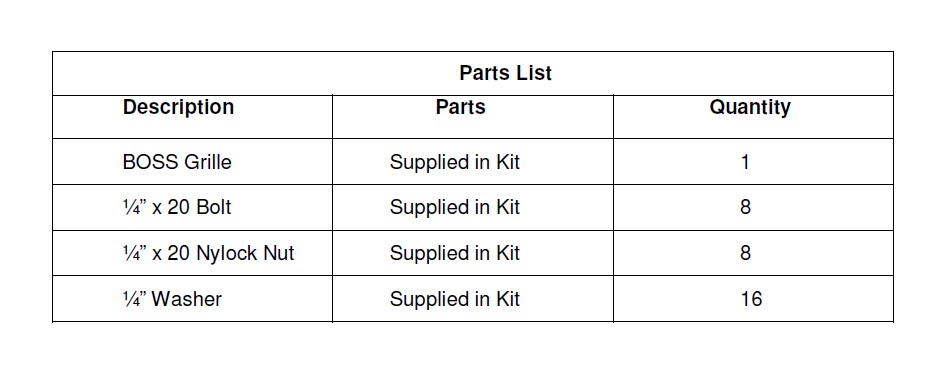
Shop Parts in this Guide
Please read all instructions before beginning installation and be sure to check to see that all part
NOTE: IT IS RECOMMENDED THE INSTALLER/TECHNICIAN READ THE INSTRUCTIONS THOROUGHLY PRIOR TO INSTALLATION OF THIS PRODUCT.
1. Open hood.
2. Remove six push pins from the hood shroud and set aside for re-installation.
3. Remove four 10mm bolts from the top of the grille and set aside for re-installation.
4. Remove grille by pulling outward on the bottom driver side corner and working
towards the passenger side. (Note: There are three plastic tabs at the bottom of the grille holding it in place.)
CAUTION: Take the proper precautions to protect the face of the grille from
cosmetic damage.
5. Reposition the grille away from the vehicle and place on a clean workbench.
6. Set the grille on a sturdy nonabrasive surface.
7. Review figure 3a and 3b before cutting your factory grille. You will need to remove the center section of the factory grille that is shaded gray in figure 3a. (Note: Leave approximately 1” of the vertical and horizontal cross bar as shown in figure 3a.)
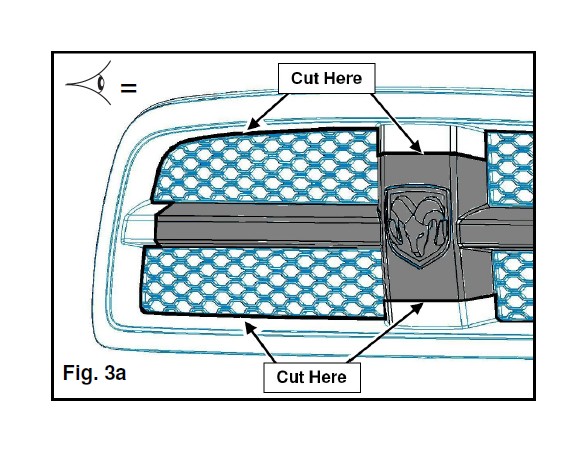
8. Carefully cut out the center section of the factory grille. Use the dashed lines in figure 3b as a guide for cutting. When you have removed the center grille section it should look like figure 3c. Make sure all cuts are flush. (Note: Discard the center section of the factory grille.)
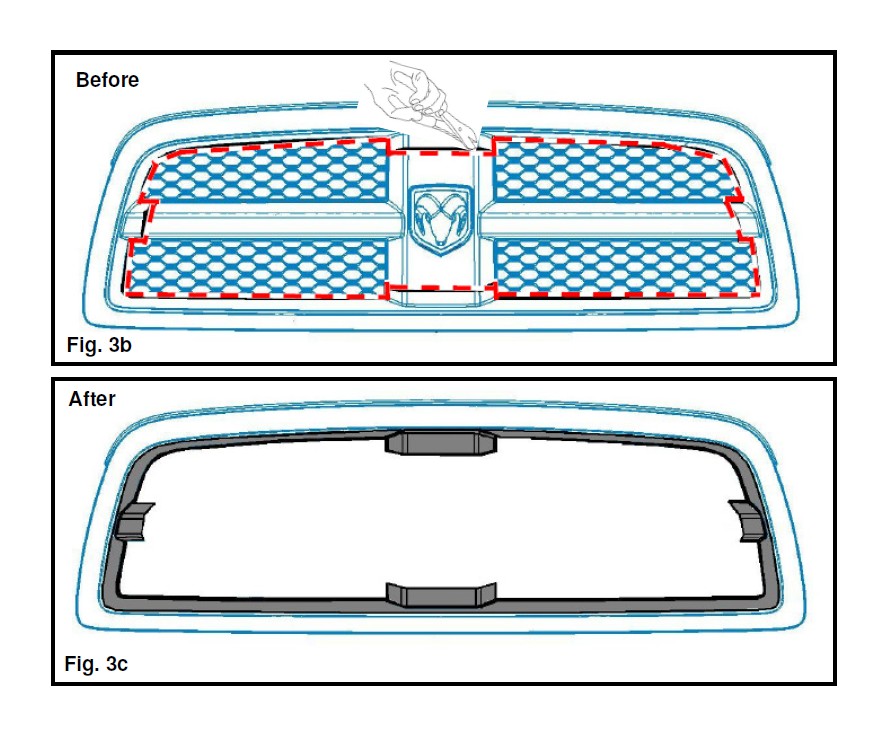
9. Position and align the BOSS Grille inside the factory surround. Mark the mounting locations using the brackets on the back side of the grille with a marker.
(Note: Ensure that the grille is centered and aligned before drilling.)
10. Remove BOSS Grille from the factory surround and drill eight holes using a
5/16” drill bit. Use the marks made in step 9 as a guide for drilling.
11. Insert the BOSS Grille into the factory surround. Align the mounting tabs with
the drilled holes.
12. Secure the grille to the factory surround using the hardware provided.
13. Temporarily attach grille/surround to the vehicle using the four 10mm bolts.
Verify that the grille is centered and aligned.
14. Remove grille/surround from the vehicle and make adjustments if needed.
15. Tighten all hardware so the grille is secured to the factory surround.
16. Attach the grille to the vehicle so it is fully engaged and secure.
17. Re-attach the four 10mm bolts that were removed in Step-3 and tighten down.
18. Re-attach the hood shroud cover that was removed in Step-2.
19. Confirm that all components and hardware are secure.
20. Close hood.


