FREE 1 to 3-Day Delivery on Orders $149+ Details
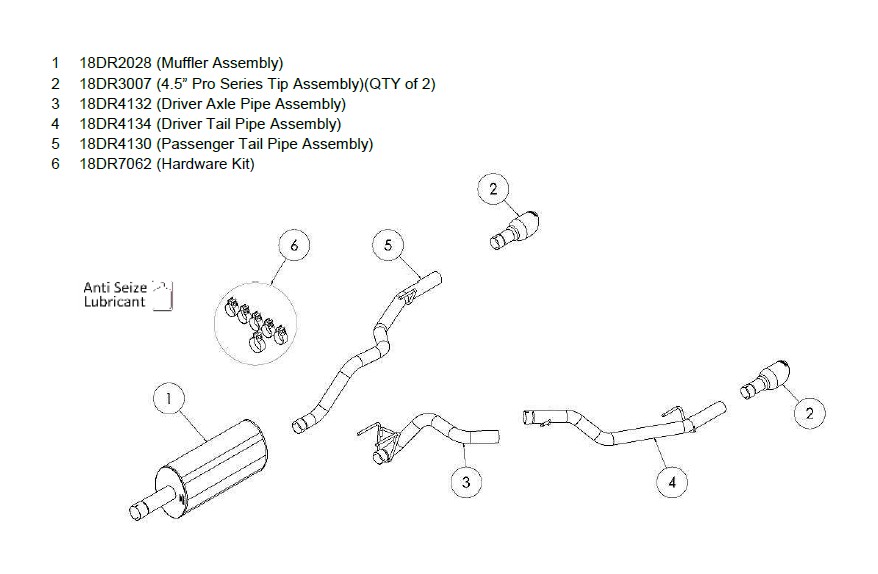
How to Install Corsa 3 in. Sport Cat-Back Exhaust w/ 4.5 in. Polished Tips - Split Rear Exit (09-17 4.7L RAM 1500) on your Dodge RAM
Tools Required
- Safety Glasses
- 15mm Socket
- 3/8” Ratchet
- Grommet Pullers
- Torque Wrench
- Soap & Water Solution

Shop Parts in this Guide
Please take time to read and understand these installation instructions.
CORSA recommends that the installation of this system be performed by a qualified service center or professional muffler installer who has the necessary equipment, tools and experienced personnel. However, if you decide to perform this install, the use of a hoist and an additional person will be required.
CAUTION: Never work on a hot exhaust system. Allow time for the vehicle to cool. Always wear eye protection when working under a vehicle.
Please confirm that all parts are present before beginning the factory exhaust system removal and CORSA exhaust system installation.
Bill of Materials:
Removal of Stock Exhaust System:
1. Using a 15mm socket, loosen the factory clamps connecting the tailpipes to the muffler. (See Fig. A). Note: The use of a soapy water solution may aid in the removal and later installation of the hangers in the rubber isolators.
2. Using a grommet puller or similar device, remove the passenger tailpipe hanger. Remove the passenger tailpipe over the axle towards the rear of the vehicle. (See Fig. B, C).
3. Remove the driver side tailpipe hangers and remove the drier side tailpipe over the axle towards the rear of the vehicle. (See Fig. D, E, F).
4. Using a 15mm socket, loosen the factory clamp connecting the muffler to the factory headpipe. (See Fig G).
5. Remove the muffler hangers; Be sure to remove the grounding strap from the factory muffler before removing the muffler from the vehicle. (See Fig. H, I, J). The removal of the factory system is complete.

Installation of CORSA Performance Exhaust System:
NOTE: Apply the anti-seize lubricant (supplied) to the threads ONLY of all the clamps and flange bolts. Failure to follow this procedure can cause nuts to seize on clamps and potentially destroy threads. After applying anti-seize lubricant, be sure to thoroughly clean your hands, as lubricant will tarnish stainless steel. All clamps should be tightened using a properly calibrated Torque Wrench. Using an air impact gun will damage the clamp and reduce its ability to effectively seal the joint. It may also cause the joint to separate, thereby causing damage to your exhaust system and to your vehicle.
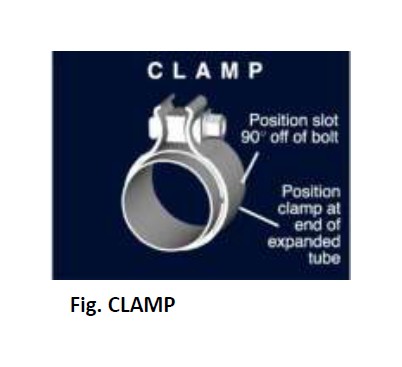
NOTE: Align all clamps so that the center of the clamp bolt is 90 degrees from the notch in the pipe. (See Fig. CLAMP)
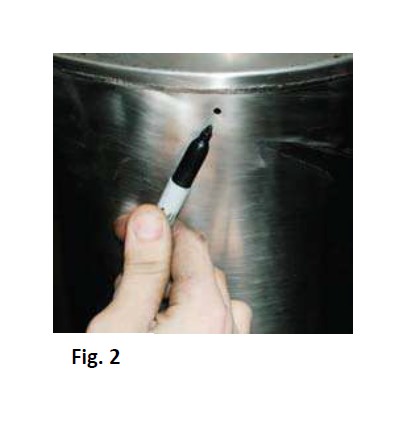
IMPORTANT: Make sure that the small drain holes in the muffler are facing down when the muffler is installed. (See Fig. 2).
1. Remove all exhaust system components from the shipping carton and verify all components are present.
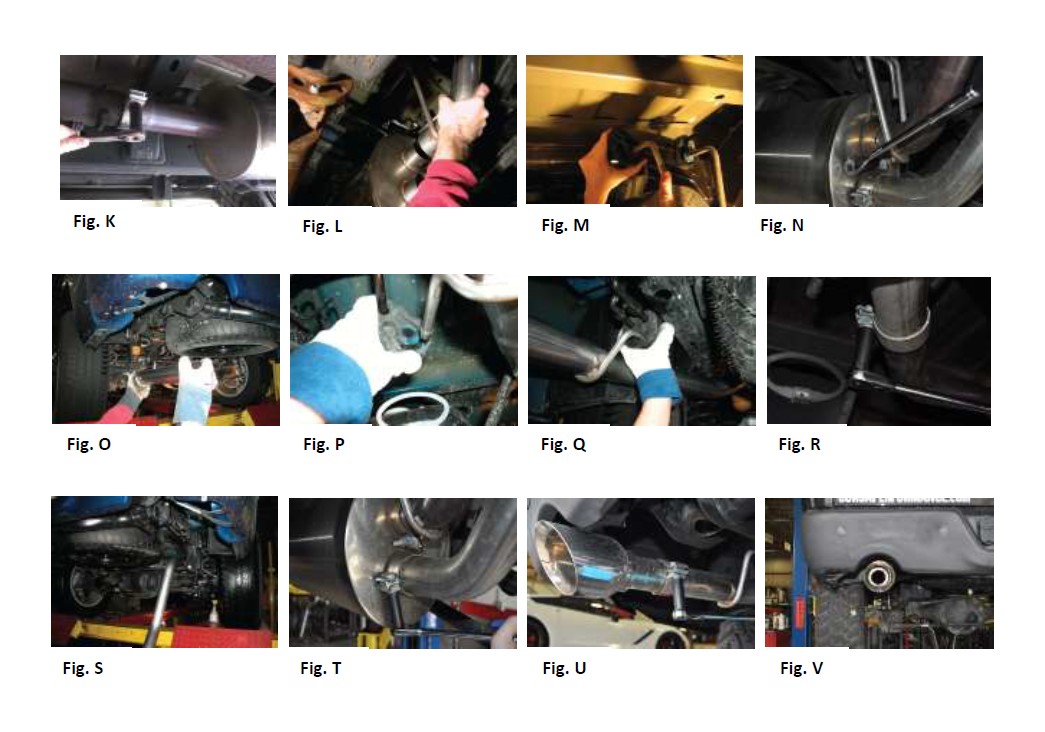
2. Slide one of the supplied clamps onto the inlet side of the muffler. Install the CORSA Performance muffler. While supporting the rear of the muffler, align the CORSA Performance muffler to the factory headpipe. The outlet pipes of the muffler should be in line vertically. Loosely tighten the clamp at this time just enough to hold the muffler onto the headpipe. (See Fig. K).
3. Slide one of the supplied clamps onto the front of the driver axle pipe assembly. Slide the front of the axle pipe assembly over the TOP outlet of the muffler. Slide the hangers into the rubber grommets. Loosely tighten the clamp at this time. (See Fig. L, M, N).
4. Slide one of the supplied clamps onto the front of the driver tail pipe assembly. Install the driver side tailpipe assembly over the axle and slide the front of the tailpipe over the outlet of the axle pipe. Make sure to check for clearances of all cables & hoses – all cables & hoses should hang between the pipe and the differential/spare tire. Slide the hangers into the rubber grommets. Loosely tighten the clamp at this time. (See Fig. O, P, Q, R).
5. Slide one of the supplied clamps over the front of the passenger tailpipe. Install the passenger side tailpipe assembly over the axle. Slide the front of the tailpipe over the bottom outlet of the muffler. Slide the hanger into the rubber grommet. Loosely tighten the clamp at this time. (See Fig. S, T).
6. Slide one of the supplied clamps over one of the CORSA Performance Pro Series tip assemblies. Slide the tip onto the rear of the driver tailpipe. Snug tip clamp at this time, keeping it loose enough for adjustment. Repeat for the passenger side. (See Fig. U).
7. At this time, make all necessary adjustments at the clamp joints to align the tips and obtain proper clearances. Check clearance of exhaust system, hangers, frame, cables, hoses, etc. Check tip depth, height, and rotation. The tips should be centered in the factory bumper cutouts. (See Fig. V).
8. Starting from the front of the system and continuing towards the rear, torque all of the nuts on the supplied clamps to 45 ft-lbs.
9. It is STRONGLY SUGGESTED that all clamps be checked and tightened if needed after road testing the vehicle. Please wait until system has fully cooled to perform this step.
NOTE: During cold weather start-ups , you may experience an exhaust sound that is deeper and louder in tone than usual. This is temporary and will diminish to normal levels once your engine has reached its normal operating temperature.
NOTE: Immediately following the installation of your exhaust system, you may experience a trace of smoke after initial start-up. DO NOT be alarmed. The smoke is caused by the burning of a small amount of forming oil residue used in the manufacturing process.