Talk to a Ram 1500 Sales Tech
1-888-706-1096
M-F 8:30A-11P, Sat-Sun 8:30A-9P
$20K Sweeps! 10 Chances to Win! Enter Daily >

Bilstein B8 5100 Series Rear Shock for 0 to 1-Inch Lift (09-18 4WD RAM 1500 w/o Air Ride, Excluding Rebel)

Item R118218
Verify parts fit and get product recommendations.
Ram 1500 Sales Techs: Connect Now M-F 8:30A-11P, Sat-Sun 8:30A-9P
$0.00
Our Price

$110.00 (each)

FREE Shipping on orders over $119 Market Price $126.99 You Save 13% ($16.99) Up to 10% off for Military & First Responders! See Details

Will this fit your Vehicle?

Select a different vehicle Help?
Update or Change Vehicle
Ship to: Ashburn - 20149
Sorry, please enter a valid US or CA postal code
We're sorry, zip can't be updated at this time.
    Create a list
    Add to New List

    Saved - View your saved items

    We're sorry. We couldn't save this product at this time.

    or use

      Product Videos

      Jake: Jake here for American Trucks, and in this video, I'm taking a look at the Bilstein B8 5100 Series Rear Shock for 0 to 1-inch lift fitting 2009-2018 4WD RAM 1500s without Air Ride, excluding the Rebel models. Upgrading your shocks is an excellent way to improve both the ride and handling characteristics of your truck, and the B8 5100s here from Bilstein make a huge difference in how your truck performs. Whether you're at stock ride height or running up to 1 inches of lift in the rear, it does all for an affordable price.I don't like to mince words when it comes to suspension modifications. When it comes to getting some kind of lift or level on your truck, yes, we all want the look, but it's got to ride and perform well too. Nobody does ride and handling quite like Bilstein. I've had Bilsteins on a few of my own vehicles, including a set of these B8 5100s, and I gotta tell you, they never fail to impress. This shock is set up for a stock ride height truck or one that has up to one inch of lift in the rear. If you're going to have variants like that, you've got to have the damping to match. Otherwise, the ride and handling is going to be compromised. But Bilstein, of course, has you covered there.The B8 5100 features digressive valving technology, so that allows the shock to instantly react to impacts and varying road surfaces. Inside the shock body, there are velocity-sensitive digressive floating pistons. Those allow for more variability in both rebound compression and also in travel. And that's just going to add up to more control out on the street or the trail. Despite being a non-adjustable monotube shock with outer-remote reservoir, the damping here is excellent and you can definitely feel the difference in body control versus stock.This is not going to ruin the ride quality by any means, which is important in a RAM that has really good ride quality to begin with. In fact, this stays pretty much the same as it does stock. It's just maybe a bit more firm and, again, more controlled. It's a shock that really doesn't compromise anyway. So whether you're out on the street, hitting the trail, or you're just hauling a bunch of stuff around, this shock is going to be up to the task and it's not going to let you down.Construction, as is typical with Bilstein's offerings, is excellent. You get a 46-millimeter diameter shock body and it's zinc-plated for durability and good looks. Inside, you've got a chromed and hardened piston rod and that velocity-sensitive, digressive floating piston, which we were discussing a few moments ago. You also get new OEM grade bushings at the mounting points, both top and bottom, giving you everything you need to replace your shock. So this is just going to bolt right into the place of your stock one. Now, Bilstein also backs this up with a lifetime warranty against defects. And I can tell you from experience, they're good about honoring that. Just make sure you save your receipt.Pricing is going to come in at about $150 per shock. And as you've definitely noticed by now, I've only got one shock up here on the table because these are sold separately. So make sure you make that quantity two. When you go to buy them, you'll need one for each side and you do want to replace these in pairs. Now, that $150 price point puts these in about the middle of the range price-wise. And to me, that seems to be about right. Since you aren't getting things like adjustable damping or remote reservoir, you are saving a bit on costs there, but these are still going to provide excellent damping and control and the ability to help level out your truck too. So if you're shopping for shocks and you aren't looking to lift it up to the sky, you really can't go wrong with these.Now, there's also a matching front shock of this same series available. And that's going to even allow you to level out the front end of your truck without anything additional. And I would highly recommend doing these together. Having these on the front and rear is going to make a big improvement in how your truck drives and behaves. And I think you'll be pretty happy once you've got that setup done.Installation will get a one out of three on our difficulty meter and should take you about one hour per shock. Now, since the rear of the RAM is not a coilover setup, you just need to unbolt your stock shock absorber and bolt this one in its place. And you're going to repeat the same process for the other one you've bought on the other side. Aside from taking off the wheel and jacking the truck up, it's really a two-bolt job, pretty straightforward. Definitely something you can accomplish at home. And to show you the process, let's hand things over to one of our AT customers right now.Customer: All right and here's the tools we'll be using to change the shocks on a RAM 1500 2017 variety. I'm going to start with a couple different ratchets. I'm gonna need a 7/8ths socket or two. You might need two, one for each of your ratchets. I'm just showing one. You'll need a 21-millimeter or two sockets as well. You know, various extensions help out just sometimes just to get the right leverage, to get the wrenches in the right spot. I used a pry bar, can really help in getting the shocks in the position when you install them. Anti-seize, I use that on any metal to metal areas, specifically for this install between the bushing and the shock bolts.Big impact wrench is handy if you have it to help get those bolts loose the first time. If you're in a rusty environment, that make it easy. You'll also need a 5/16ths driver bit and either an electric screwdriver, or if you have if you don't have an electric screwdriver, just one of those screwdrivers that has the end where you can put the hex into. And then I also had an extra impact driver just to kind of help set the bolts after you install without kind of over-torquing them. This guy will do the big torque. You also need, to make it a little bit easier, well, really to get the tire off, you'll need a jack stand over here, and then jack stands as well. To secure the truck once you get it up in the air, you'll lower the jack stands or the truck onto the jack stand.Step two is to remove the fender liner. And we need to get rid of the fender liner because the shock here goes all the way up and it's really hard to reach without removing the liner. In total there's 10 bolts and they use a 5/16ths driver bit to remove. That was eight around the perimeter. And then there's two holding the fender liner against the frame. So on this truck, back in the corner there was a hidden bolt. So that would make 11.Another thing to be careful of is if these clips fall out, and make sure to put them back in so you don't lose them. There's the other one right there. So now, as you can see, we got access to that upper bolt. This is the head of the bolt. Back behind here is the nut and that's gonna be tough to get to. However, someone already came up with a solution. You can fiddle around with that back there or company called Thuren Manufacturing, have to check the name, makes these little flags and it's a flag like you'd see on other trucks with hidden bolts. And you can kind of slide in the back so we'll see how well this works. I haven't tried it the old-fashioned way, just trying to wiggle a wrench in there so I'm gonna do it the way someone did and designed this. The other one's easy to get to, my light being in the way.Now, with the classic one right there. We'll start with the bottom. These are 21-millimeter sockets. So, we'll remove this bottom bolt. You gotta make sure your wrenches are set the right direction. Once those wrenches are set the right direction, it comes apart pretty easy with the right impact. And there's our bottom one. Take a look at the threads. Make sure when you removed it you didn't smash any of the threads. And the inside looks good. And when I'm working on stuff, especially with a lot of bolts, I'll try to thread the old bolts where they belong, especially if I'm reusing them. That can help out a lot, just remembering where stuff is. Luckily for this install, you got five lug nuts and two bolts. Should be pretty easy to remember those.And now we will work on those upper bolts. I'm going to take this Thuren Manufacturing deal and it just clipped on right there. All right. Move everybody over a little bit, make some room and now if all goes to plan, throw in a little tool to help us get it off the back. I think one of the challenges of using a regular wrench is gonna be that just on the other side, it's hard to see because of the fuel line, the fuel filler, is it's kind of like captured. The nut's captured. You'll either need a really tiny, short 21-millimeter open end wrench, box end wrench, or you'll need to sacrifice one to the great automotive gods and chop it off so that you can get it to fit in there. I would imagine that cutting it off, you'll be able to just kind of leave it in there and it'll push against the bracket itself, kind of like this flag does. But those Thuren Manufacturing deals aren't too bad considering comparing it to having a sabotage, or not sabotage, destroy a box end wrench, and then you kind of, it has a single purpose as well.The nice part about the Thurens is they also come with a two-pack of these that are pre-assembled and that nut is smashed in there so it's not coming out. So the next time you get around to doing the rear shocks you can reuse this guy. So there's another benefit to buying that kit and it's also new hardware. A lot of times new hardware is good to use. It's going to get loud. We're going to take those rears off or the uppers off. So that went flying. Where did that go? Yeah, there's your little bracket. I think it came free. Let's see if we can get that bolt out.We'll have to get a little creative. We'll be using a 7/8ths socket and a lot of power. Now the bolt's free. And you can check to make sure it's free. Checking the nut so, you know, pretty corroded up there. That fender liner must really even here, we're on it. You saw how relatively rust-free this truck is. I'm a second owner. He came from out East, so there's still some rust. It was a work truck. Lots of dust, white dust. I don't know where they were working. But yeah, so there's the old bolt. Slap that out and let the shock fall. All right, we'll be back to install the new one. And we'll start by putting the shock in the upper mount. Makes it a little bit easier to push on the shock to get it in position. And remember, keep those bolts where you can see them.And we're back. So we're about to install the Bilstein shocks here. Zoom out a little bit and we'll install the Bilstein shocks here. You want the writing to be right side up. So what that means for this install is the boot will be up here. We'll attach the boot up here and the shiny bottom of the shock, the pretty part, will be on the bottom. So if anyone gets to look under the truck, they'll see the nice, pretty Bilsteins that we're installing today. All right. So as I mentioned earlier, it's nice to keep your bolts where you took them out to help with the install. Slide that bad boy in.And then since I'm replacing the upper shock nut with this Thuren piece, we'll be putting a new nut in there. If we look at the old one, it's not in too bad of shape. If I had easy access to the backside of this and I didn't have these Thuren Manufacturing pieces, I would probably reuse this after hitting it with a wire brush and some anti-seize. One thing I like to do, as I mentioned earlier on when I messed up and I didn't get the bolt all the way off, is sometimes the bolt can seize inside the bushing, the metal part of the bushing, and to help prevent that, whenever I install new shocks, I use some anti-seize on the area on the bolt that's nice and clean in this case. On the area that's nice and clean, that's the area that was not exposed to the elements and was stuck inside that shock.So just a little bit will take you a long way on this anti-seize So let's see. Brush this on. Especially on the shank here, that's a little bit wider than the threads. That's the part that'll seize first. I know based on reading a lot of internet forums there's mixed opinions on putting any kind of lubricant or foreign substance on the threads that are engaged with the nut. So just for since I'm not in a area where I'm worried about a lot of rust, just want a little bit. I'm not going to put any on the threads. I have in the past and on my 2010 Jeep Wrangler and I haven't ever run into any problems with that so I go both ways. Just trying to get the nut threaded on a little bit by hand. I always try to thread bolts on by hand. If you have access to the impact wrenches. You can crush thread bolts really easy, especially those lug nuts. Can't see that. I was tapping on the lug nuts.Now, those are really easy to thread, cross-thread on and cause yourself problems. So I've got it hand-threaded. The new nuts have a nylon, they're self-locking. So they've got nylon there and I'm gonna use my little impact gun not to over torque the shock nuts. Just gonna kinda get that in there for now. It's still a little loose, but that's okay. Now comes the fun part.All right, and now we're back. As you can see, you want the shock, according to Bilstein, you want the shock with the lettering up, kind of walking when going over bumps on the highway and just kind of a truck feeling a little off. So decided to replace these with those Bilsteins. Again, I'm going to put some anti-seize on this guy. There might be a trick someone else knows. I just generally use brute strength and then the pry bar. The shocks that have the bolt on the top don't always work nicely. All right, got that part way in.And now, the plan is to use this pry bar to help get it the rest of the way. Presto. Again, threading the bolt on. Hopefully this is centered enough for everybody until I get to the stopping point and I'll hit it a little bit with the impact. It's slipping off a bit. Little bit of an extension but we're really close. Probably leave it there until we get our torque spec out. All right, so the torque spec for both the upper and lower rear shock bolts is 100 foot-pounds. So I'm using my torque wrench. I've already got it set to 100 foot-pounds. And 100 foot-pounds is a good amount in this angle. I will torque it until this one is...until it clicks.There we go. And now my stick is a little stuck, help give this a little twist or a hammer. See if I can break this loose. All right, we got this installed. I'm gonna move you guys around to the upper and now we will do the upper. Learn from me. Make sure you have the right size on your torque wrench. It's a 21-millimeter, not a 7/8ths. All right, 100 foot-pounds. And now that tab is in there. Ready for the next time we change these out.Let's finish off this job. We've got two more tasks to do, which is put the fender liner back in, throw the wheel on, and then we'll torque the wheel down. All right, we've got a pretty shock. And it'll be important to remember that hidden bolt on the truck. I'm going to try to finagle the liner in, and then in all likelihood put that bolt in first. It's also a good idea, which I didn't do, to check to make sure all your clips that those screws go into are in. As we saw, the clips along the frame actually were clipped onto the tub of the truck. You know, those popped out and we wanna make sure we get those back in.So those wall clips on this backside shifted a little bit while I was putting the fender liner back in. Kind of once it falls into place, it kind of fits there. We'll take our handful of screws and that 5/16ths bit and we will install everything back together. To help hold the fender in place, I'm gonna put the back screws in first. And you can kind of see where the screw, the washers on the screws were. I always try to line those back up just trying to get everything back in as close in the same position as I could. That one's a little off. All right. I'll put that hidden one in first because there's the hidden screws right here. There's a fender screw right here and another one up here. So as soon as you put those two in, you won't be able to get to this one.And it'll really help to have a light. If you're doing these by hand, kind of use a flashlight. You can kind of get an idea of where the hole on the fender is. And that can help you get it in the right spot. These screws are pretty aggressive, I could see. there being a potential of not getting it in the right hole and you're kind of just drilling into the fender. It won't be as secure with it versus the metal clips. And in a perfect world as you put more and more of these in, it should help line the fender up. So there we go. All right. I don't know if everybody can see that. Yes, you can. All right, so you can see here I wasn't careful enough and it's not tightening down, I must have missed that screw hole. I'm going up here first. I can see that one.Jake: That's going to wrap things up here for our review and install of the Bilstein B8 5100 Series Rear Shock for 0 to 1-inch lift, fitting 2009 to 2018 4-wheel drive RAM 1500s without Air Ride, excluding the Rebel models. Thanks so much for watching, and as always, for all things RAM, be sure to keep it right here at americantrucks.com.

      Product Information

      Features, Description, Reviews, Q&A, Specs & Installation

      Features & Specs

      • Rear Shock Absorber
      • Built for Fade-Free Off-Road Performance
      • Engineered for Superior Comfort and Stability
      • Made for Trucks with 0 to 1-Inch Lifts
      • Features a Digressive Piston for Quick Reaction
      • Advanced Velocity-Sensitive Valving Technology
      • Premium-Level and Stunning Finish
      • Straightforward Installation
      • Sold Individually – Includes 1 Rear Shock
      • Covered by a Limited Lifetime Warranty
      • Made in the USA
      • Fits All 2009-2018 4WD RAM 1500s Without Air Rides, Excluding Rebel Models

      Description

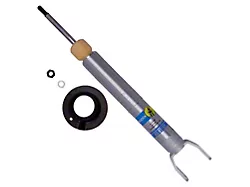
      High-Performance Rear Shock Damping Capability. The Bilstein B8 5100 Series Rear Shock for 0 to 1-Inch Lift fortifies your RAM 1500’s suspension system for aggressive adventures without compromising comfort, control, and stability. It is equipped with a self-adjusting deflective disc valve setting that offers independent tuning of its rebound and compression, allowing you to tackle uneven terrain with unrelenting traction and wheel travel.

      Outstanding Velocity-Sensitive Technology. The B8 5100 Series Rear Shock for 0 to 1-Inch Lift includes Bilstein’s digressive valving technology. This feature allows your truck to quickly react to varying road surfaces so you can take full control over your truck no matter how suddenly the road conditions may shift.

      Built for Aggressive Applications. The B8 5100 Series Rear Shock for 0 to 1-Inch Lift guarantees unmatched strength and reliable performance. This heavy-duty, gas-charged monotube shock absorber is equipped with a 46mm piston that is designed to take on road hazard impacts and heavy compressions. It also comes with a high-quality rubber bushing for extra cushion and durability.

      Quick and Simple to Set Up. Setting up the B8 5100 Series Rear Shock for 0 to 1-Inch Lift is trouble-free. It attaches to the suspension system using OE mounting points without alterations.

      Hassle-Free Limited Lifetime Warranty. Bilstein guarantees that the B8 5100 Series Rear Shock for 0 to 1-Inch Lift is free from manufacturing defects from the original date of retail sale for as long as the original purchaser owns this product. Some conditions for this warranty may apply. Please refer to the manufacturer’s website to learn more.

      Application. This Bilstein B8 5100 Series Rear Shock for 0 to 1-Inch Lift fits all the 2009-2018 4WD RAM 1500s without Air Rides, excluding Rebel models. This shock absorber is sold Individually.

      Fitment:

      Details

      Bilstein 24-187374

      CA Residents: WARNING: Cancer and Reproductive Harm - www.P65Warnings.ca.gov

      Installation & What's in the Box

      Installation Info

      What's in the Box

      • (1) Rear Shock Absorber
      • (1) Shock Boot
      • Installation Hardware
      4.9

      Customer Reviews (203)

        Questions & Answers

        10 More Questions

        Will It Fit My Ram 1500

        • 3.0L V6 EcoDiesel - 14, 15, 16, 17, 18
        • 3.6L V6 - 13, 14, 15, 16, 17, 18
        • 3.7L V6 - 10
        • 4.7L V8 - 09, 10, 11, 12, 13
        • 5.7L V8 - 09, 10, 11, 12, 13, 14, 15, 16, 17, 18