FREE 1 to 3-Day Delivery on Orders $149+ Details
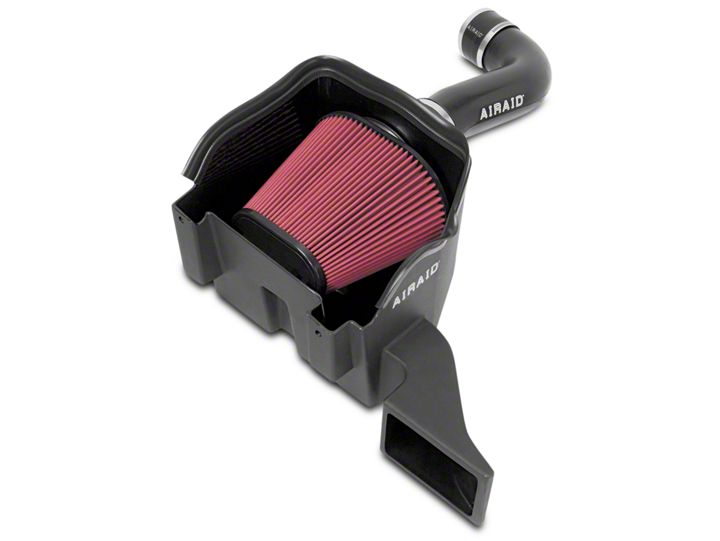
How to Install Airaid MXP Series Cold Air Intake w/ SynthaFlow Oiled Filter on your Ram
Shop Parts in this Guide
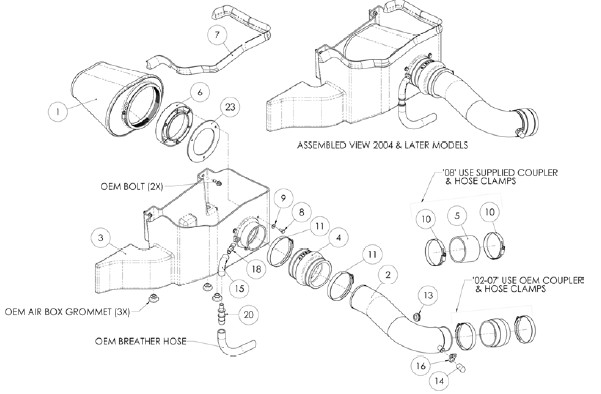
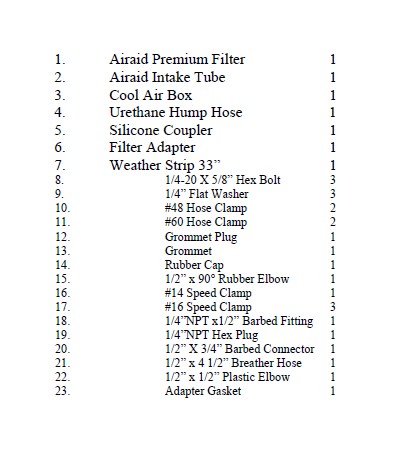
Component Identification
1. Disconnect the negative battery cable. 2003-12 Models: A) Squeeze the tab on the intake air temperature sensor wiring connector on the front or back of the factory resonator, and disconnect it from the sensor. 02-07 Models: B) Loosen two hose clamps. One on the back of the coupler on the throttle body, and one on the air filter lid side of the flexible intake tube. 2008 Models: Loosen the hose clamp that holds the flexible tube to the airbox lid. 2004-12 Models: C) Disconnect the crankcase breather hose from the air filter lid. 2002 & 2003 Models: Disconnect the breather hose from the back of the resonator.
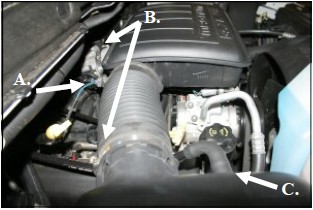
2. Slide the flexible intake tube off of the airbox lid and then lift the complete airbox straight up and out of the vehicle.
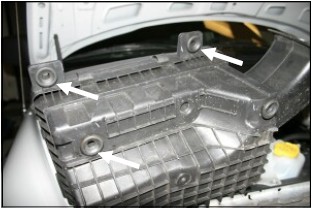
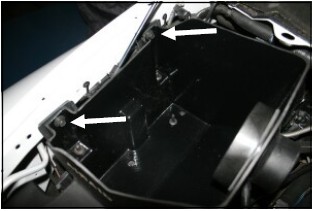
3. Turn the factory air box over and remove 3 of the 4 grommets. They will be reinstalled in the Airaid Cool Air Box in step #8.
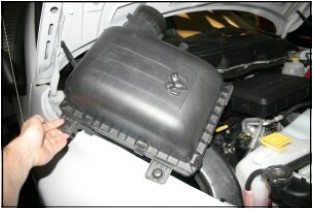
4. Using a 10mm socket, remove the two bolts (one bolt on 2008 and newer models) that secure the intake resonator to the engine, one on the drivers side, and one on the passenger side of the resonator. Grab the resonator with both hands at the front and push back and up to release it from the locator grommet on the bottom. Remove the resonator from the vehicle.
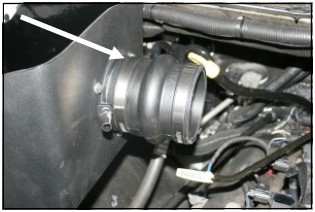
5. 2002-07 Models Loosen the factory hose clamp on the coupler and remove the coupler assembly from the resonator. 2003-12 Models Rotate the air temp sensor counterclockwise and remove it from the resonator. These parts will be reinstalled on the Airaid intake tube in step #12.

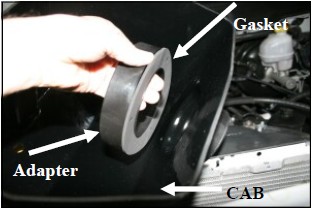
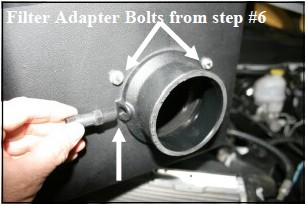
6. Install the filter gasket (#23) and filter adapter (#6) onto the Airaid Cool Air Box, or CAB (#3) as shown using three 1/4” x 5/8” bolts (#8), and 1/4” flat washers (#9). Refer to the line drawing above for reference.
7. 2004-12 Models: Install the 1/4” NPT x 1/2”Barbed fitting (#18) into the CAB as shown. 2002-03 Models Install the 1/4” hex plug (#19) in place of the barbed fitting.
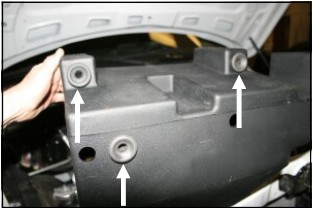
8. Install the factory grommets removed in step #3 into the bottom of the CAB at the locations shown here.
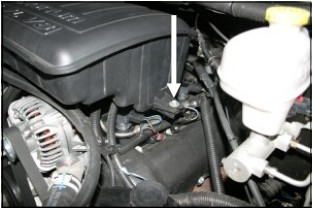
9. Remove the two bolts that secure the factory airbox mounting bracket to the inner fender. They will be reinstalled in step #10.
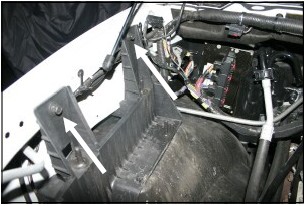
10. Install the CAB into the vehicle aligning the grommets over the locating pins. Reinstall the two factory bolts into the fender that were removed in step #9.
11. Install the hump hose (#4) onto the CAB using two #60 hose clamps (#11). Tighten the hose clamp on the CAB.
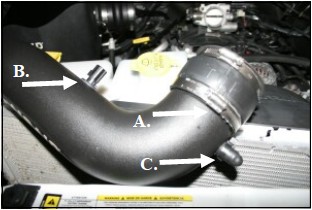
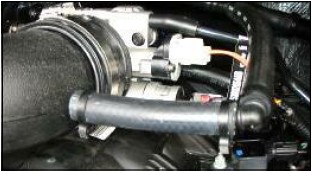
12. 2002-07 Models: A.) Reinstall the factory coupler and hose clamps on to the Airaid intake tube (#2). (2008-12 Models: use the supplied coupler (#5), and #48 hose clamps (#10). Tighten the hose clamp on the tube. 2003-12Models: B.) Install the supplied grommet (#13) into the hole in the Airaid tube, and then carefully push the factory air temperature sensor into the grommet. 2002 Models: Install the grommet plug (#12) in place of the grommet. 2004-12 Models: C.) Slide the rubber cap (#14) over the nipple on the Airaid intake tube and secure it with the #14 speed clamp (#16).
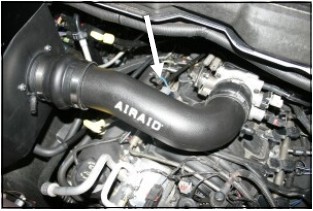
13. Slide the Airaid intake tube into the hump hose first, and then onto the throttle body. Adjust for fit, and then tighten the two remaining hose clamps. 2003-12 Models: Reconnect the temperature sensor wiring harness to the sensor in the tube. (It may be necessary to remove the tape on the wiring harness, pull out enough wire to reach the temperature sensor, and then retape the harness ).
14. 2004-12 Models: Reconnect the factory breather hose to the 1/2” barbed fitting on the CAB using the 1/2” rubber elbow (#15), and 1/2”x 3/4” barbed fitting (#20) as shown.
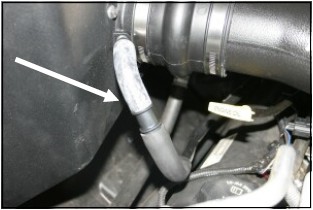
15. 2002-03 Models: Install one end of the provided 90° barbed fitting (#22) into the factory breather hose and then connect the supplied 1/2” breather hose (#21) to the other end. Connect the hose to the nipple on the Airaid intake tube. Secure all three connections with the provided #16 Speed Clamps (#17).
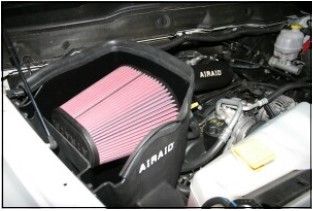
16. Install the Airaid Premium Filter (#1) onto the Airaid filter adapter, and tighten the hose clamp. Install the weather strip (#7) onto the top of the CAB, starting at the fender, and working your way towards the radiator.
17. Double check your work!
Make sure there is no foreign material in the intake path. Make sure all clamps, hoses, bolts, and screws are tight. Periodically check the tightness of all hose clamps.
18. Reconnect the negative battery cable!
Best Sellers
-
 J&L 3.0 Oil Separator; Black Anodized; Passenger Side (11-26 2.7L/3.5L EcoBoost F-150)
 (500+)
$152.10 $169.00
(500+)
$152.10 $169.00